<?xml version="1.0" encoding="utf-8"?><feed xmlns="http://www.w3.org/2005/Atom" ><generator uri="https://jekyllrb.com/" version="3.10.0">Jekyll</generator><link href="https://tomikiya.github.io/feed.xml" rel="self" type="application/atom+xml" /><link href="https://tomikiya.github.io/" rel="alternate" type="text/html" /><updated>2026-11-01T14:06:33+00:00</updated><id>https://tomikiya.github.io/feed.xml</id><title type="html">パパセンセイ365</title><subtitle>ExcelとPower Platformと、ときどき子育ての記録</subtitle><entry><title type="html">Python in Excelで散布図行列に相関行列をつける</title><link href="https://tomikiya.github.io/python-in-excel-scatter-plot-matrix-correlation-matrix/" rel="alternate" type="text/html" title="Python in Excelで散布図行列に相関行列をつける" /><published>2025-10-06T00:00:00+00:00</published><updated>2025-10-06T00:00:00+00:00</updated><id>https://tomikiya.github.io/python-in-excel-scatter-plot-matrix-correlation-matrix</id><content type="html" xml:base="https://tomikiya.github.io/python-in-excel-scatter-plot-matrix-correlation-matrix/"><![CDATA[<p>個人的なメモ</p>

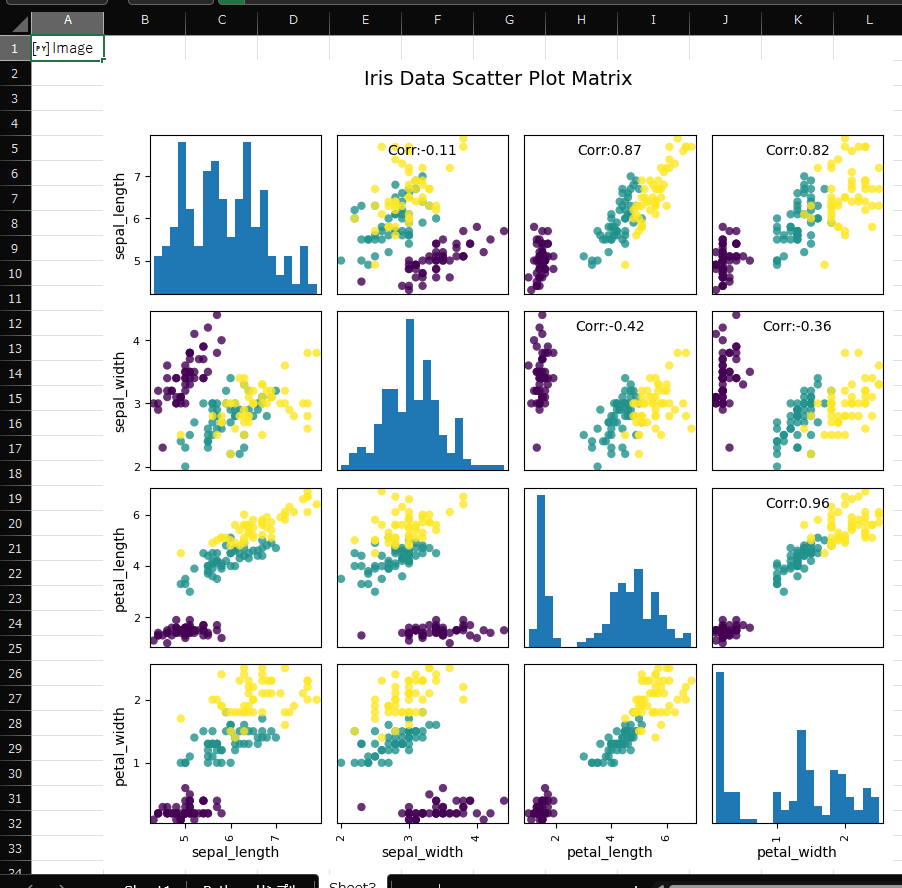
<p>Excelの中で使えるPythonで散布図行列を作れるのでちょっと改良して相関行列も一緒に表示できるようにする。※Pythonは初心者なので当たり前のこともコメントに書いているかもしれない。</p>

<h2 id="詳細">詳細</h2>

<p>以下はExcelのサンプルで出力される散布図行列を元にして、相関行列を計算し上半分に相関係数を表示する。参照データを変えれば他のデータでも使える。</p>

<div class="language-plaintext highlighter-rouge"><div class="highlight"><pre class="highlight"><code>import pandas as pd
import matplotlib.pyplot as plt
import numpy as np # 数値計算とインデックス操作のために使う

from pandas.plotting import scatter_matrix

# --- 1. データと相関行列の準備 ---
# ExcelからデータセットをDataFrameに取り込む
sample_df = xl("IrisDataSet[#すべて]", headers=True)
columns_to_plot = ["sepal_length", "sepal_width", "petal_length", "petal_width"]

# 相関行列を計算 (描画対象の列のみを使う)
corr = sample_df[columns_to_plot].corr() 

# --- 2. 散布図行列を作成し、Axes配列を変数に格納 ---
categories = sample_df["species"].unique()
colors = {category: i for i, category in enumerate(categories)}

# axes_array に Axes の配列を格納 (戻り値を変数に格納することが重要)
fig = plt.figure(figsize=(8, 8))
axes_array = scatter_matrix(
    sample_df[columns_to_plot], 
    c=sample_df["species"].apply(lambda x: colors[x]), 
    marker='o', 
    hist_kwds={'bins': 20}, 
    alpha=0.8, 
    ax=fig.gca() 
)

# --- 3. 相関係数を表記 ---
# np.triu_indices_from を使って上三角部分のインデックスを取得
for i, j in zip(*np.triu_indices_from(axes_array, k=1)):
    # Axesオブジェクトに直接アノテーションを追加
    axes_array[i, j].annotate(
        f"Corr:{corr.iloc[i,j]:.2f}",
        (0.5, 0.9), # 座標 (グラフの相対位置)
        xycoords='axes fraction',
        ha='center',
        va='center',
        fontsize=10,
        color='black'
    )

# 4. グラフの装飾と表示
plt.suptitle("Iris Data Scatter Plot Matrix", fontsize=14, y=1.02)
plt.tight_layout() # レイアウトを自動調整

# 最後の行で Figure オブジェクトを返すことで、Excelセルに画像が出力されます
plt.show()
</code></pre></div></div>

<p><img src="/images/scatter_plot_matrix.png" alt="" /></p>

<p>散布図行列と相関行列をそれぞれ別のセルで計算して結合して出そうとしたが一度セル上に展開するとうまくいかなかったので一気に実行することにした。</p>

<h2 id="所感">所感</h2>

<p>Python in Excelは相関行列を作るために生まれてきたのかもしれない。</p>

<h2 id="参考にしたブログ">参考にしたブログ</h2>

<p>データと統計学　<a href="https://df-learning.com/scatter-plot-matrixcorrelation-matrix/" title="散布図行列(Scatter plot matrix)と相関行列(Correlation matrix)をpythonで実装する">散布図行列(Scatter plot matrix)と相関行列(Correlation matrix)をpythonで実装する</a></p>]]></content><author><name></name></author><category term="Excel" /><category term="Python" /><summary type="html"><![CDATA[個人的なメモ]]></summary></entry><entry><title type="html">ExcelでVBAを使わないでドラクエ3のパズルを作ってみた</title><link href="https://tomikiya.github.io/excel-game-dq3-puzzle/" rel="alternate" type="text/html" title="ExcelでVBAを使わないでドラクエ3のパズルを作ってみた" /><published>2024-12-15T00:00:00+00:00</published><updated>2024-12-15T00:00:00+00:00</updated><id>https://tomikiya.github.io/excel-game-dq3-puzzle</id><content type="html" xml:base="https://tomikiya.github.io/excel-game-dq3-puzzle/"><![CDATA[<p><a href="https://adventar.org/calendars/10519">モニクル Advent Calendar 2024</a> 15日目の記事です。</p>

<p>ドラクエ3のリメイクをトロフィーコンプリートまで遊んだところ無性に作りたくなってしまったので勢いでやってしまいました。開発期間2日でとりあえずの雑な作りになっていますが大枠はできたので残しておきたいと思います。これまで作ったゲームと説明が重複する部分もありますのでご了承ください。</p>

<h2 id="この記事の対象者">この記事の対象者</h2>

<ul>
  <li>Excelをある程度知っているが更に深い使い方を知りたい方</li>
  <li>Excelを好きになりたい方</li>
  <li>Excelで遊びたい方</li>
</ul>

<p>正直、業務で利用できる話は1割程度ですので面白半分で見てください。</p>

<h2 id="何を作ったか">何を作ったか</h2>

<p>ドラクエ3のエジンベアにある岩を動かすパズルをExcelのセル上で遊べるようにしました。</p>

<p>https://www.youtube.com/watch?v=_EGlyOLvw3Q</p>

<p><strong>VBA、OfficeScript、Pythonは使わず、関数とExcelの標準機能だけで</strong>作っています。</p>

<p>以前作成したゲームで使用していた循環参照や散布図、F9連打などの技術は使わずシンプルな仕組みになっています。シンプルな故、エクセル感が残って良い感じに仕上がっています。Excelで初めてゲームを作るにはちょうど良いレベルです。</p>

<p>ファイルはGitHubに置いておきます。画像をセルに埋め込めるExcelのバージョンなら動くはずです。</p>

<p>なお、<strong>ドラクエの画像をそのまま使って配布するのはよろしくないのでフリー素材の画像に差し替えています。</strong>結果的にドラクエというか倉庫番になってしまいました。</p>

<p><a href="https://github.com/tomikiya/excel-game-dq3-puzzle">https://github.com/tomikiya/excel-game-dq3-puzzle</a></p>

<p>それでは詳細です。</p>

<h2 id="詳細">詳細</h2>

<h3 id="セルに画像を埋め込む">セルに画像を埋め込む</h3>

<p>これまでのゲーム作りではリンクされた図や散布図を使って描画していました。2024年1月のアップデートで画像をセルに埋め込めるようになりましたので検証を兼ねて使っています。</p>

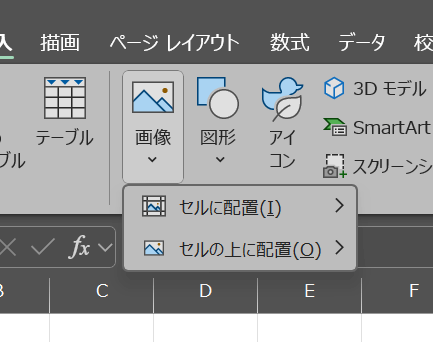
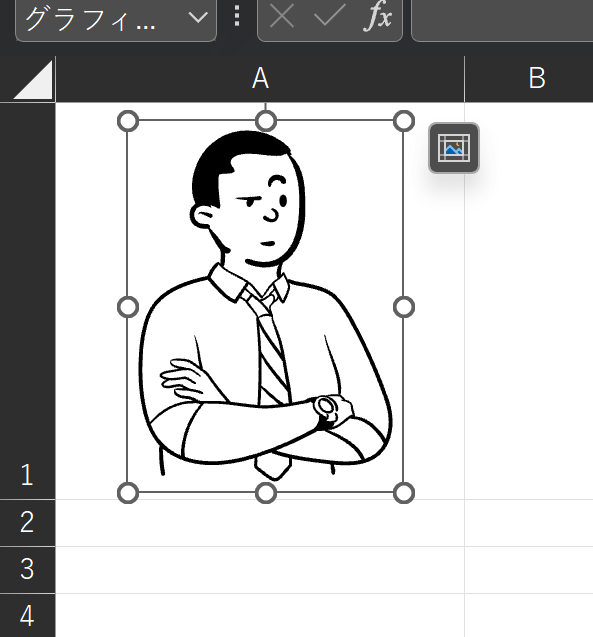
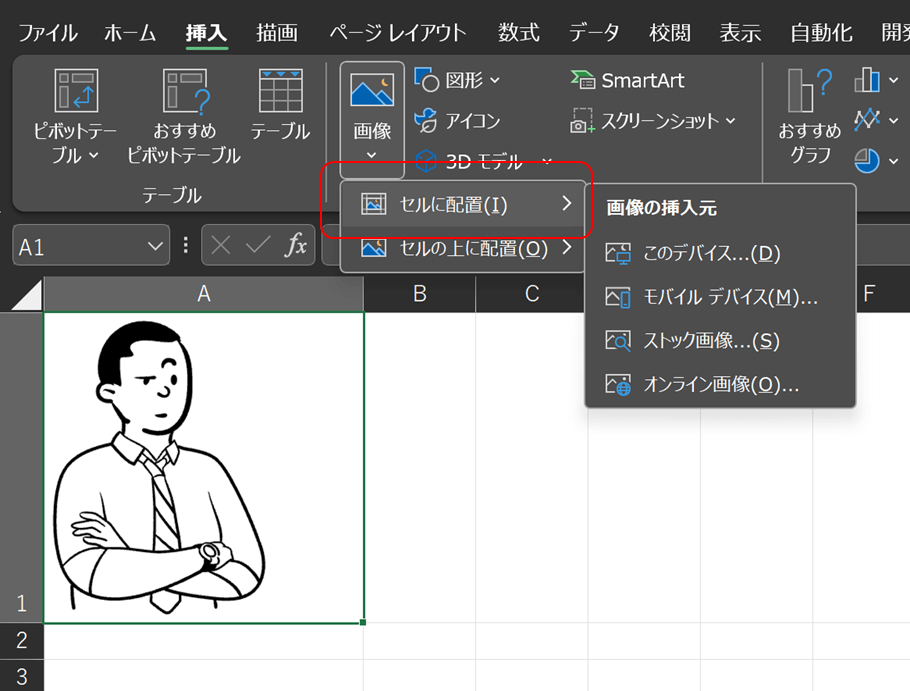
<p>[画像]-[セルの配置]から画像を指定することでセル内に画像を埋め込めます。</p>

<p><img src="/images/画像の挿入.png" alt="" /></p>

<p>セル内へ埋め込むと数値や文字と同じように扱えるため、XLOOKUPのような関数で画像を検索して取得できるようになります。詳しくは<a href="https://tomikiya.github.io/excel-image-tips-in-cell/" title="詳しい話は別記事">[Excel]画像をセルに埋め込められるようになったので何ができるか調べた</a>にまとめています。</p>

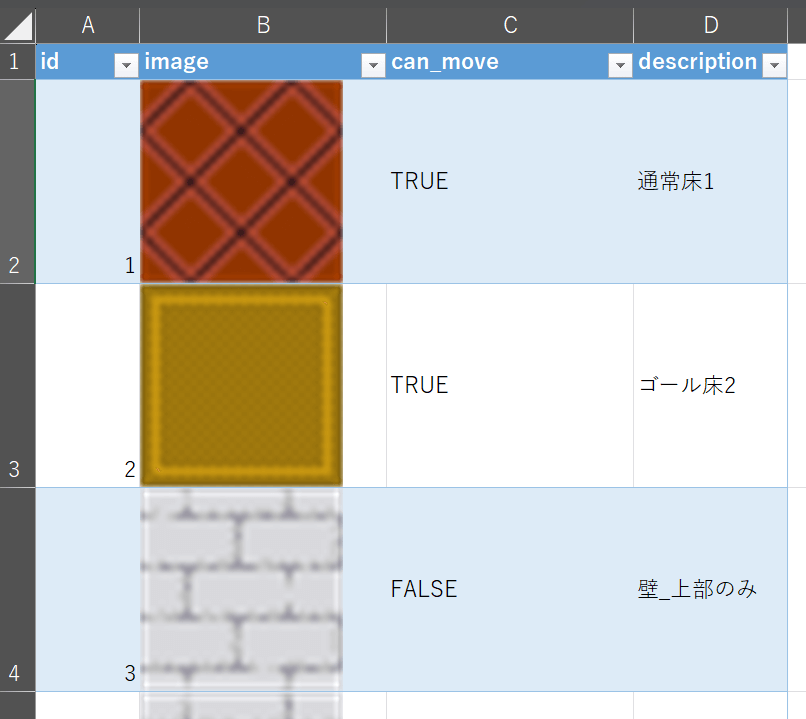
<p>画像は１つずつIDをつけてあとで検索して呼び出せるようにし、テーブル化しておきます。</p>

<p><img src="/images/backgroundデータ画像.png" alt="" /></p>

<p>セル内への画像埋め込みの残念な点として、複数のレイヤーを扱えません。背景が地面でキャラクターをその上に配置するような処理ができないので、背景とキャラクターを1つの画像にまとめてから配置することになります。つまり背景×キャラクター（上下左右）の組み合わせ全ての画像を用意します。今回はパターンが少なかったので全通りの画像を用意しましたが、それが難しい場合は散布図を使う方法がお勧めです。散布図を使ったゲームを詳しく知りたい場合は<a href="https://tomikiya.github.io/excel-game-dq3/" title="ExcelでVBAを使わないでドラクエ3を再現する">ExcelでVBAを使わないでドラクエ3を再現する</a>にて解説していますので確認してみてください。</p>

<h3 id="マップを作る">マップを作る</h3>

<p>画像にIDを付けていますのでそのIDでマップを作れるようになります。</p>

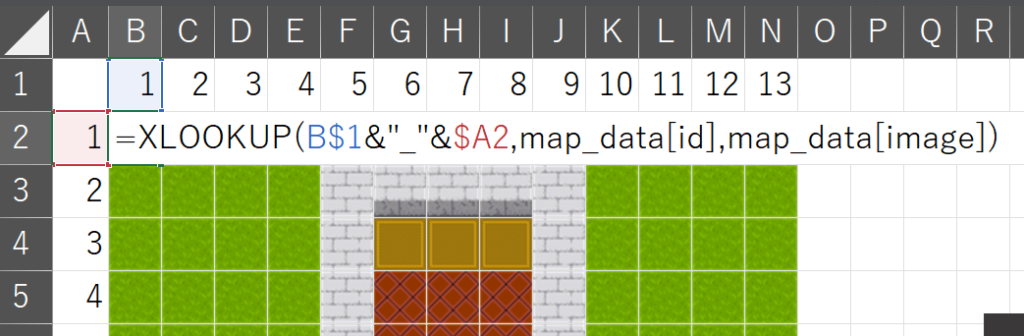
<p>画像を表示しているセルには以下のような式が入っています。※分かりやすくするために重要な部分だけ抜き出して一部改変しています。</p>

<p><img src="/images/画像式表示-1024x336.png" alt="" /></p>

<div class="language-plaintext highlighter-rouge"><div class="highlight"><pre class="highlight"><code>=XLOOKUP(B$1&amp;"_"&amp;$A2,map_data[id],map_data[image])
</code></pre></div></div>

<p>IDでマップを管理できますので好きなようにパズルを変更して難易度を調整したり画像データを変えたりできます。</p>

<h3 id="マウスの操作履歴を取得する">マウスの操作履歴を取得する</h3>

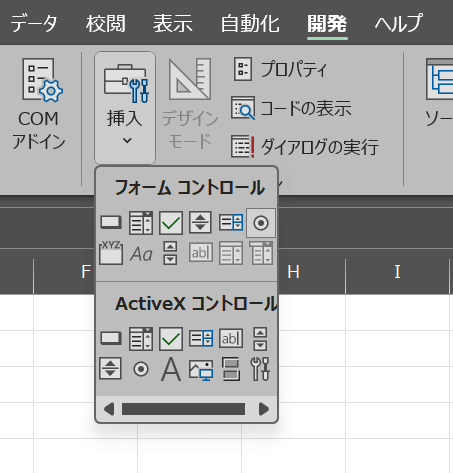
<p>マウス操作をセルの数値に伝搬させるため、操作した履歴を取得する処理を組み込みます。今回は、フォームコントロールのオプションボタンを使います。[開発]-[挿入]-[オプションボタン]からボタンを4つ挿入します。</p>

<p><img src="/images/フォームコントロール.png" alt="" /></p>

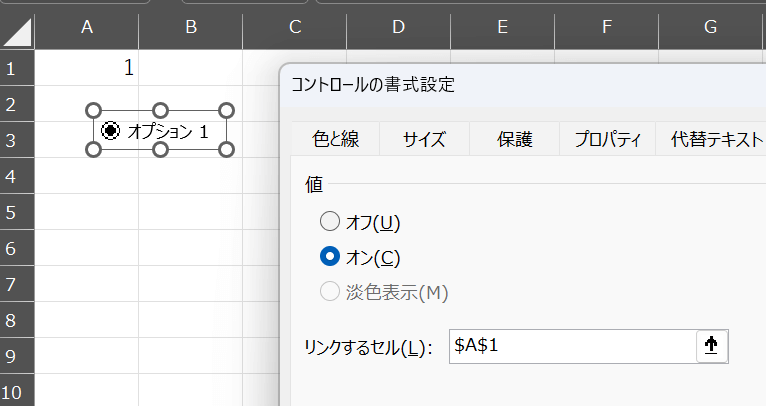
<p>オプションボタンの設定には「リンクするセル」があり、これを指定するとボタンを押した時にボタンに紐づく数値がセルに書き込まれます。</p>

<p><img src="/images/リンクされた図.png" alt="" /></p>

<p><strong>通常の使い方ではこのセルは動きませんが、通常ではない使い方でこれを動かします。</strong></p>

<p>リンクするセルには以下の式を登録します。そのままでは登録できないため、名前定義を経由します。</p>

<div class="language-plaintext highlighter-rouge"><div class="highlight"><pre class="highlight"><code>=INDIRECT("Sheet1!$A$"&amp;COUNTA(Sheet1!$A:$A)+1)
</code></pre></div></div>

<p>この状態でオプションボタンを連続クリックするとリンクするセルの位置が毎回1セルずつ下に移動し、押した履歴を残せるようになります。</p>

<p>もっと詳しく知りたい場合は<a href="https://tomikiya.github.io/excel-game-tetris/" title="ExcelでVBAを使わないでテトリスを再現する">ExcelでVBAを使わないでテトリスを再現する</a>をご覧ください。</p>

<h3 id="操作履歴をもとに移動可否を計算する">操作履歴をもとに移動可否を計算する</h3>

<p>操作履歴があればキャラクターの位置を計算できるので、あとは計算ロジックを組み込むだけです。必要な情報は以下のようになります。</p>

<ul>
  <li>キャラクターの初期位置</li>
  <li>操作履歴</li>
  <li>移動先候補</li>
  <li>移動先候補に移動できるか</li>
  <li>最終的な移動先</li>
</ul>

<p>通常のプログラミングではこれらの処理を順番に上から下へ処理ごとに分けて記述すればできあがりますが、残念ながらこれはExcelです。</p>

<p>Excelでのゲーム作りでは、これらの処理を1行で書いたほうが扱いやすいです。<br />
話をシンプルにするためにキャラクターの移動に焦点を当てて説明します。<br />
セルの並びのイメージです。</p>

<p><img src="/images/計算テーブル-1024x124.png" alt="" /></p>

<p>まずはキャラクターの位置を座標<code class="language-plaintext highlighter-rouge">chara_x,chara_y</code>を使って表します。（キャラクターの向きもありますが説明では省略）</p>

<div class="language-plaintext highlighter-rouge"><div class="highlight"><pre class="highlight"><code>chara_x =IF([@id]=1,init_chara_x,X1)
chara_y =IF([@id]=1,init_chara_y,Y1)
</code></pre></div></div>

<p>1行目は初期位置、2行目以降は1つ上のX列とY列の値、つまり<code class="language-plaintext highlighter-rouge">next_chara_x,next_chara_y</code>を参照します。</p>

<p>次に「押したボタン」を管理する<code class="language-plaintext highlighter-rouge">input_id</code>をその横に付けます。このinput_id列に上述した操作履歴を保存していきます。</p>

<p>そしてinput_idの値によって移動する方向<code class="language-plaintext highlighter-rouge">move_x, move_y</code>を計算します。</p>

<div class="language-plaintext highlighter-rouge"><div class="highlight"><pre class="highlight"><code>move_x =SWITCH([@[input_id]],→,1,←,-1,0)
move_y =SWITCH([@[input_id]],↑,-1,↓,1,0)
</code></pre></div></div>

<p>キャラクターの位置と移動する方向で移動予定の座標<code class="language-plaintext highlighter-rouge">plan_chara</code>を計算します。</p>

<div class="language-plaintext highlighter-rouge"><div class="highlight"><pre class="highlight"><code>plan_chara =[@[chara_x]]+[@[move_x]]&amp;"_"&amp;[@[chara_y]]+[@[move_y]]
</code></pre></div></div>

<p>移動予定の座標に動けるか<code class="language-plaintext highlighter-rouge">can_move</code>を計算します。map_dataには画像ごとにその上に動けるかどうかを判定する<code class="language-plaintext highlighter-rouge">can_move</code>が事前に登録しています。</p>

<div class="language-plaintext highlighter-rouge"><div class="highlight"><pre class="highlight"><code>can_move =XLOOKUP([@[plan_chara]],map_data[id],map_data[can_move])
</code></pre></div></div>

<p>動けるようなら移動、動けないなら元の位置の座標を計算し<code class="language-plaintext highlighter-rouge">next_chara_x,next_chara_y</code>へ保存します。ちなみに、リセットボタンの挙動もあるためその挙動も含め<code class="language-plaintext highlighter-rouge">IFS</code>で複数の条件を繋げています。</p>

<div class="language-plaintext highlighter-rouge"><div class="highlight"><pre class="highlight"><code>next_x =IFS([@reset],init_chara_x,[@[can_move]],VALUE(INDEX(TEXTSPLIT([@[plan_chara]],"_"),1)),ELSE,[@[chara_x]])

next_y =IFS([@reset],init_chara_y, [@[can_move]],VALUE(INDEX(TEXTSPLIT([@[plan_chara]],"_"),2)),ELSE,[@[chara_y]])
</code></pre></div></div>

<p>以上の処理を1行に横方向へつなげることで一連の処理を1行でまとめられます。</p>

<p>再度ボタンを押すと新しい行が追加され、次の行では前の行の結果をベースに再度計算します。この繰り返しで移動の履歴を計算できます。</p>

<p>発展的な話</p>

<p>このパズルでは岩が3つあるので通常だとFORやMAPで同じ処理を3回ループさせて判定しますが、Excelだとループ処理が複雑だったりテーブル上だとスピルできなかったりするため、今回は3つ分の列を作り同じ処理を3回書いてます。岩を増やしたい場合はそれだけ列が増えていくため、ここは改良の余地があります。将来的にExcelの機能が拡充して<a href="https://support.microsoft.com/ja-jp/office/excel-%E3%83%87%E3%83%BC%E3%82%BF%E5%9E%8B-%E6%A0%AA%E4%BE%A1%E3%81%A8%E5%9C%B0%E7%90%86-61a33056-9935-484f-8ac8-f1a89e210877" title="データ型の株価">データ型の株価</a>のように1つのセルに複数の情報を自由に持たせられるようになるか、スピルさせない指示が出せるようになればもっと簡単に記述できるようになります。</p>

<p>また、クリックするたびに行が増えてだんだんと重くなる課題もあります。ゴールするまでの操作回数に制限をかけるなど対策をしたほうが良いでしょう。</p>

<h3 id="完了条件を定義する">完了条件を定義する</h3>

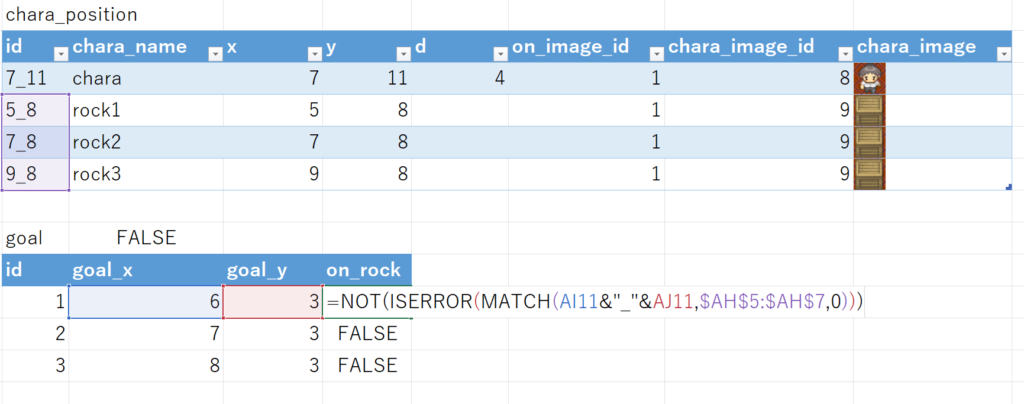
<p>岩を所定の位置に置いたら完了判定をします。これは単純にゴールの位置とその上に岩があるかを1つずつ判定して3つともゴールと重なっていたら完了とします。</p>

<div class="language-plaintext highlighter-rouge"><div class="highlight"><pre class="highlight"><code>=NOT(ISERROR(MATCH(AI11&amp;"_"&amp;AJ11,$AH$5:$AH$7,0)))
</code></pre></div></div>

<p><img src="/images/ゴール-1024x404.png" alt="" /></p>

<p>以上で完成です。</p>

<h2 id="まとめ">まとめ</h2>

<p>ね、冒頭に言った通り、業務に役立つ情報はなかったでしょ？コーヒーブレイクになれば幸いです。<br />
これでいろんなパズルが楽しめますね！</p>

<p>他にもゲームを作っているので興味がありましたら見てみてください。</p>

<h2 id="vbaを使わないexcelゲームシリーズ">VBAを使わないExcelゲームシリーズ</h2>

<p>https://tomikiya.github.io/excel-game-dq3/</p>

<p>https://tomikiya.github.io/excel-game-tetris/</p>

<p>https://tomikiya.github.io/excel-nonvba-3d-maze/</p>

<p>https://tomikiya.github.io/excel-game-minesweeper/</p>

<h2 id="その他">その他</h2>

<p>ドット絵は以下から使わせていただきました。ありがとうございました。</p>

<p>ぴぽや <a href="https://pipoya.net/">https://pipoya.net/</a></p>

<p>このページで利用している株式会社スクウェア・エニックスを代表とする共同著作者が権利を所有する画像の転載・配布は禁止いたします。<br />
© ARMOR PROJECT/BIRD STUDIO/SPIKE CHUNSOFT/SQUARE ENIX</p>]]></content><author><name></name></author><category term="Excel" /><summary type="html"><![CDATA[モニクル Advent Calendar 2024 15日目の記事です。]]></summary></entry><entry><title type="html">久しぶりの投稿（リハビリ＆テスト）</title><link href="https://tomikiya.github.io/houkoku-20240927/" rel="alternate" type="text/html" title="久しぶりの投稿（リハビリ＆テスト）" /><published>2024-09-27T00:00:00+00:00</published><updated>2024-09-27T00:00:00+00:00</updated><id>https://tomikiya.github.io/houkoku-20240927</id><content type="html" xml:base="https://tomikiya.github.io/houkoku-20240927/"><![CDATA[<p>会社で「1時間でブログを書く」というイベントがあったので、勢いで近況報告を書いています！</p>

<p>最近、とても残念なことですがExcelをあまり触れていません。特に、LAMBDA関数が登場してから自由度が高まりすぎて、機能を探したり実現方法を模索したりするモチベーションが少し下がってしまいました。大体の機能はLAMBDAで実現できてしまうんだろうなと思うことが多くなったためです。ブログの投稿回数が減ったのもそれが原因です。</p>

<p>現在、データ分析をする機会が増えており、BigQueryやdbtを使ったデータ処理に取り組んでいます。さらに、ExcelでPythonが使えるようになったこともあり、今後はデータ分析に関する記事を書こうかなと考えています。月1回以上は投稿していきたいですね。</p>

<p>Power Platformは全然触れていません。この前、モバイルからアプリを消してしまいました、ごめんなさい。（Power BIには触れる可能性があるかもしれません。）</p>

<p>今回はリハビリの一環として軽い共有をしたいと思います。</p>

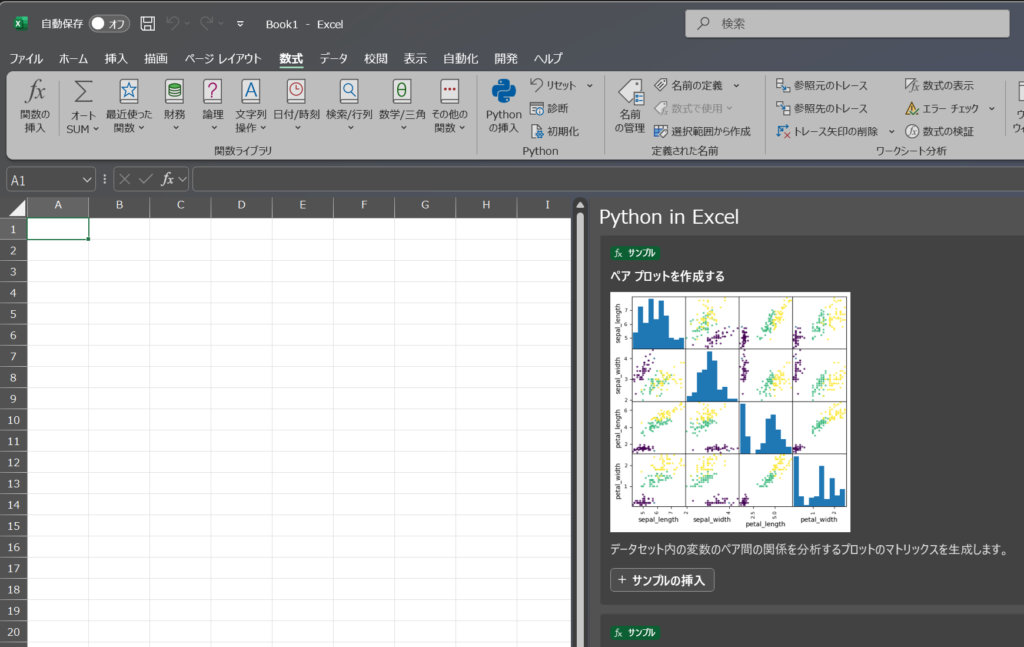
<p>ExcelでPythonが使えるようになったので、散布図行列を作れるようになりました！[数式] &gt; [Pythonの挿入]からサンプルを挿入できるので、ぜひ試してみてください！</p>

<p><img src="/images/散布図行列-1024x647.png" alt="" /></p>

<p>以上！</p>]]></content><author><name></name></author><category term="未分類" /><summary type="html"><![CDATA[会社で「1時間でブログを書く」というイベントがあったので、勢いで近況報告を書いています！]]></summary></entry><entry><title type="html">[Excel]画像をセルに埋め込められるようになったので何ができるか調べた</title><link href="https://tomikiya.github.io/excel-image-tips-in-cell/" rel="alternate" type="text/html" title="[Excel]画像をセルに埋め込められるようになったので何ができるか調べた" /><published>2023-12-17T00:00:00+00:00</published><updated>2023-12-17T00:00:00+00:00</updated><id>https://tomikiya.github.io/excel-image-tips-in-cell</id><content type="html" xml:base="https://tomikiya.github.io/excel-image-tips-in-cell/"><![CDATA[<p>この記事は<a href="https://adventar.org/calendars/8977">モニクル Advent Calendar 2023</a>の18日目の記事です。</p>

<p>Excelで画像をセル内に埋め込めるようになって結構経ちますが詳細を調べていなかったので触ってみました。中には表計算ソフトで画像を取り扱うことに違和感もあるかもしれませんが、せっかくできた機能ですし見てみましょう。</p>

<h2 id="セルに画像を埋め込むとは">セルに画像を埋め込むとは？</h2>

<p>Excelではこれまでセルの中に画像を埋め込めませんでした。画像はセルの上に配置するだけにとどまり、データのように扱えませんでした。このため、セルの数値を参照して画像を変えるようなギミックは工夫して作らないといけませんでした。</p>

<p>旧来の手法である画像をセルの上に配置するのは画像の挿入でできます。セルの枠内に収まるように上手に配置してセルの中にあるように見せるやり方です。</p>

<p><img src="/images/セルの上に画像を配置.png" alt="" /></p>

<p>画像を動的に切り替えるには「リンクされた図」を使ったりします。</p>

<p><img src="/images/リンクされた図.gif" alt="" /></p>

<p>リンクされた図は便利なのですが処理負荷が高く複数使うとExcelが固まることもあり、画像をデータとして扱いたい場合は毎回気を使います。ちなみにゲームを作る時の候補としてリンクされた図の検討をしますが処理速度の問題で大概却下されます。</p>

<p>https://tomikiya.github.io/excel-game-tetris/</p>

<p>画像を扱う別の方法としてIMGAGE関数がありますが、IMAGE関数はクラウド上の画像が対象なのでローカル画像を埋め込めませんでした。</p>

<p>そんな中、「セルに配置」という機能が追加されました。<br />
セルの中に画像を配置し、文字や数値と同じように取り扱えるようになりました。<br />
セルに配置ではローカル画像も利用できます。</p>

<p><img src="/images/セル内に画像を配置.png" alt="" /></p>

<h2 id="セルに画像を配置すると何ができる">セルに画像を配置すると何ができる？</h2>

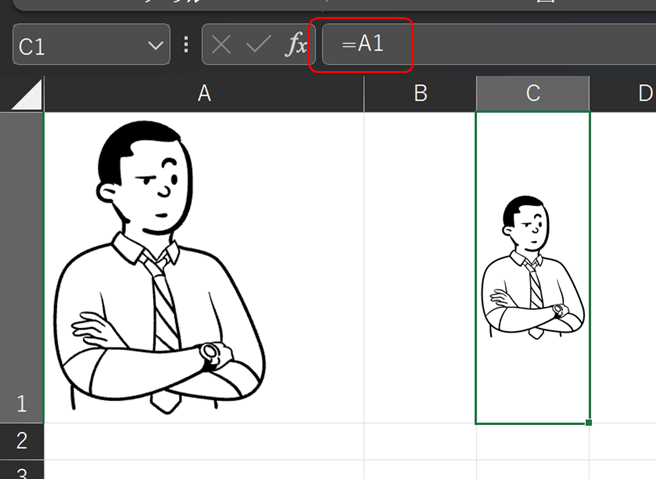
<p>セルに画像を配置すると数字や文字と同じように扱えるので、関数を使って画像を呼び出すことができます。リンクされた図は不要です。<br />
例えばA1に画像を埋め込んでおいて、他のセルで=A1とすると画像を参照できます。</p>

<p><img src="/images/セル内画像参照.png" alt="" /></p>

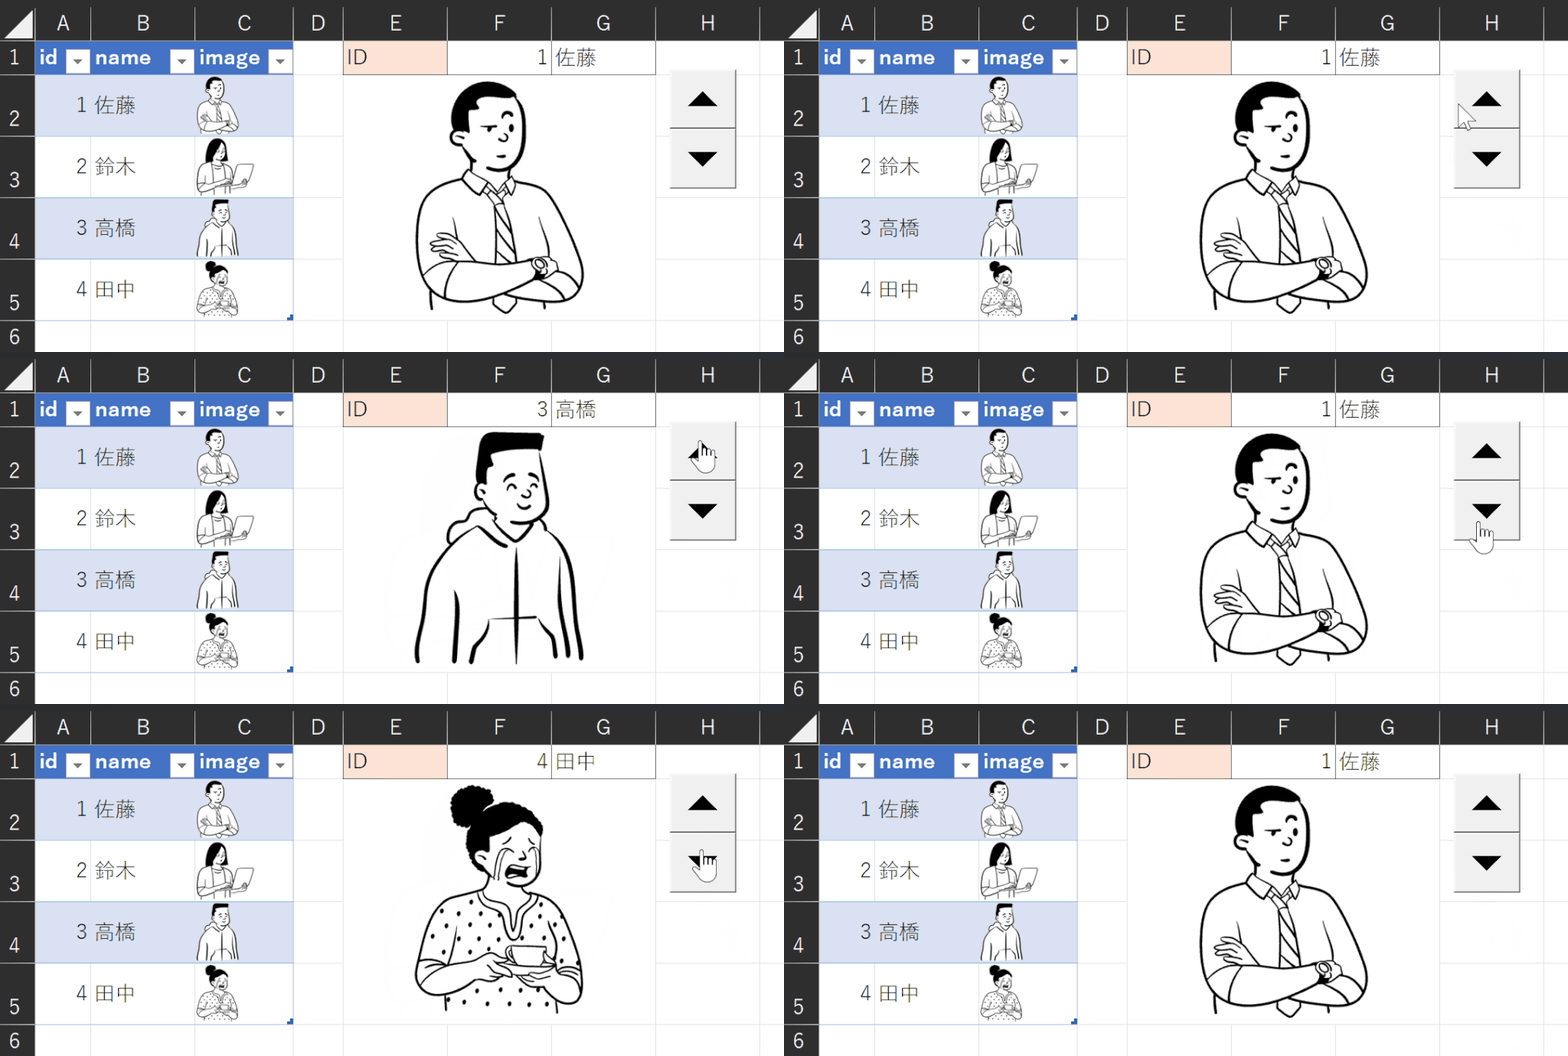
<p>また、VLOOKUPのような関数を使って画像を呼び出すことができます。</p>

<p><img src="/images/セル内画像を動的に変更-1024x460.gif" alt="" /></p>

<div class="language-plaintext highlighter-rouge"><div class="highlight"><pre class="highlight"><code>セルE2の式 =VLOOKUP(F1,A2:C5,3,false)
</code></pre></div></div>

<p>Excelをデータベースとして利用するときに画像も取り扱えるようになったわけです。<br />
※Excelをデータベースとして使うことを推奨しているわけではありません。</p>

<h2 id="セル内の画像のあれこれ">セル内の画像のあれこれ</h2>

<h3 id="セルをコピーしたらコピー元とコピー先は同じデータの扱いになる">セルをコピーしたらコピー元とコピー先は同じデータの扱いになる</h3>

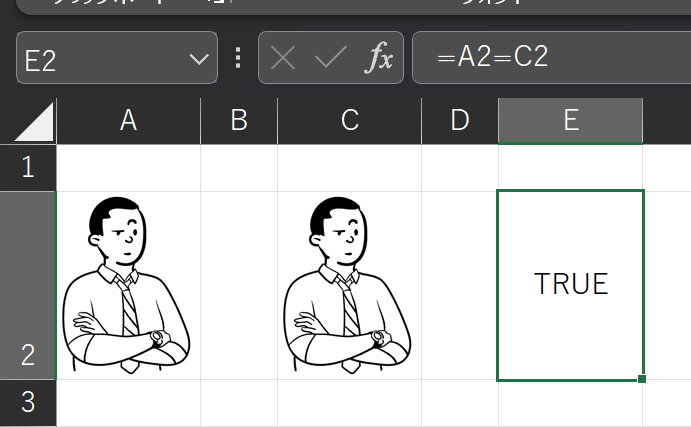
<p>画像が入ったセルをコピーして別のセルに貼り付けた場合、コピー元とコピー先を比較すると等しいと判定されます。</p>

<p><img src="/images/セル内画像の等しさ1.png" alt="" /></p>

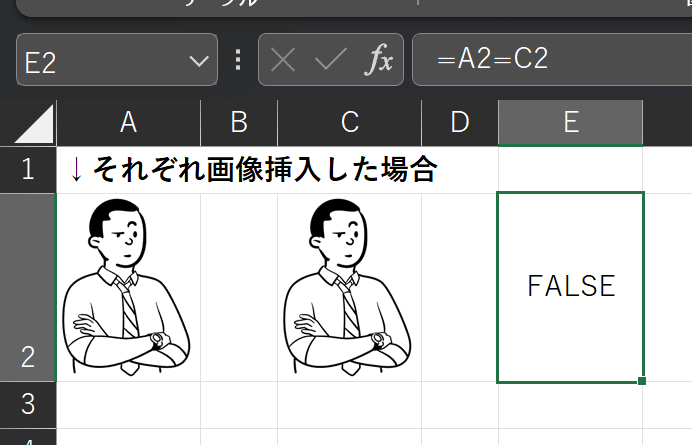
<p>一方、同じ画像ファイルでも別々に取り込むと別扱いになります。</p>

<p><img src="/images/セル内画像の等しさ2.png" alt="" /></p>

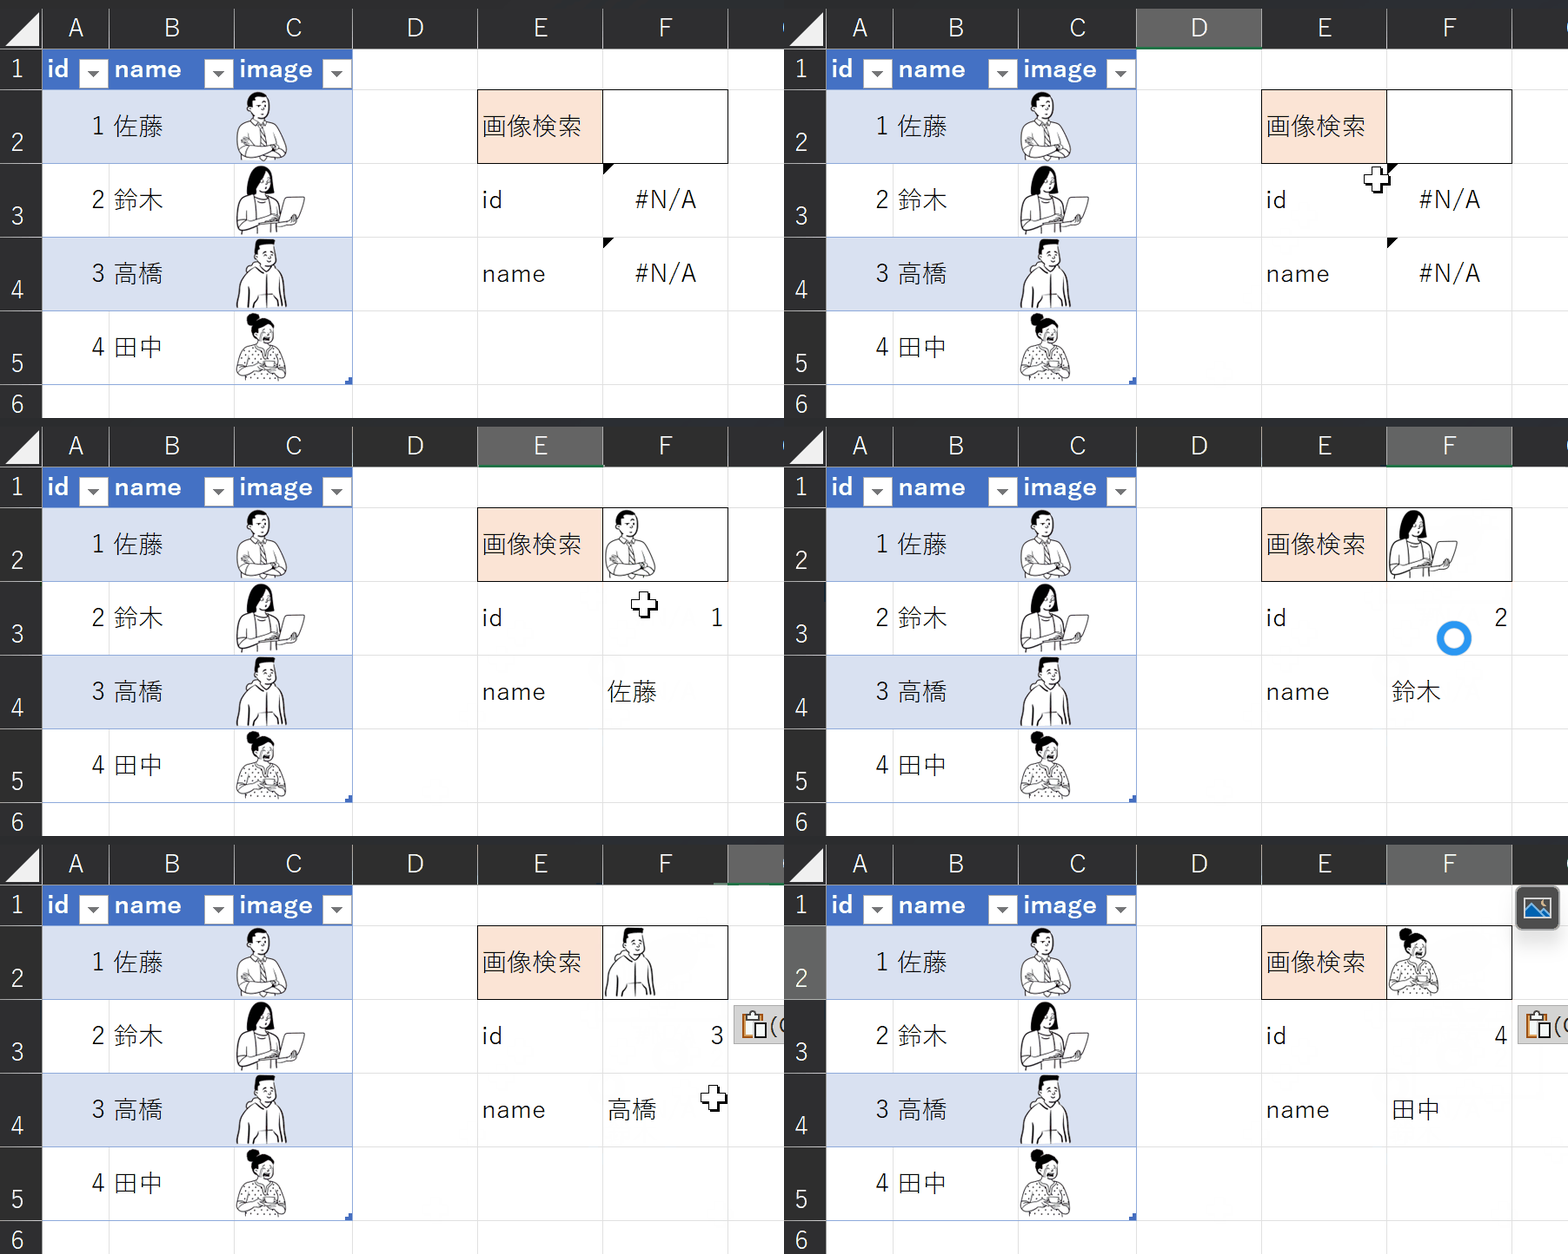
<h3 id="画像で検索ができる">画像で検索ができる</h3>

<p>数値や文字と同じように使えるので画像をXLOOKUPの検索値に指定して他のデータを呼び出すこともできます。<br />
ただ、できるというはいうものの業務内でこの仕様で何か作る機会はあまりないと思われます…。</p>

<p><img src="/images/セル内画像で検索.gif" alt="" /></p>

<h3 id="値の貼り付け数式の貼り付けでコピーできる">値の貼り付け、数式の貼り付けでコピーできる</h3>

<p>コピーするときに「値の貼り付け」または「数式の貼り付け」でコピーできます。書式のコピーを省けますのでVBA等で処理するときに若干軽くできそうです。</p>

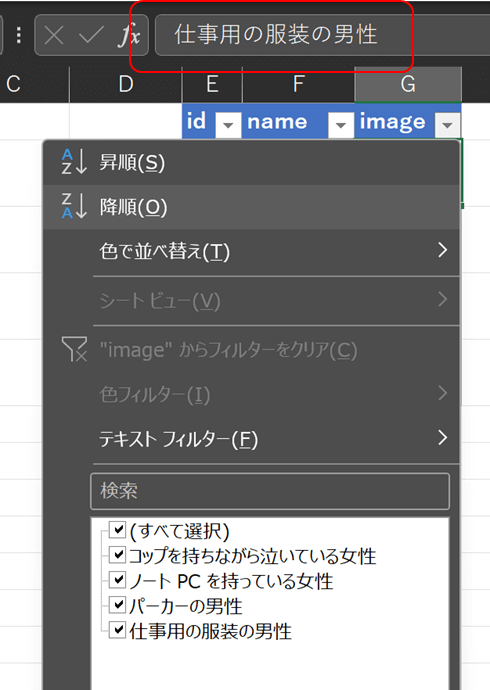
<h3 id="画像の名前は代替えテキストから変更する">画像の名前は代替えテキストから変更する</h3>

<p>画像が含まれるセルの式を見ると「画像」という文字だったり画像の名前が入ったりしています。フィルター機能を使う場合はこの文字での検索となります。</p>

<p><img src="/images/画像のフィルター.png" alt="" /></p>

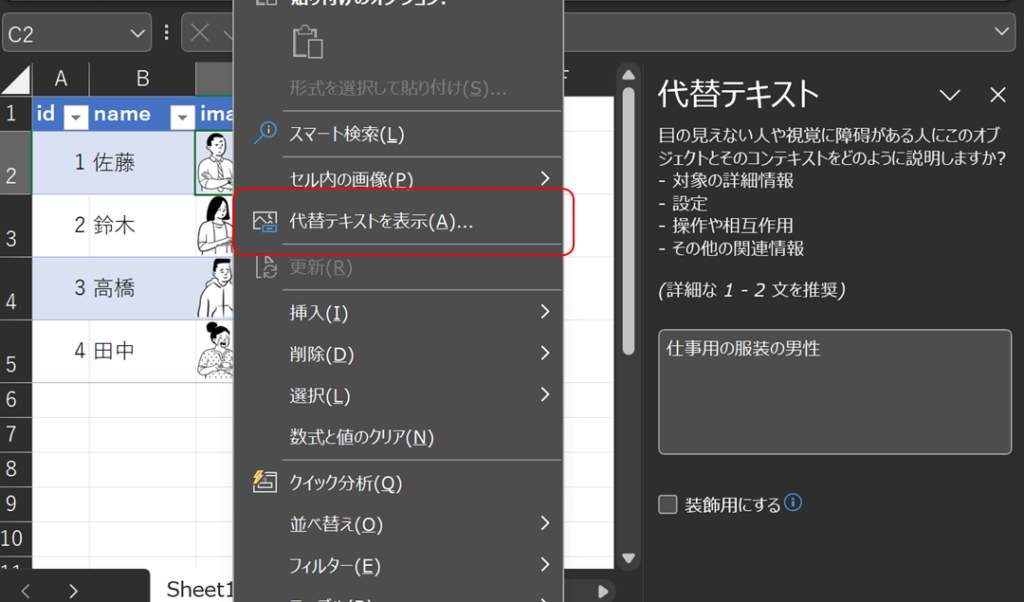
<p>この名前を書き換えたい場合、直接式を変更すると画像が消えてしまいますので、代替テキストで変更します。セルを右クリックして「代替テキストを表示」で書き換えられます。</p>

<p><img src="/images/代替えテキスト-1024x602.png" alt="" /></p>

<h3 id="powerqueryには読み込めない">PowerQueryには読み込めない</h3>

<p>PowerQueryに読み込むとエラーになります。ExcelのPowerQueryは厳しそうですね。PowerBIだと画像が扱えるのでできそうではあります。<br />
（深く調べればできるかもしれません、未調査）</p>

<h2 id="どう使う">どう使う？</h2>

<p>業務として利用できそうなシーンは、<strong>データの一部として画像を登録して参照するようなケースには重宝します</strong>。社員一覧で顔写真を参照するとか、植物の名前と画像のデータを作って参照するとか、そんな使い方は出来そうです。</p>

<p>業務としては、、、そのくらいですかね。</p>

<h3 id="この記事で一番伝えたかったこと">この記事で一番伝えたかったこと</h3>

<p><strong>ゲーム作りに使う分には大変重宝しますね！</strong><br />
マップを作る時に画像を使ってデータを生成できます。</p>

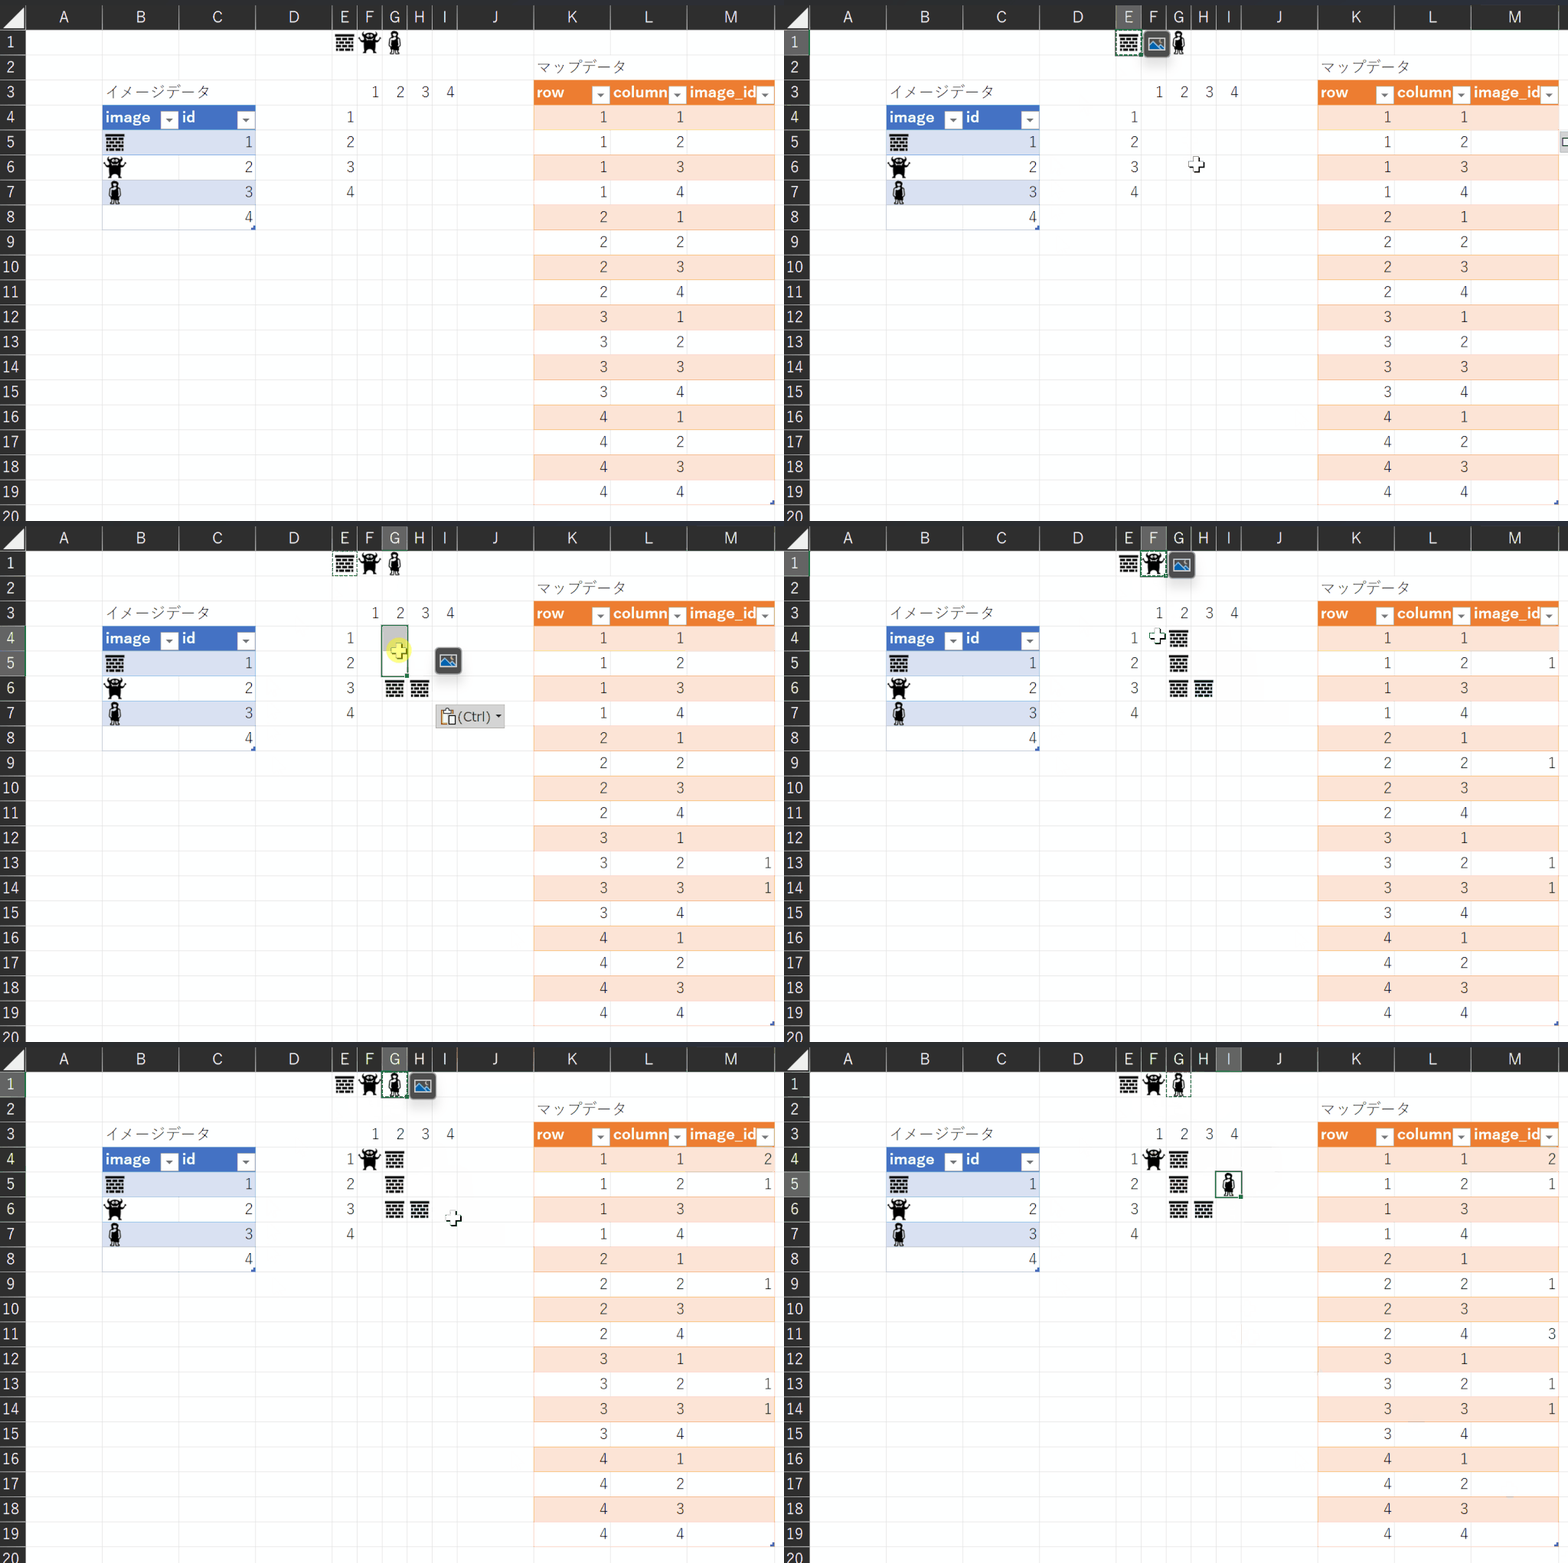
<p><img src="/images/ゲームで利用1-1024x681.gif" alt="" /></p>

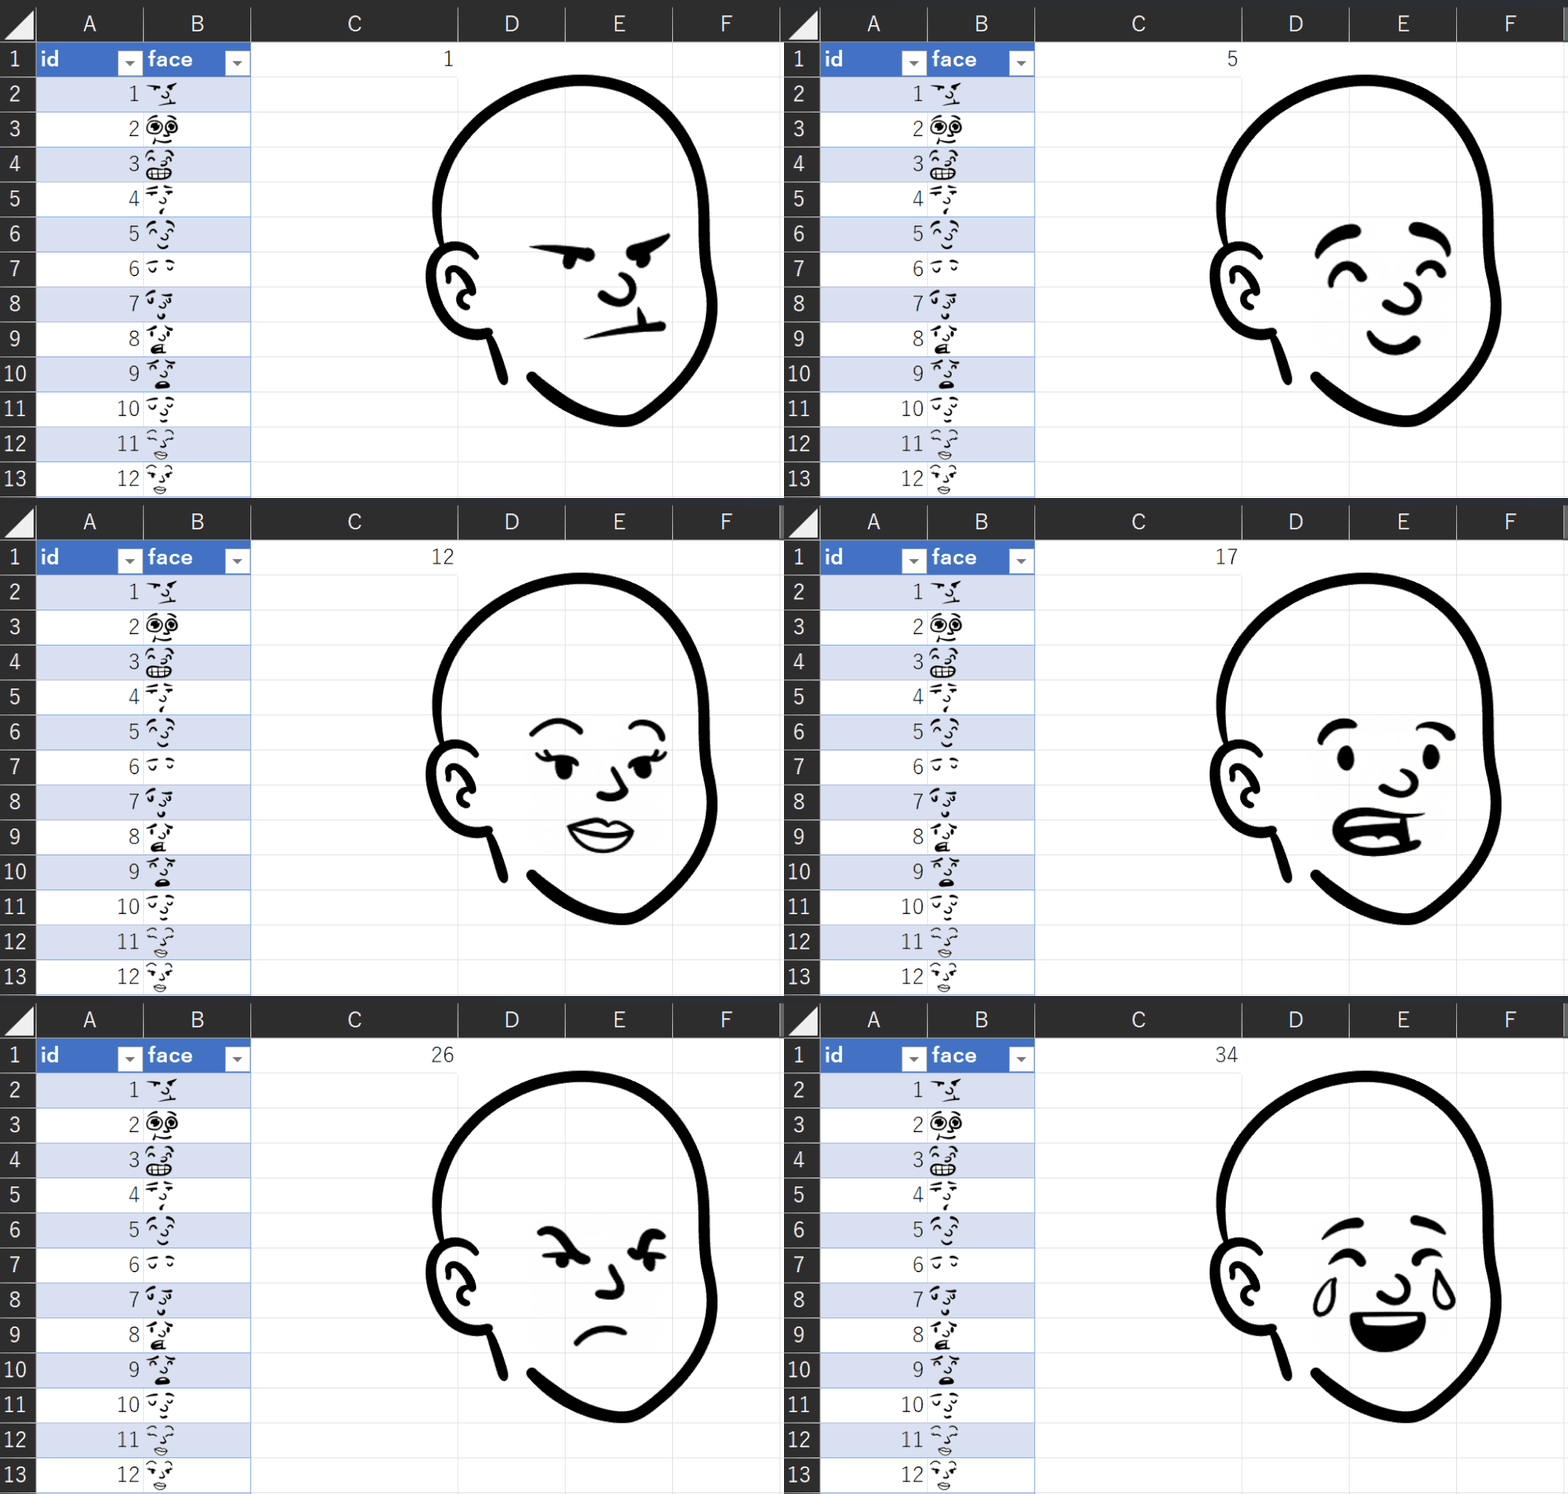
<p>また、動的に切り替えるような動きもセル内画像で簡単にできるようになります。</p>

<p><img src="/images/顔変換-1024x651.gif" alt="" /></p>

<p>ということで、データとして画像が使えるようになったのでExcelの表現力、対応力がさらに上がりました。表計算ソフトの域はすでに脱しているので「Excelは表計算ソフト」という考えは改めて自由に使っていけるといいですね。私はこれからも自由に使わせてもらいます！</p>]]></content><author><name></name></author><category term="Excel" /><summary type="html"><![CDATA[この記事はモニクル Advent Calendar 2023の18日目の記事です。]]></summary></entry><entry><title type="html">popIn Aladdin Connectorで音ズレが発生したので改善した話</title><link href="https://tomikiya.github.io/popin-aladdin-connector/" rel="alternate" type="text/html" title="popIn Aladdin Connectorで音ズレが発生したので改善した話" /><published>2021-12-05T00:00:00+00:00</published><updated>2021-12-05T00:00:00+00:00</updated><id>https://tomikiya.github.io/popin-aladdin-connector</id><content type="html" xml:base="https://tomikiya.github.io/popin-aladdin-connector/"><![CDATA[<p>このブログのカテゴリーでは全くないのですが、同じように困っている方もいらっしゃるのではないかと思い、私が行った改善方法をまとめたいと思います。どれか1つで改善することもあれば複数実施しても改善しないこともあるかとは思います。</p>

<p><a href="https://aladdin.popin.cc/">popIn Aladdin</a>はとても良い商品なので音ズレだけで評価を下げられてしまうのは非常に勿体ないです。是非いろいろ試してみて改善されることを期待します。</p>

<h2 id="popin-aladdinとは">popIn Aladdinとは</h2>

<p>照明とプロジェクターが一体化した製品です。照明の機能がありながら壁に映像を映し出して大画面で映画やテレビを見ることができます。私の自宅ではテレビを買い替える時期だったので大画面のテレビも検討をしていたのですが置く場所が無かったためpopIn Aladdinを採用した経緯があります。</p>

<p>https://amzn.to/3onRsFt</p>

<p>https://amzn.to/3GfiXar</p>

<p>今はpopIn Aladdin2とpopIn Aladdin SEがあって違いがありますので各ご家庭にあったタイプを選ぶとよさそうです。</p>

<p><a href="https://aladdin.popin.cc/pages/popin-aladdin-2-se-difference">https://aladdin.popin.cc/pages/popin-aladdin-2-se-difference</a></p>

<p>いずれにしても本体から映像と音声が出力されるようになっています。</p>

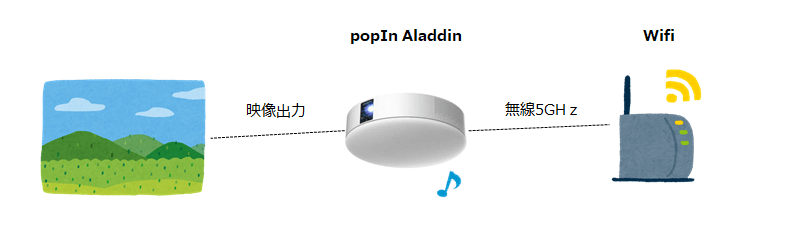
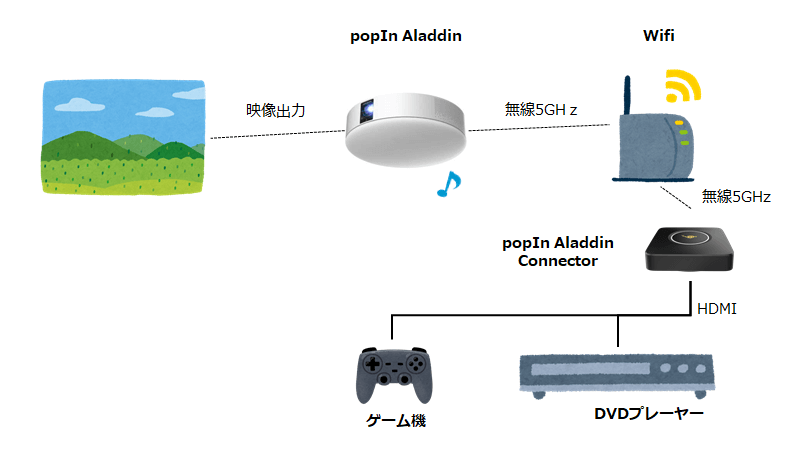
<p>※popIn Aladdinへは無線で映像を送信することになりますので無線の環境が必要です。画像はイメージです。無線は2.4GHzでも接続できます。</p>

<p><img src="/images/単体.png" alt="" /></p>

<h2 id="popin-aladdin-connectorとは">popIn Aladdin Connectorとは</h2>

<p>popIn Aladdin単体でも内蔵されたアプリでYouTubeやAmazonプライム、HuluやNetflixといったサービスを見ることができます。テレビチューナーがあればテレビも見れるようになります。これだけでも十分なのですが、単体ではプロジェクターで表示できないデバイスもあります。例えばDVDプレーヤーやゲームの映像は出力できません。接続は無線だけになっているからです。</p>

<p>そこでHDMIなどの有線で接続するデバイスの映像を出力するためにpopIn Aladdin Connector（以下、Aladdin Connector）を仲介させます。</p>

<p>https://amzn.to/3rCV5JR</p>

<p>Aladdin ConnectorにはHDMIの入力がありますのでHDMIでつなげるデバイスはプロジェクターに映し出せます。ただ入力は1個だけなので複数繋げたい場合は切り替えが必要です。</p>

<p><img src="/images/コネクター.png" alt="" /></p>

<h2 id="aladdin-connectorで繋ぐと音ズレが100発生する">Aladdin Connectorで繋ぐと音ズレが100%発生する</h2>

<p>私の自宅の場合、本体単体での運用なら映像のカクツキは稀にあるものの、音ズレは発生しなかったのですが、Aladdin ConnectorでDVDの映像を送ったところ音ズレが100%発生しました。繋ぎ始めた直後から音ズレが始まり最悪0.3秒ほどの音ズレになりました。</p>

<p>そこでサポートへ問い合わせをして改善方法を教えてもらいながら色々と検証してみました。改善したものもあれば改善しなかったものもありましたので原因はいろいろとあるようです。</p>

<h2 id="音ズレを解消するために試すこと">音ズレを解消するために試すこと</h2>

<p>手軽な方法から順に記述します。</p>

<h3 id="aladdin-connectorを再起動する">Aladdin Connectorを再起動する</h3>

<p>繋ぎ始めた直後が特に顕著だったのですが、映像が表示されたりされなかったり不安定な動きをしていました。初期設定の後は電源を抜いて再起動をすると安定したこともあるので、まずはAladdin Connectorの再起動を試してみてください。あとはpopIn Aladdin本体の再起動やルーターの再起動もすると改善することがあるようです。電源を10分以上抜いておくコールドブートを試すと改善することもあるようです。</p>

<p>私の自宅ではコールドブートで少し改善しました。5分程度で0.3秒程度のずれていたのが15分程度まで耐えるようになりました。</p>

<h3 id="aladdin-connector同梱のhdmiケーブルを使用する">Aladdin Connector同梱のHDMIケーブルを使用する</h3>

<p>Aladdin ConnectorにはHDMIケーブルが同梱しているのでそれで繋ぐと改善することがあるようです。確かに古いタイプのHDMIで繋ぐと何が起こるか分かりませんし、popIn社で検証済みのHDMIの方が問題の切り分けができます。</p>

<p>私の自宅ではこの方法を使えませんでした。そもそもChrome Castを繋ぐこともあるのでpopIn社のHDMIケーブルの入る余地が無かったこともあります。</p>

<h3 id="aladdin-connectorやhdmi接続機器にてhdmiケーブルの抜き差しをする">Aladdin ConnectorやHDMI接続機器にて、HDMIケーブルの抜き差しをする</h3>

<p>Aladdin Connectorの入力に接続しているHDMIを抜き差しすることで改善することがあります。私の自宅もこれで改善しました。</p>

<p>ただ最初は改善するものの、時間が経つにつれて徐々にズレ始めます。音と映像のスピードが違うような現象になります。（たまにそんなYoutube動画ありますよね）</p>

<h3 id="aladdin-connectorの光っているボタンを2回押す">Aladdin Connectorの光っているボタンを2回押す</h3>

<p>Aladdin Connectorの上部は光るようになっています（ライトリング）。黄色の時に押すと映像が表示され、青い時に押すと停止します。そのボタンを青い時に間を開けて2回押す、つまり再接続するとズレが解消されます。前述のケーブの抜き差しと同じ対応になるかと思います。</p>

<p>この方法も最初は改善するものの、徐々に音ズレしますので根本解決にはならないかもしれません。</p>

<h3 id="給電不足を解消する">給電不足を解消する</h3>

<p>たこ足配線になっていると給電不足が原因になることもあるようです。直接壁から接続してみて改善するか確認してください。</p>

<h3 id="無線の環境をpopin-aladdinに最適化する">無線の環境をpopIn Aladdinに最適化する</h3>

<p>popIn AladdinとAladdin Connectorは無線LANで接続しますので、その環境が悪いと音ズレの原因になることがあります。私の自宅もこれに当てはまりました。</p>

<p>ルータが2階のクローゼットの中にあり、ドアや床の障害を経由して1階のpopIn Aladdinと接続していました。このため音ズレもそうですが映像もカクカクしていました。無線LANの通信方法も、通信速度が速い5GHz帯にしたかったのですが、壁を超えないといけないため2.4GHzを使うしかない状態でした。</p>

<p>そこでルータとpopIn Aladdin本体とAladdin Connecotrを同じ部屋に配置し、5GHzで接続するようにしました。すると映像のカクツキが無くなり、音ズレも若干改善しました。</p>

<p>あと、効果があったかは分かりませんが、他の家の無線になるべく干渉しなそうなチャンネルを手動で設定してみました。</p>

<p>https://aladdin.popin.cc/pages/faq#faq555817762864</p>

<h3 id="ルーターの負荷を下げる">ルーターの負荷を下げる</h3>

<p>ルーターの負荷を下げると改善する可能性があるとサポートから教えてもらいました。他の機器の接続を止めてどの程度改善するか確認するのも良いと思います。私の自宅の場合、1台のルータがルータ機能と無線機能を兼任していたので、2台のルータを用意し1台をブリッジモードにして負荷を分散しました。効果があったかは分かりません。</p>

<h3 id="通信が混雑していない時間帯で試してみる">通信が混雑していない時間帯で試してみる</h3>

<p>回線が弱いことで生じる原因かもしれないので早朝などある程度回線速度を確保できる時間帯で検証してみるのもよいと思います。</p>

<h3 id="aladdin-connector本体の取り換え">Aladdin Connector本体の取り換え</h3>

<p>私の場合はこれでした。サポートに問い合わせて本体を入れ替えたところ音ズレはすぐに解消しました。</p>

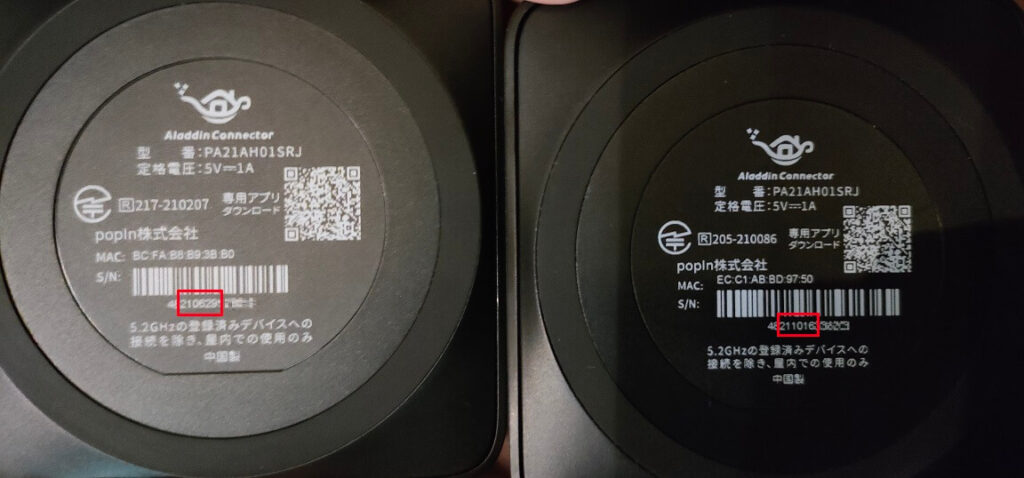
<p>機器の型番は同じだったのですがS/Nの（おそらく）製造日っぽい番号を見ると（おそらく）10月に作ったもので音ズレが発生していました。入れ替えとして送られてきた機器は（おそらく）6月に作ったもののようです。</p>

<p>画像左が音ズレが発生しない機器、右が音ズレが発生した機器。</p>

<p><img src="/images/SN-1024x478.jpg" alt="" /></p>

<p>型番が同じでもライトリングの光の色が違ったりしたので時期によって製造方法や材料が違っているのでしょうか。画面転送状態を表す黄色ですが、正常に動く方は黄色というよりオレンジに近い色でした。逆に音ズレする方はThe黄色と言った色で光りました。青も正常に動く方は鮮やかに光ります。</p>

<p>Twitterで検索したら私と同様の条件で音ズレが発生していて機器を交換したら直ったという方もいたので、色の光方やS/Nが似ている方は疑ってみてもよいかもしれません。</p>

<p>やることをやっても改善しない場合はサポートに問い合わせてみましょう。</p>

<h2 id="外部スピーカーで音を出したときの音ズレ">外部スピーカーで音を出したときの音ズレ</h2>

<p>ここからはAladdin Connectorを使わなくても発生する音ズレに対する改善方法です。現時点で「改善できない」ケースもありますがそこは妥協点を見つけるしかないかなと思います。</p>

<h3 id="popin-aladdinからbluetooth経由で外部スピーカに出力する時の音ズレ">popIn AladdinからBluetooth経由で外部スピーカに出力する時の音ズレ</h3>

<p>popIn AladdinにはBluetooth出力の機能が標準でついていて外部のスピーカーで音声を流せるようにはなっています。ただ0.1秒ほどの体感できるような音ズレが発生することがあります。</p>

<p>私の自宅の環境では、アプリによっておこる場合と起こらない場合がありました。</p>

<table>
  <thead>
    <tr>
      <th> </th>
      <th> </th>
    </tr>
  </thead>
  <tbody>
    <tr>
      <td>アプリ</td>
      <td>症状</td>
    </tr>
    <tr>
      <td>テレビ</td>
      <td>1分程度で音ズレが体感できる</td>
    </tr>
    <tr>
      <td>Amazonプライム</td>
      <td>5分程度は音ズレなし、30分程度でズレを体感できるようになる</td>
    </tr>
    <tr>
      <td>YouTube</td>
      <td>ズレない（長い動画だとズレてくるかも）</td>
    </tr>
    <tr>
      <td>Aladdin Connector</td>
      <td>接続後すぐに音ズレを体感できる</td>
    </tr>
  </tbody>
</table>

<p>アプリごとの症状</p>

<p>音がずれてきたとしてもチャンネルを変えたり他の動画に切り替えたりするとリセットされるので短い動画ならそこまで気になりません。テレビは30分以上見ることがあるので非常にストレスです。またAladdin Connectorは接続直後からずれます。</p>

<p>ちなみに私の自宅の外部スピーカーはヤマハのサウンドバーYAS-209Bです。</p>

<p>https://amzn.to/31nm0Ph</p>

<h3 id="bluetoothのコーデックがsbc">BluetoothのコーデックがSBC</h3>

<p>popIn AladdinのBluetoothのコーデック形式が、遅延の発生が多いSBCということもあり、どうしようもできない部分であります。</p>

<p>https://aladdin.popin.cc/pages/faq#faq388810407984</p>

<p>今後の本体のアップデートで改善されるかもしれませんが、現状、遅延が発生するスピーカーは正直Bluetooth接続を諦めた方が良いと思いました。私は諦め、popIn Aladdin本体のスピーカーから流すことにしました。</p>

<h3 id="aladdin-connectorは音声だけ直接スピーカに接続することで解消できるかも">Aladdin Connectorは音声だけ直接スピーカに接続することで解消できるかも</h3>

<p>popIn Aladdin本体に内蔵されたアプリだと現時点で改善方法が見つかりませんでしたが、Aladdin Connectorの音ズレは改善する方法を見つけましたので紹介します。</p>

<p>それは音声だけ直接外部スピーカーに繋げる方法です。</p>

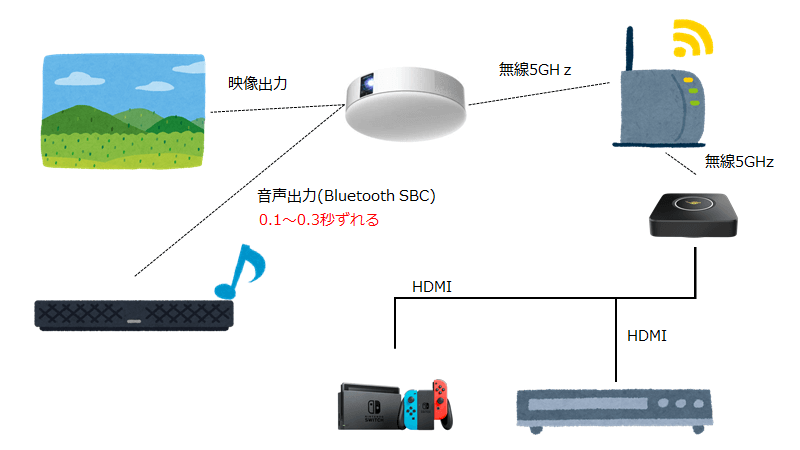
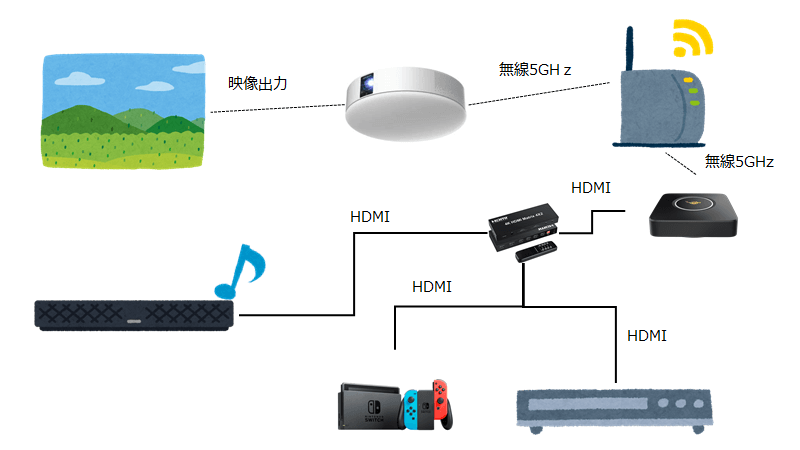
<p>ゲームやDVDプレーヤーの出力をAladdin Connectorに繋ぐ前に音声分配器を仲介して繋げます。映像は無線を経由して表示される一方、音声はHDMI接続のみですぐに出力されるのでズレが無くなることがあります。</p>

<p>私の自宅がたまたま映像と音声が一致しただけで、他の家の環境だと音声の方が速く流れてしまうかもしれないのは否定できません。</p>

<p>↓こちらが音ズレが発生したつなぎ方です。</p>

<p><img src="/images/遅れるつなぎ方.png" alt="" /></p>

<p>音ズレが起きなくなったつなぎ方が↓こちらです。</p>

<p><img src="/images/最適化.png" alt="" /></p>

<p>音声分配器はこちらを購入しました。</p>

<p>https://amzn.to/3rC72Q7</p>

<p>4つの入力と2つの出力を制御できるので、DVDプレーヤーとゲーム機とChrome Castを入力に繋いで、Aladdin Connectorと外部スピーカそれぞれに出力しました。popIn Aladdinからも音が出てしまいますが音量を0にすればよいだけです。</p>

<p>これにより私の自宅のAladdin Connectorの音ズレは完全に解消しました。</p>

<h3 id="ちなみに">ちなみに</h3>

<p>私の自宅のDVDレコーダーはBluetooth機能がついていて、外部スピーカとBluetoothで繋いだケースも検証したのですが音ズレは発生しませんでした。Aladdin Connectorを経由しない方法が取れるなら改善するかもしれません。</p>

<h2 id="ゲームの遅延はどうなの">ゲームの遅延はどうなの？</h2>

<p>ゲームは音ズレというより入力から画面への反映に遅延が出るので解決は難しいかと思います。私はマリオを試したのですが、ギリジャンができなくて毎回穴に落ちました。速さを求めないパズルゲーム等なら出来るとは思いますが違和感が気になる人はやめた方が良いと思います。</p>

<p>遅延が出ない方法があれば知りたいです。</p>

<h2 id="ということで">ということで</h2>

<p>popIn Aladdinは素晴らしい商品です。これまでにないUXを体験できます。冒頭に書いたように音ズレで評価を下げたり使わないのはとても勿体ないので、これまでに挙げた方法を試して改善することを祈ります。</p>]]></content><author><name></name></author><category term="AV機器" /><summary type="html"><![CDATA[このブログのカテゴリーでは全くないのですが、同じように困っている方もいらっしゃるのではないかと思い、私が行った改善方法をまとめたいと思います。どれか1つで改善することもあれば複数実施しても改善しないこともあるかとは思います。]]></summary></entry><entry><title type="html">[Excel]A1セルに1つだけ式を入れてアニメーションを作る</title><link href="https://tomikiya.github.io/exce-oneliner-animatio/" rel="alternate" type="text/html" title="[Excel]A1セルに1つだけ式を入れてアニメーションを作る" /><published>2021-10-18T00:00:00+00:00</published><updated>2021-10-18T00:00:00+00:00</updated><id>https://tomikiya.github.io/exce-oneliner-animatio</id><content type="html" xml:base="https://tomikiya.github.io/exce-oneliner-animatio/"><![CDATA[<p>作業セルはなるべく使わない方が良いというネタツイを見てしまい、逆に1つのセルでどれだけのことができるんだろうかと思い作ってしまいました。ネタ記事なので業務で使える技術的な話は無いかもしれません。コーヒーブレイクとしてお楽しみください。</p>

<h2 id="本当はこんなのが作りたかった">本当はこんなのが作りたかった</h2>

<p>実際に完成はしたものの「1行だけの式でアニメーション」とはならなかったものがこちらです。</p>

<p>https://twitter.com/10mikiya/status/1449423491065790473</p>

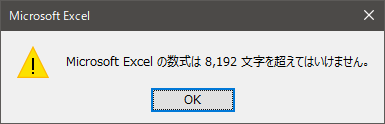
<p>作れなかった理由は、1つの式は8192文字を超えて記述できないExcelの仕様があるからです。</p>

<p><img src="/images/FB1Oz4JVgAILfLj.png" alt="" /></p>

<p>データとして記述している文字列があるため、この制限に簡単に引っかかってしまいました。ちなみにデータは9万文字です。</p>

<h2 id="データ量を少なくすることで解決">データ量を少なくすることで解決</h2>

<p>幅と高さとアニメーションの枚数を削ることで8192文字を超えないようにデータ量を調整しました。これで1つの式でアニメーションが出来るようになります。</p>

<blockquote>
  <p>解像度とフレーム数を下げてワンライナーで書ける限界で作ってみた。これなら式をコピペしてF9を押し続けるとスピルが使えるエクセルならどこでも動くはず。<br />
※循環参照やマクロは使ってない。<a href="https://twitter.com/hashtag/Excel?src=hash&amp;ref_src=twsrc%5Etfw">#Excel</a> <a href="https://twitter.com/hashtag/NoVBA?src=hash&amp;ref_src=twsrc%5Etfw">#NoVBA</a> <a href="https://t.co/jHsC3grCEd">pic.twitter.com/jHsC3grCEd</a></p>

  <p>— パパセンセイ@Excelを眺める人 (@10mikiya) <a href="https://twitter.com/10mikiya/status/1449540108680450048?ref_src=twsrc%5Etfw">October 17, 2021</a></p>
</blockquote>

<h2 id="デモ用のデータ">デモ用のデータ</h2>

<p>せっかくなのでデモ用の式を載せておきます。スピル関数が使えるExcelで有効です。</p>

<p>この式をA1セルに貼り付けてF9を押し続けると動きます。<strong>文字を中央揃えにして、セルの幅を0.38(5ピクセル)、高さを3.75(5ピクセル)に変更しておく</strong>とよりわかりやすいと思います。</p>

<div class="language-plaintext highlighter-rouge"><div class="highlight"><pre class="highlight"><code>=IF(MID(TEXTJOIN("",FALSE,DEC2BIN(DECIMAL(MID(MID(CONCAT("VVVVVVVVVVVVVVVVVTVVVVHVVVO1VVVG0FVU00FVU007VVG03VVO03VVO03VVTUJVVVVRVVVV0VVVV07VVVU7VVVVVVVVVVVVVVV","VVVVVVVVVVVVVVVVVTVVVVHVVVO1VVVG0FVU00FVU007VVG03VVO03VVO03VVTUJVVVVRVVVV0VVVV07VVVU7VVVVVVVVVVVVVVV","VVVVVVVVVVVVVVVVVTVVVVHVVVO1VVVG0FVU00FVU007VVG03VVO03VVO03VVTUJVVVVRVVVV0VVVV07VVVU7VVVVVVVVVVVVVVV","VVVVVVVVVVVVVVVVVTVVVVHVVVO1VVVG0FVU00FVU007VVG03VVO03VVO03VVTUJVVVVRVVVV0VVVV07VVVU7VVVVVVVVVVVVVVV","VVVVVVVVVVVVVVVVVTVVVVHVVVO1VVVG0FVU00FVU007VVG03VVO03VVO03VVTUJVVVVRVVVV0VVVV07VVVU7VVVVVVVVVVVVVVV","VVVVVVVVVVVVVVVVVTVVVVHVVVO1VVVG0FVU00FVU007VVG03VVO03VVO03VVTUJVVVVRVVVV0VVVV07VVVU7VVVVVVVVVVVVVVV","VVVVVVVVVVVVVVVVVTVVVVHVVVO1VVVG0FVU00FVU007VVG03VVO03VVO03VVTUJVVVVRVVVV0VVVV07VVVU7VVVVVVVVVVVVVVV","VVVVVVVVVVVVVVVVVTVVVVHVVVO1VVVG0FVU00FVU007VVG03VVO03VVO03VVTUJVVVVRVVVV0VVVV07VVVU7VVVVVVVVVVVVVVV","VVVVVVVVVVVVVVVVVR0FVVG67VVG7VVV07VVV07VVU07VVU03VVV03VVV07VVV07VVV07VVVV7VVVVVVVVVVVVVVVVVVVVVVVVVV","VVVVVVVVVVVVVVVVVVVVVSVRVVS03VVVG1VVVG1VVVO0VVVO0FVVO0FVVS0FVV00FVVR0FVVVGFVVVOFVVVSFVVVUFVVVVVVVVVV","VVVVVVVVVVVVVVVVVVVVVSVRVVS03VVVG1VVVG1VVVO0VVVO0FVVS0FVVS0FVV00FVVO0FVVVGFVVVOFVVVSFVVVUFVVVVVVVVVV","VVVVVVVVVVVVVVVVVVVVVSVRVVS03VVVG1VVVG1VVVO0VVVO0FVVS0FVVS0FVV00FVVO0FVVVGFVVVOFVVVSFVVVUFVVVVVVVVVV","VVVVVVVVVVVVVVVVSFVVVU0RVVVG3VVVG1VVVG1VVVO0VVVO0FVVO0FVVG0FVV00FVVS0FVVV0FVVVOFVVVUFVVVVVVVVVVVVVVV","VVVVVVVVVVVVVVVVVVVVVVUVVVVUVVVVOFVVVG0VVV01VVV03VVV03VVV03VVU01VVVTVVVVVVVVVVVVVVVVVVVVVVVVVVVVVVVV","VVVVVVVVVVVVVVVVVTVVVVHVVVO1VVVG0FVU00FVU007VVG03VVO03VVO03VVTUJVVVVRVVVV0VVVV07VVVU7VVVVVVVVVVVVVVV","VVVVVVVVVVVVVVVVVTVVVVHVVVO1VVVG0FVU00FVU007VVG03VVO03VVO03VVTUJVVVVRVVVV0VVVV07VVVU7VVVVVVVVVVVVVVV","VVVVVVVVVVVVVVVVVTVVVVHVVVO1VVVG0FVU00FVU007VVG03VVO03VVO03VVTUJVVVVRVVVV0VVVV07VVVU7VVVVVVVVVVVVVVV","VVVVVVVVVVVVVVVVVTVVVVHVVVO1VVVG0FVU00FVU007VVG03VVO03VVO03VVTUJVVVVRVVVV0VVVV07VVVU7VVVVVVVVVVVVVVV","VVVVVVVVVVVVVVVVVTVVVVHVVVO1VVVG0FVU00FVU007VVG03VVO03VVO03VVTUJVVVVRVVVV0VVVV07VVVU7VVVVVVVVVVVVVVV","VVVVVVVVVVVVVVVVVTVVVVHVVVO1VVVG0FVU00FVU007VVG03VVO03VVO03VVTUJVVVVRVVVV0VVVV07VVVU7VVVVVVVVVVVVVVV","VVVVVVVVVVVVVVVVVUFVVVGFVVU07VVU03VVS01VVO01VVG01VVQ01VVPN1VVH71VVRVPVVVVPVVVV0VVVV0FVVV47VVVVVVVVVV","VVVVVVVVVVVVVVVVVVJVVVO3VVVG1VVVG0VVVG0FVV00FVV00FV09OFU07UFSCFUVU0FSVVGU9VVVS0FVVVSFVVVVVVVVVVVVVVV","VVVVVVVVVVVVVVVVVU1VVVO1VVVG0VVV00FVKG0FVGO0FS0O0FS0FOFU07TFU0FSFU0C4VV0U0VVKVSFVVVVVVVVVVVVVVVVVVVV","VVVVVVVVVVVVVSVVVU1VVVO0VSO80FO1C07OO007OG807O0707O0FV7S07V7S0FV7V0FS7VGVSVVLVVVVVVVVVVVVVVVVVVVVVVV","VVVVVVVVVVVVVPVVVU1VVVC0VSFG0FOEG07O4G07O9S07OGD07SGVVNS0VV7U0FV7VGFG3VVVVVVVVVVVVVVVVVVVVVVVVVVVVVV","VVVVVVVVVVVVVVVVVVJVUVS3VS7O0VO7G0FO7G0FO700FO7G0FS7VEFS0VIFU0FGFVGFT3VVVVHVVVVVVVVVVVVVVVVVVVVVVVVV","VVVVVVVVVVVVVVVVVVJVVFU3VS3O1VS3G0VS3G0FS300FS300FS3O0FU1VUFU0FGFVGFG7VVVV3VVVVPVVVVVVVVVVVVVVVVVVVV","VVVVVVVVVVVVVVVVVVVVVFV3VS3O3VS1G1VS1G0VS100FS200FS300FU3Q8FU0BSFVGFUFVVVUFVVVG3VVVH1VVVVVVVVVVVVVVV","VVVVVVVVVVVVVVVVVVVVV7V7VS3S7VS3G3VO301VO200VS000VS600VU100VU07OVVGFSVVVVUVVVVO7VVVG3VVVV3VVVVVVVVVV","VVVVVVVVVVVVVVVVVVVVUFUFVS7OFVS30FVO203VO001VO001VS001VS000VU00SVVGFSVVVVG7VVVG3VVVVVVVVVVVVVVVVVVVV","VVVVVVVVVVVVVVVVVVVVUVUFVS7SFVO30FVO203VO001VO001VS400VS004VU0BG7V0FG3VTVVJVVVVVVVVVVVVVVVVVVVVVVVVV","VVVVVVVVVVVVVVVVVVVVUVUFVO7SFVO70FVO603VO401VO0007O0001S007RU0GJVV0VVVVVVVVVVVVVVVVVVVVVVVVVVVVVVVVV","VVVVVVVVVVVVVVVVVVVVUVUVVOFSVVO60VVG407VG003RO0001O801VS203VS0CFVV0FVVVVVVVVVVVVVVVVVVVVVVVVVVVVVVVV","VVVVVVVVVVVVVVVVVVVVUFSFVO7OFVO60FVO407VO400HO0003O800VS001VU0HVVV0VVVVVVVVVVVVVVVVVVVVVVVVVVVVVVVVV","VVVVVVVVVVVVVVVVVVVVUFSFVO7SFVO60FVO207VO403VO400HO0003S001VU0HVVV0VVVVVVVVVVVVVVVVVVVVVVVVVVVVVVVVV","VVVVVVVVVVVVVVVVVVVVUVUFVS7SFVO20FVO207VO003VO401VS001VS000VU0F01V0FNVVVVVVVVVVVVVVVVVVVVVVVVVVVVVVV","VVVVVVVVVVVVVVVVVVVVUFUFVS7SFVO20FVO203VO003VO001VS401VS001VU0FKVV0FO7VVVG3VVVVJVVVVVVVVVVVVVVVVVVVV","VVVVVVVVVVVVVVVVVVVVUFUFVS7SFVS30FVO203VO201VO001VS001VS000VU08SVVGFSVVVVG7VVVG3VVVVJVVVVVVVVVVVVVVV","VVVVVVVVVVVVVVVVVVVVVFV3VS3S3VS3G3VO301VO300VS200VS200VS1G0FU03OFVGFSVVTVUVVVVO7VVVG3VVVVJVVVVVVVVVV","VVVVVVVVVVVVVVVVVVVVVFV3VS3S3VS3G3VO301VO300VS200VS200VS1G0FU03OFVGFSVVTVUVVVVO7VVVG3VVVVJVVVVVVVVVV","VVVVVVVVVVVVVVVVVVVVVFV3VS3S3VS3G3VO301VO300VS200VS200VS1G0FU03OFVGFSVVTVUVVVVO7VVVG3VVVVJVVVVVVVVVV","VVVVVVVVVVVVVVVVVVVVVFV3VS3S3VS3G3VO301VO300VS200VS200VS1G0FU03OFVGFSVVTVUVVVVO7VVVG3VVVVJVVVVVVVVVV","VVVVVVVVVVVVVVVVVVVVVFV3VS3S3VS3G3VO301VO300VS200VS200VS1G0FU03OFVGFSVVTVUVVVVO7VVVG3VVVVJVVVVVVVVVV","VVVVVVVVVVVVVVVVVVVVV7V7VS3S7VS3G3VO101VO200VS000VS600VS1G0VU07OVVGFSVVVVUVVVVO7VVVG3VVVVJVVVVVVVVVV","VVVVVVVVVVVVVVVVVVVVUFUFVS3SFVS30FVO203VO001VO001VS001VS000VU00SVVGFSFVVVG7VVVG3VVVVVVVVVVVVVVVVVVVV","VVVVVVVVVVVVVVVVVVVVVFVJVS7S3VS3G3VO3G1VO300VS200VS600FS3G0FU0BOFVGFSFVTVUFVVVO7VVVO3VVVP3VVVVVVVVVV","VVVVVVVVVVVVVVVVVVVVVVVJVUVV3VSFO3VOFG0VOFG0VOF00FOF00FSV00FS4VSFV0VSFVPVUVVVVSVVVV07VVV27VVVVVVVVVV","VVVVVVVVVVVVVVVVVVVVVOHVVVS07VVO07VVS03VVV01VVV01VVU01VVUC1VVVV0VVVVO1VVVVHVVVVVVVVVVVVVVVVVVVVVVVVV","VVVVVVTVVVVSVVVVO1VVVO0VVVS07VVU0FVVU07VVU03VVT01HVTG01VSO0VVVS3VVVVVVVVVVVVVVVVVVVVVVVVVVVVVVVVVVVV","VVVVVVVVVVVJVVVVGNVVVG0FVVG0FVVO0FVVS07VVS07VVS03VVU03VVVG01VVS3VVVVVVVVVVVVVVVVVVVVVVVVVVVVVVVVVVVV","VVVVVVVVVVVVVVVVVSVVVU0VVU00VVV00FVV007VVG07VVO03VVO03VVU03VVVV1VVVVGFVVVG3VVVV3VVVVVVVVVVVVVVVVVVVV","VVVVVVVVVVVVVVVVVTVVVVHVVVO1VVVG0FVU00FVU007VVG03VVO03VVO03VVTUJVVVVRVVVV0FVVV07VVVU7VVVVVVVVVVVVVVV"),MOD(INT((NOW()-INT(NOW()))*864000),52)*100+1,100),SEQUENCE(100),1),32),5)),SEQUENCE(20,25),1)="0","■","□")
</code></pre></div></div>

<h2 id="式の解説">式の解説</h2>

<p>全体像はこんな形です。</p>

<div class="language-plaintext highlighter-rouge"><div class="highlight"><pre class="highlight"><code>=IF(
    MID(
        TEXTJOIN(
            "",
            FALSE,
            DEC2BIN(
                DECIMAL(
                    MID(
                        MID(
                            データ,
                            MOD(INT((NOW()-INT(NOW()))*864000),52)*100+1,
                            100
                        ),
                        SEQUENCE(100),
                        1
                    ),
                    32
                ),
                5
            )
        ),
        SEQUENCE(20,25),
        1
    )="0",
    "■",
    "□"
)
</code></pre></div></div>

<div class="language-plaintext highlighter-rouge"><div class="highlight"><pre class="highlight"><code>// データ
CONCAT(
    "VVVVVVVVVVVVVVVVVTVVVVHVVVO1VVVG0FVU00FVU007VVG03VVO03VVO03VVTUJVVVVRVVVV0VVVV07VVVU7VVVVVVVVVVVVVVV",
    "VVVVVVVVVVVVVVVVVTVVVVHVVVO1VVVG0FVU00FVU007VVG03VVO03VVO03VVTUJVVVVRVVVV0VVVV07VVVU7VVVVVVVVVVVVVVV",
    "VVVVVVVVVVVVVVVVVTVVVVHVVVO1VVVG0FVU00FVU007VVG03VVO03VVO03VVTUJVVVVRVVVV0VVVV07VVVU7VVVVVVVVVVVVVVV",
    "VVVVVVVVVVVVVVVVVTVVVVHVVVO1VVVG0FVU00FVU007VVG03VVO03VVO03VVTUJVVVVRVVVV0VVVV07VVVU7VVVVVVVVVVVVVVV",
    "VVVVVVVVVVVVVVVVVTVVVVHVVVO1VVVG0FVU00FVU007VVG03VVO03VVO03VVTUJVVVVRVVVV0VVVV07VVVU7VVVVVVVVVVVVVVV",
    "VVVVVVVVVVVVVVVVVTVVVVHVVVO1VVVG0FVU00FVU007VVG03VVO03VVO03VVTUJVVVVRVVVV0VVVV07VVVU7VVVVVVVVVVVVVVV",
    "VVVVVVVVVVVVVVVVVTVVVVHVVVO1VVVG0FVU00FVU007VVG03VVO03VVO03VVTUJVVVVRVVVV0VVVV07VVVU7VVVVVVVVVVVVVVV",
    "VVVVVVVVVVVVVVVVVTVVVVHVVVO1VVVG0FVU00FVU007VVG03VVO03VVO03VVTUJVVVVRVVVV0VVVV07VVVU7VVVVVVVVVVVVVVV",
    "VVVVVVVVVVVVVVVVVR0FVVG67VVG7VVV07VVV07VVU07VVU03VVV03VVV07VVV07VVV07VVVV7VVVVVVVVVVVVVVVVVVVVVVVVVV",
    "VVVVVVVVVVVVVVVVVVVVVSVRVVS03VVVG1VVVG1VVVO0VVVO0FVVO0FVVS0FVV00FVVR0FVVVGFVVVOFVVVSFVVVUFVVVVVVVVVV",
    "VVVVVVVVVVVVVVVVVVVVVSVRVVS03VVVG1VVVG1VVVO0VVVO0FVVS0FVVS0FVV00FVVO0FVVVGFVVVOFVVVSFVVVUFVVVVVVVVVV",
    "VVVVVVVVVVVVVVVVVVVVVSVRVVS03VVVG1VVVG1VVVO0VVVO0FVVS0FVVS0FVV00FVVO0FVVVGFVVVOFVVVSFVVVUFVVVVVVVVVV",
    "VVVVVVVVVVVVVVVVSFVVVU0RVVVG3VVVG1VVVG1VVVO0VVVO0FVVO0FVVG0FVV00FVVS0FVVV0FVVVOFVVVUFVVVVVVVVVVVVVVV",
    "VVVVVVVVVVVVVVVVVVVVVVUVVVVUVVVVOFVVVG0VVV01VVV03VVV03VVV03VVU01VVVTVVVVVVVVVVVVVVVVVVVVVVVVVVVVVVVV",
    "VVVVVVVVVVVVVVVVVTVVVVHVVVO1VVVG0FVU00FVU007VVG03VVO03VVO03VVTUJVVVVRVVVV0VVVV07VVVU7VVVVVVVVVVVVVVV",
    "VVVVVVVVVVVVVVVVVTVVVVHVVVO1VVVG0FVU00FVU007VVG03VVO03VVO03VVTUJVVVVRVVVV0VVVV07VVVU7VVVVVVVVVVVVVVV",
    "VVVVVVVVVVVVVVVVVTVVVVHVVVO1VVVG0FVU00FVU007VVG03VVO03VVO03VVTUJVVVVRVVVV0VVVV07VVVU7VVVVVVVVVVVVVVV",
    "VVVVVVVVVVVVVVVVVTVVVVHVVVO1VVVG0FVU00FVU007VVG03VVO03VVO03VVTUJVVVVRVVVV0VVVV07VVVU7VVVVVVVVVVVVVVV",
    "VVVVVVVVVVVVVVVVVTVVVVHVVVO1VVVG0FVU00FVU007VVG03VVO03VVO03VVTUJVVVVRVVVV0VVVV07VVVU7VVVVVVVVVVVVVVV",
    "VVVVVVVVVVVVVVVVVTVVVVHVVVO1VVVG0FVU00FVU007VVG03VVO03VVO03VVTUJVVVVRVVVV0VVVV07VVVU7VVVVVVVVVVVVVVV",
    "VVVVVVVVVVVVVVVVVUFVVVGFVVU07VVU03VVS01VVO01VVG01VVQ01VVPN1VVH71VVRVPVVVVPVVVV0VVVV0FVVV47VVVVVVVVVV",
    "VVVVVVVVVVVVVVVVVVJVVVO3VVVG1VVVG0VVVG0FVV00FVV00FV09OFU07UFSCFUVU0FSVVGU9VVVS0FVVVSFVVVVVVVVVVVVVVV",
    "VVVVVVVVVVVVVVVVVU1VVVO1VVVG0VVV00FVKG0FVGO0FS0O0FS0FOFU07TFU0FSFU0C4VV0U0VVKVSFVVVVVVVVVVVVVVVVVVVV",
    "VVVVVVVVVVVVVSVVVU1VVVO0VSO80FO1C07OO007OG807O0707O0FV7S07V7S0FV7V0FS7VGVSVVLVVVVVVVVVVVVVVVVVVVVVVV",
    "VVVVVVVVVVVVVPVVVU1VVVC0VSFG0FOEG07O4G07O9S07OGD07SGVVNS0VV7U0FV7VGFG3VVVVVVVVVVVVVVVVVVVVVVVVVVVVVV",
    "VVVVVVVVVVVVVVVVVVJVUVS3VS7O0VO7G0FO7G0FO700FO7G0FS7VEFS0VIFU0FGFVGFT3VVVVHVVVVVVVVVVVVVVVVVVVVVVVVV",
    "VVVVVVVVVVVVVVVVVVJVVFU3VS3O1VS3G0VS3G0FS300FS300FS3O0FU1VUFU0FGFVGFG7VVVV3VVVVPVVVVVVVVVVVVVVVVVVVV",
    "VVVVVVVVVVVVVVVVVVVVVFV3VS3O3VS1G1VS1G0VS100FS200FS300FU3Q8FU0BSFVGFUFVVVUFVVVG3VVVH1VVVVVVVVVVVVVVV",
    "VVVVVVVVVVVVVVVVVVVVV7V7VS3S7VS3G3VO301VO200VS000VS600VU100VU07OVVGFSVVVVUVVVVO7VVVG3VVVV3VVVVVVVVVV",
    "VVVVVVVVVVVVVVVVVVVVUFUFVS7OFVS30FVO203VO001VO001VS001VS000VU00SVVGFSVVVVG7VVVG3VVVVVVVVVVVVVVVVVVVV",
    "VVVVVVVVVVVVVVVVVVVVUVUFVS7SFVO30FVO203VO001VO001VS400VS004VU0BG7V0FG3VTVVJVVVVVVVVVVVVVVVVVVVVVVVVV",
    "VVVVVVVVVVVVVVVVVVVVUVUFVO7SFVO70FVO603VO401VO0007O0001S007RU0GJVV0VVVVVVVVVVVVVVVVVVVVVVVVVVVVVVVVV",
    "VVVVVVVVVVVVVVVVVVVVUVUVVOFSVVO60VVG407VG003RO0001O801VS203VS0CFVV0FVVVVVVVVVVVVVVVVVVVVVVVVVVVVVVVV",
    "VVVVVVVVVVVVVVVVVVVVUFSFVO7OFVO60FVO407VO400HO0003O800VS001VU0HVVV0VVVVVVVVVVVVVVVVVVVVVVVVVVVVVVVVV",
    "VVVVVVVVVVVVVVVVVVVVUFSFVO7SFVO60FVO207VO403VO400HO0003S001VU0HVVV0VVVVVVVVVVVVVVVVVVVVVVVVVVVVVVVVV",
    "VVVVVVVVVVVVVVVVVVVVUVUFVS7SFVO20FVO207VO003VO401VS001VS000VU0F01V0FNVVVVVVVVVVVVVVVVVVVVVVVVVVVVVVV",
    "VVVVVVVVVVVVVVVVVVVVUFUFVS7SFVO20FVO203VO003VO001VS401VS001VU0FKVV0FO7VVVG3VVVVJVVVVVVVVVVVVVVVVVVVV",
    "VVVVVVVVVVVVVVVVVVVVUFUFVS7SFVS30FVO203VO201VO001VS001VS000VU08SVVGFSVVVVG7VVVG3VVVVJVVVVVVVVVVVVVVV",
    "VVVVVVVVVVVVVVVVVVVVVFV3VS3S3VS3G3VO301VO300VS200VS200VS1G0FU03OFVGFSVVTVUVVVVO7VVVG3VVVVJVVVVVVVVVV",
    "VVVVVVVVVVVVVVVVVVVVVFV3VS3S3VS3G3VO301VO300VS200VS200VS1G0FU03OFVGFSVVTVUVVVVO7VVVG3VVVVJVVVVVVVVVV",
    "VVVVVVVVVVVVVVVVVVVVVFV3VS3S3VS3G3VO301VO300VS200VS200VS1G0FU03OFVGFSVVTVUVVVVO7VVVG3VVVVJVVVVVVVVVV",
    "VVVVVVVVVVVVVVVVVVVVVFV3VS3S3VS3G3VO301VO300VS200VS200VS1G0FU03OFVGFSVVTVUVVVVO7VVVG3VVVVJVVVVVVVVVV",
    "VVVVVVVVVVVVVVVVVVVVVFV3VS3S3VS3G3VO301VO300VS200VS200VS1G0FU03OFVGFSVVTVUVVVVO7VVVG3VVVVJVVVVVVVVVV",
    "VVVVVVVVVVVVVVVVVVVVV7V7VS3S7VS3G3VO101VO200VS000VS600VS1G0VU07OVVGFSVVVVUVVVVO7VVVG3VVVVJVVVVVVVVVV",
    "VVVVVVVVVVVVVVVVVVVVUFUFVS3SFVS30FVO203VO001VO001VS001VS000VU00SVVGFSFVVVG7VVVG3VVVVVVVVVVVVVVVVVVVV",
    "VVVVVVVVVVVVVVVVVVVVVFVJVS7S3VS3G3VO3G1VO300VS200VS600FS3G0FU0BOFVGFSFVTVUFVVVO7VVVO3VVVP3VVVVVVVVVV",
    "VVVVVVVVVVVVVVVVVVVVVVVJVUVV3VSFO3VOFG0VOFG0VOF00FOF00FSV00FS4VSFV0VSFVPVUVVVVSVVVV07VVV27VVVVVVVVVV",
    "VVVVVVVVVVVVVVVVVVVVVOHVVVS07VVO07VVS03VVV01VVV01VVU01VVUC1VVVV0VVVVO1VVVVHVVVVVVVVVVVVVVVVVVVVVVVVV",
    "VVVVVVTVVVVSVVVVO1VVVO0VVVS07VVU0FVVU07VVU03VVT01HVTG01VSO0VVVS3VVVVVVVVVVVVVVVVVVVVVVVVVVVVVVVVVVVV",
    "VVVVVVVVVVVJVVVVGNVVVG0FVVG0FVVO0FVVS07VVS07VVS03VVU03VVVG01VVS3VVVVVVVVVVVVVVVVVVVVVVVVVVVVVVVVVVVV",
    "VVVVVVVVVVVVVVVVVSVVVU0VVU00VVV00FVV007VVG07VVO03VVO03VVU03VVVV1VVVVGFVVVG3VVVV3VVVVVVVVVVVVVVVVVVVV",
    "VVVVVVVVVVVVVVVVVTVVVVHVVVO1VVVG0FVU00FVU007VVG03VVO03VVO03VVTUJVVVVRVVVV0FVVV07VVVU7VVVVVVVVVVVVVVV"
)
</code></pre></div></div>

<h3 id="データについて">データについて</h3>

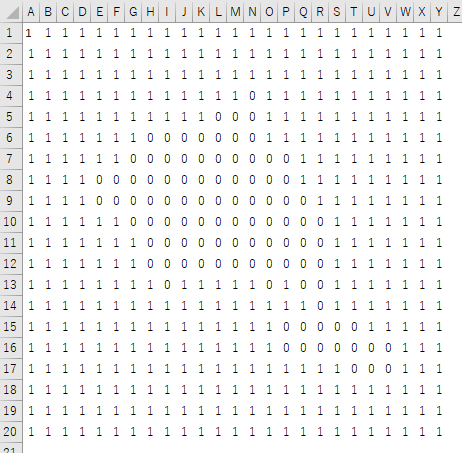
<p>文字が意味不明に羅列している部分がデータになっています。データは32進数で、2進数に直すと1と0の並びに変換されます。この1と0を幅25、高さ20に並べることで1枚の絵となります。</p>

<div class="language-plaintext highlighter-rouge"><div class="highlight"><pre class="highlight"><code>// 32進数表記
VVVVVVVVVVVVVVVVVTVVVVHVVVO1VVVG0FVU00FVU007VVG03VVO03VVO03VVTUJVVVVRVVVV0VVVV07VVVU7VVVVVVVVVVVVVVV
</code></pre></div></div>

<p>↓</p>

<div class="language-plaintext highlighter-rouge"><div class="highlight"><pre class="highlight"><code>// 2進数表記
11111111111111111111111111111111111111111111111111111111111111111111111111111111111111110111111111111111111111100011111111111111111100000001111111111111111100000000001111111111111000000000000111111111111100000000000001111111111111100000000000011111111111111000000000001111111111111100000000000111111111111111011111010011111111111111111111111101111111111111111111111000001111111111111111111100000001111111111111111111111000111111111111111111111111111111111111111111111111111111111111111111111111111111
</code></pre></div></div>

<p>↓</p>

<div class="language-plaintext highlighter-rouge"><div class="highlight"><pre class="highlight"><code>// 幅25、縦20に整形
1111111111111111111111111
1111111111111111111111111
1111111111111111111111111
1111111111111011111111111
1111111111100011111111111
1111111000000011111111111
1111110000000000111111111
1111000000000000111111111
1111000000000000011111111
1111110000000000001111111
1111111000000000001111111
1111111000000000001111111
1111111101111101001111111
1111111111111111101111111
1111111111111110000011111
1111111111111110000000111
1111111111111111111000111
1111111111111111111111111
1111111111111111111111111
1111111111111111111111111
</code></pre></div></div>

<p>デモの式は52枚分のデータが用意されています。</p>

<p>2進数で保存できればシンプルなのですが、前述のように8192文字の制限がありますのでなるべくデータを圧縮して文字数を減らすために32進数へ変換しています。32進数は5個分の1と0を1文字に縮小できます。</p>

<p>Excelにはn進数を10進数に変換する<a href="https://support.microsoft.com/ja-jp/office/decimal-%E9%96%A2%E6%95%B0-ee554665-6176-46ef-82de-0a283658da2e">DECIMAL関数</a>と、10進数を2進数に変換する<a href="https://support.microsoft.com/ja-jp/office/dec2bin-%E9%96%A2%E6%95%B0-0f63dd0e-5d1a-42d8-b511-5bf5c6d43838">DEC2BIN関数</a>がありますので変換自体は容易です。</p>

<p>また、データに<a href="https://support.microsoft.com/ja-jp/office/concat-%E9%96%A2%E6%95%B0-9b1a9a3f-94ff-41af-9736-694cbd6b4ca2">CONCAT関数</a>を使っています。1枚毎のデータに区切って可読性を上げるためという理由もありますが、数式に指定できる文字数は255文字の制限があるのでそれを回避するためでもあります。区切らず全ての文字をつなげると以下のような警告が出ます。</p>

<p><img src="https://pbs.twimg.com/media/FB3tn6OVIAkaz1E?format=png&amp;name=900x900" alt="画像" /></p>

<h3 id="now関数を使ってアニメーションさせる">NOW関数を使ってアニメーションさせる</h3>

<p>F9を押し続けることによってアニメーションします。NOW関数を使っていて参照するデータの位置をずらすことで実現しています。</p>

<div class="language-plaintext highlighter-rouge"><div class="highlight"><pre class="highlight"><code>// 一部抜粋
MID(
    データ,
    MOD(INT((NOW()-INT(NOW()))*864000),52)*100+1,
    100
)
</code></pre></div></div>

<p><code class="language-plaintext highlighter-rouge">NOW()-INT(NOW())</code>により、1日以下の時刻(小数表記)を取得できます。そこに86400秒*10をかけることで0.1秒単位でカウントアップするカウンターが作れます。さらにMODを入れることで0～51を繰り返すカウンターになります。</p>

<p>あとは<a href="https://support.microsoft.com/ja-jp/office/mid-%E9%96%A2%E6%95%B0-midb-%E9%96%A2%E6%95%B0-d5f9e25c-d7d6-472e-b568-4ecb12433028">MID関数</a>で100文字単位でデータを切り取れば、0.1秒ごとに取得するデータを変えることができます。</p>

<p>取得できるデータは、例えば以下のような100文字の文字列になります。</p>

<div class="language-plaintext highlighter-rouge"><div class="highlight"><pre class="highlight"><code>VVVVVVVVVVVVVVVVVTVVVVHVVVO1VVVG0FVU00FVU007VVG03VVO03VVO03VVTUJVVVVRVVVV0VVVV07VVVU7VVVVVVVVVVVVVVV
</code></pre></div></div>

<h3 id="文字を1つずつ2進数に変換">文字を1つずつ2進数に変換</h3>

<div class="language-plaintext highlighter-rouge"><div class="highlight"><pre class="highlight"><code>// 一部抜粋と加工
MID(
    "VVVVVVVVVVVVVVVVVTVVVVHVVVO1VVVG0FVU00FVU007VVG03VVO03VVO03VVTUJVVVVRVVVV0VVVV07VVVU7VVVVVVVVVVVVVVV",
    SEQUENCE(100),
    1
)
</code></pre></div></div>

<p>MID関数と<a href="https://support.microsoft.com/ja-jp/office/sequence-%E9%96%A2%E6%95%B0-57467a98-57e0-4817-9f14-2eb78519ca90">SEQUENCE関数</a>を組み合わせて1文字ずつ切り取れます。上記の式ですとSEQUENCE(100)で1～100の配列が生成され、それぞれがMIDで評価されます。結果的に100個の文字が返されます。</p>

<p>そして、それぞれの文字をDECIMALとDEC2BINで2進数に変換します。</p>

<div class="language-plaintext highlighter-rouge"><div class="highlight"><pre class="highlight"><code>// 一部抜粋と加工
DEC2BIN(
    DECIMAL(
        {"V";"V";"V";"V";"V";"V";"V";"V";"V";"V";"V";"V";"V";"V";"V";"V";"V";"T";"V";"V";"V";"V";...}, //省略
        32
    ),
    5
)
</code></pre></div></div>

<h3 id="幅25高さ20に展開">幅25×高さ20に展開</h3>

<p>TEXTJOIN関数で一旦すべての文字列を結合したら、MIDとSEQUENCEで幅25、高さ20に展開します。</p>

<div class="language-plaintext highlighter-rouge"><div class="highlight"><pre class="highlight"><code>// 一部抜粋と加工
MID(
    TEXTJOIN(
        "",
        FALSE,
        {"00000";"00000";"00000";...} //省略
    ),
    SEQUENCE(20,25),
    1
)
</code></pre></div></div>

<p>↓</p>

<p><img src="/images/かいる10.png" alt="" /></p>

<p>以上でほぼ完成です。あとは■や□を使って見やすくするだけになります。IFの部分で変更できます。</p>

<p>ちなみにIFをREPTで代替えできますが1と0の比率によって描画する量が変わり処理の負荷が不安定になることがあります。</p>

<h2 id="ということで">ということで</h2>

<p>俗にいうワンライナーでアニメーションが出来ました。こういった遊びもたまには良いですね！！</p>]]></content><author><name></name></author><category term="Excel" /><summary type="html"><![CDATA[作業セルはなるべく使わない方が良いというネタツイを見てしまい、逆に1つのセルでどれだけのことができるんだろうかと思い作ってしまいました。ネタ記事なので業務で使える技術的な話は無いかもしれません。コーヒーブレイクとしてお楽しみください。]]></summary></entry><entry><title type="html">Excelで入力規則を指定したのにエラーメッセージが表示されない原因と対策</title><link href="https://tomikiya.github.io/excel-data-validation-problem/" rel="alternate" type="text/html" title="Excelで入力規則を指定したのにエラーメッセージが表示されない原因と対策" /><published>2021-05-27T00:00:00+00:00</published><updated>2021-05-27T00:00:00+00:00</updated><id>https://tomikiya.github.io/excel-data-validation-problem</id><content type="html" xml:base="https://tomikiya.github.io/excel-data-validation-problem/"><![CDATA[<p>不具合なのか仕様なのか不明ですが、入力規則のリストを設定する際にとある条件で思った通りの挙動を示さないケースがあったのでまとめます。</p>

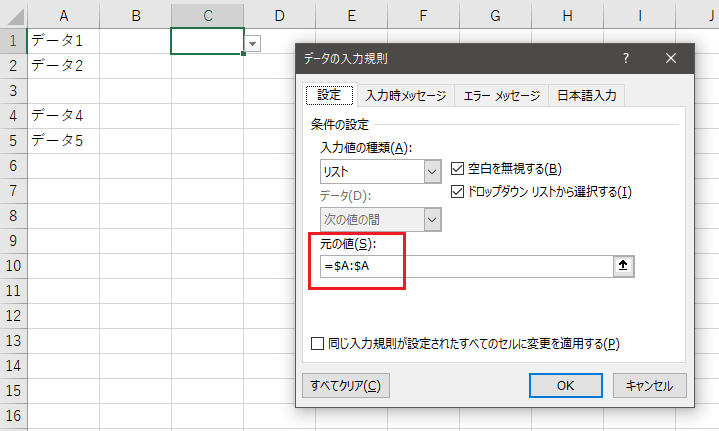
<h2 id="何が起こったか">何が起こったか</h2>

<p>入力規則を設定して指定した文字だけを登録させたかったのですが、どんな文字でも登録できるケースがありました。</p>

<p>こんな感じです。</p>

<p>https://youtu.be/WF17QQ8U2U8</p>

<p>同じ文字を入力してもエラーメッセージが出たりでなかったりしてますね。</p>

<h2 id="エラーメッセージが表示されない条件は">エラーメッセージが表示されない条件は？</h2>

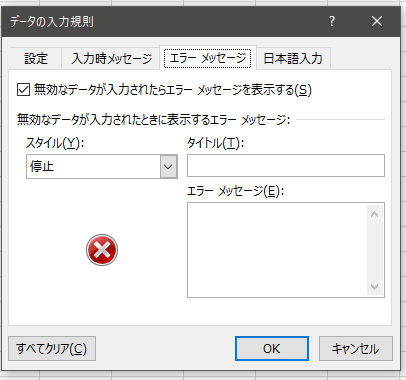
<p>まず確認することはエラーメッセージタブの「無効なデータが入力されたらエラーメッセージを表示する」のチェックが有効になっているかです。このチェックが無効だとエラーメッセージが出ません。</p>

<p><img src="/images/エラーメッセージタブ.png" alt="" /></p>

<p>今回の課題はこのチェックが有効でも発生していました。</p>

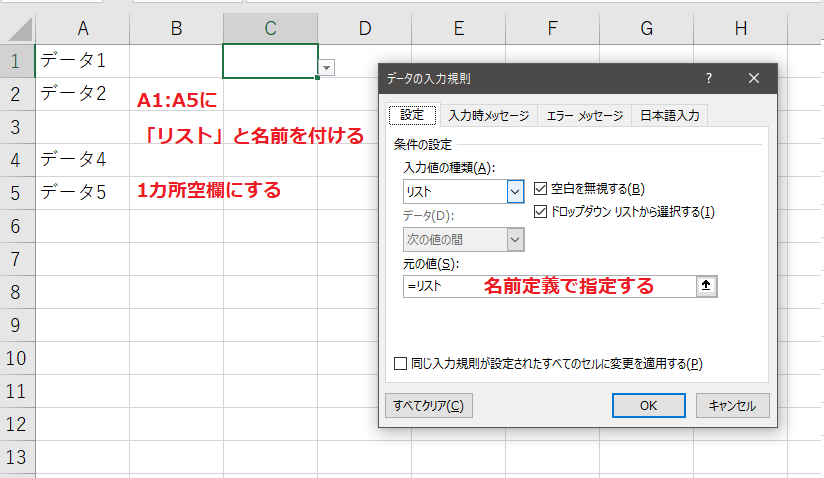
<p>いろいろと探ってみましたが以下の条件が重なるとエラーメッセージが出なくなるようです。</p>

<ol>
  <li>入力規則の入力値の種類に「リスト」を指定する</li>
  <li>セル範囲に名前定義を登録する</li>
  <li>2で登録した名前定義を「元の値」に指定する</li>
  <li>2で登録したセル範囲で1個以上空欄にする</li>
</ol>

<p><img src="/images/エラー条件-1.png" alt="" /></p>

<p>名前定義を経由することとリストに空欄があるのが今回の問題のポイントになっています。</p>

<h2 id="どう対策すればよい">どう対策すればよい？</h2>

<p>前述したように名前定義を使わなければこのケースに巡り合うことはありません。リストの入力規則を設定する際はトリッキーなことをせず王道な方法で設定しましょう。私はテーブル化して参照するパターンが好みです、動的に適用範囲が変わりますからね。テーブルが使えないならOFFSETで頑張ります。</p>

<p>こちらのサイトが分かりやすいと思いました。ご参考までに。</p>

<p><a href="https://excel-design-dr.com/excel-pulldown-list/">https://excel-design-dr.com/excel-pulldown-list/</a></p>

<h3 id="名前定義を使うなら空欄は厳禁">名前定義を使うなら空欄は厳禁</h3>

<p>どうしても名前定義を使いたいなら空欄は無いようにしましょう。（正直管理できないと思うのでお勧めしません。）</p>

<h2 id="おまけ">おまけ</h2>

<p>リストの指定方法で面白かったのが、リスト専用のシートを追加して範囲に「A:A」としてもうまくいくんですよね。</p>

<p><img src="/images/列指定.png" alt="" /></p>

<p>式が綺麗なところもよいですし、動的に範囲も変わってくれるんですよね。テーブルが使えないバージョンで動的リストが必要になったり、サーバでExcelを生成する時にライブラリがテーブル機能を扱えなかったりするならこの方法もありかもしれません。</p>

<p>ただし、こちらも少々制限があって、いわゆる最後のセル（Ctrl+End）の行までリストが生成される仕様です。変に100行目のセルを編集しようものなら100個のリストが生成されるのでご注意ください。</p>

<p>制限と折り合いをつけながら要件に合った方法で指定しましょう。</p>]]></content><author><name></name></author><category term="Excel" /><summary type="html"><![CDATA[不具合なのか仕様なのか不明ですが、入力規則のリストを設定する際にとある条件で思った通りの挙動を示さないケースがあったのでまとめます。]]></summary></entry><entry><title type="html">Power Automate Desktop WebページでJavaScript関数を実行するアクションに引数を渡すのがなかなかに面倒だった話</title><link href="https://tomikiya.github.io/pad-webjs-parameter/" rel="alternate" type="text/html" title="Power Automate Desktop WebページでJavaScript関数を実行するアクションに引数を渡すのがなかなかに面倒だった話" /><published>2021-05-23T00:00:00+00:00</published><updated>2021-05-23T00:00:00+00:00</updated><id>https://tomikiya.github.io/pad-webjs-parameter</id><content type="html" xml:base="https://tomikiya.github.io/pad-webjs-parameter/"><![CDATA[<p>Power Automate DesktopのアクションとしてWebページでJavaScriptを実行したかったのですが、引数を渡す方法に癖があったので備忘録としてまとめます。今後改善されるかもしれませんし、このやり方が最適な方法ではないかもしれませんのでそこはご了承ください。</p>

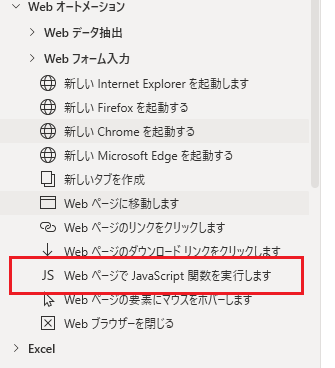
<h2 id="webページでjavascript関数を実行するアクション">WebページでJavaScript関数を実行するアクション</h2>

<p><img src="/images/アクション.png" alt="" /></p>

<p>Webフォーム入力のアクションにあります。単独でも動きますが変数を使えば引数として渡すことができます。</p>

<p>このアクションはブラウザを事前に起動しておく必要がありますので「新しい（ブラウザ）を起動する」のアクションでブラウザを立ち上げないとエラーになります。</p>

<h2 id="変数の型によって渡し方が異なる">変数の型によって渡し方が異なる</h2>

<p>Power Automate Desktopで用意されている型は以下の通りです。（※2021/5/22時点）</p>

<p><a href="https://docs.microsoft.com/ja-jp/power-automate/desktop-flows/variable-data-types">https://docs.microsoft.com/ja-jp/power-automate/desktop-flows/variable-data-types</a></p>

<table>
  <thead>
    <tr>
      <th> </th>
      <th> </th>
    </tr>
  </thead>
  <tbody>
    <tr>
      <td>型</td>
      <td>指定方法例</td>
    </tr>
    <tr>
      <td>テキスト値</td>
      <td>apple</td>
    </tr>
    <tr>
      <td>数値</td>
      <td>100</td>
    </tr>
    <tr>
      <td>ブール値</td>
      <td>True / False</td>
    </tr>
    <tr>
      <td>リスト</td>
      <td>%[1, 2, 3]% または「新しいリストの作成」と「項目をリストに追加」で指定</td>
    </tr>
    <tr>
      <td>データテーブル</td>
      <td>%{^[‘id’,’name’,’value’],[1,’hoge’,100],[2,’fuga’,200]}%</td>
    </tr>
    <tr>
      <td>データ行</td>
      <td>%データテーブル[0]%</td>
    </tr>
    <tr>
      <td>カスタムオブジェクト</td>
      <td>%{ ‘ID’: 1, ‘Value’: ‘hello’ }%</td>
    </tr>
  </tbody>
</table>

<p>仕様なのか不具合なのか分かりませんが、型によって渡し方が異なっていました。</p>

<h2 id="テキストの場合はシングルクオーテーションで囲む">テキストの場合はシングルクオーテーションで囲む</h2>

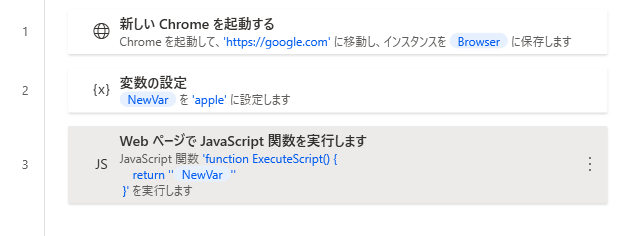
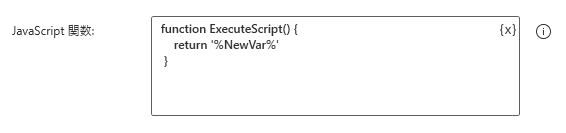
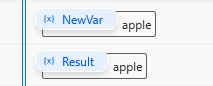
<p>Power Automate Desktopの変数は%%で囲うことで使用できます。これはJavaScript内でも一緒です。テキストの場合はJavaScript関数内でシングルクオーテーションで囲うことで認識してもらえます。</p>

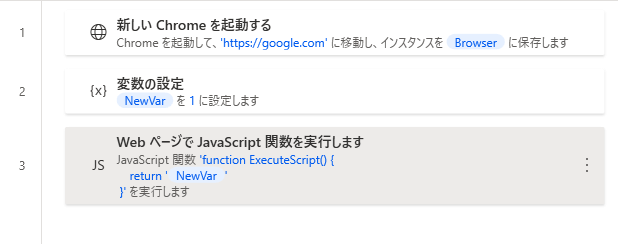
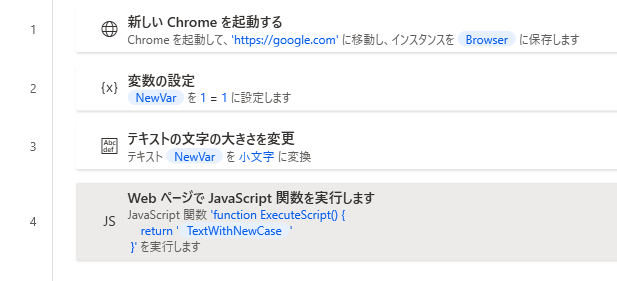
<p>以下のフローは、ブラウザを起動して変数にappleをセットし、Javascriptに渡してそのままreturnしているだけです。</p>

<p><img src="/images/テキスト.png" alt="" /></p>

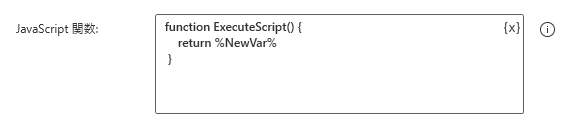
<p>Javascriptのreturnでは<code class="language-plaintext highlighter-rouge">%NewVar%</code>を<code class="language-plaintext highlighter-rouge">''</code>で囲っています。</p>

<p><img src="/images/テキストJS.png" alt="" /></p>

<p>結果がそのまま返ってきているのでJavaScriptに引数を渡せたことが分かります。</p>

<p><img src="/images/テキスト結果.png" alt="" /></p>

<p>以下のコードをPower Automate Desktopにコピペすると確認できます。</p>

<div class="language-plaintext highlighter-rouge"><div class="highlight"><pre class="highlight"><code>WebAutomation.LaunchChrome Url: $'''https://google.com''' WindowState: WebAutomation.BrowserWindowState.Normal ClearCache: False ClearCookies: False Timeout: 60 BrowserInstance=&gt; Browser
SET NewVar TO $'''apple'''
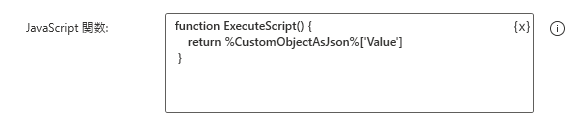
WebAutomation.ExecuteJavascript BrowserInstance: Browser Javascript: $'''function ExecuteScript() { 
    return \'%NewVar%\'
 }''' Result=&gt; Result
</code></pre></div></div>

<h2 id="数値の場合は特に何も加工しなくても渡せる">数値の場合は特に何も加工しなくても渡せる</h2>

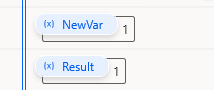
<p>数値の場合はそのまま<code class="language-plaintext highlighter-rouge">%%</code>の記述で渡せます。</p>

<p><img src="/images/数値.png" alt="" /></p>

<p><img src="/images/数値JS.png" alt="" /></p>

<p><img src="/images/数値結果.png" alt="" /></p>

<div class="language-plaintext highlighter-rouge"><div class="highlight"><pre class="highlight"><code>WebAutomation.LaunchChrome Url: $'''https://google.com''' WindowState: WebAutomation.BrowserWindowState.Normal ClearCache: False ClearCookies: False Timeout: 60 BrowserInstance=&gt; Browser
SET NewVar TO 1
WebAutomation.ExecuteJavascript BrowserInstance: Browser Javascript: $'''function ExecuteScript() { 
    return %NewVar%
 }''' Result=&gt; Result
</code></pre></div></div>

<h2 id="ブール値の場合は小文字にして渡す">ブール値の場合は小文字にして渡す</h2>

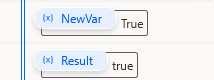
<p>Power Automate Desktopの真偽値は<code class="language-plaintext highlighter-rouge">True</code>と<code class="language-plaintext highlighter-rouge">False</code>で持っており、これをそのままJavaScriptすと<code class="language-plaintext highlighter-rouge">undefined</code>となって渡せませんでした。</p>

<p>しかし全て小文字にすると渡せるようなので「テキストの文字の大きさを変更」のアクションで小文字に変換してから渡します。</p>

<p><img src="/images/ブール値.png" alt="" /></p>

<p><img src="/images/ブール値JS-1.png" alt="" /></p>

<p><img src="/images/ブール値結果.png" alt="" /></p>

<div class="language-plaintext highlighter-rouge"><div class="highlight"><pre class="highlight"><code>WebAutomation.LaunchChrome Url: $'''https://google.com''' WindowState: WebAutomation.BrowserWindowState.Normal ClearCache: False ClearCookies: False Timeout: 60 BrowserInstance=&gt; Browser
SET NewVar TO 1 = 1
Text.ChangeCase Text: NewVar NewCase: Text.CaseOption.LowerCase Result=&gt; TextWithNewCase
WebAutomation.ExecuteJavascript BrowserInstance: Browser Javascript: $'''function ExecuteScript() { 
    return %TextWithNewCase%
 }''' Result=&gt; Result
</code></pre></div></div>

<h2 id="リストの場合は文字列結合してから渡す">リストの場合は文字列結合してから渡す</h2>

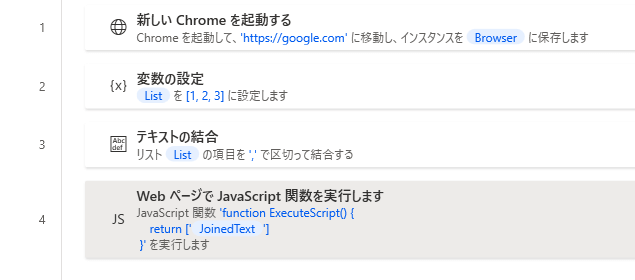
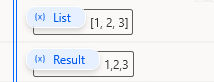
<p>リストを<code class="language-plaintext highlighter-rouge">%List%</code>のようにそのまま渡しても何故か1つ目の値しか渡せません。<code class="language-plaintext highlighter-rouge">%List[0]%</code>と同じになってしまいます。文字列にすると何故か渡せるので結合するアクションを追加します。ただし数値のリストと文字のリストでは若干異なるのが注意です。</p>

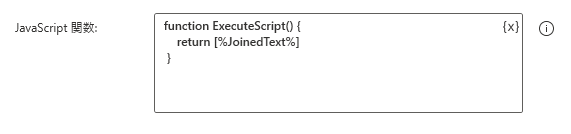
<p>数値だけのリストでは「テキストの結合」アクションで区切り文字を<code class="language-plaintext highlighter-rouge">,</code>とします。またJavaScript関数内では<code class="language-plaintext highlighter-rouge">[]</code>で囲みます。</p>

<p><img src="/images/リスト.png" alt="" /></p>

<p><img src="/images/リストJS.png" alt="" /></p>

<p><img src="/images/リスト結果.png" alt="" /></p>

<div class="language-plaintext highlighter-rouge"><div class="highlight"><pre class="highlight"><code>WebAutomation.LaunchChrome Url: $'''https://google.com''' WindowState: WebAutomation.BrowserWindowState.Normal ClearCache: False ClearCookies: False Timeout: 60 BrowserInstance=&gt; Browser
SET List TO [1, 2, 3]
Text.JoinWithCustomDelimiter List: List CustomDelimiter: $''',''' Result=&gt; JoinedText
WebAutomation.ExecuteJavascript BrowserInstance: Browser Javascript: $'''function ExecuteScript() { 
    return [%JoinedText%]
 }''' Result=&gt; Result
</code></pre></div></div>

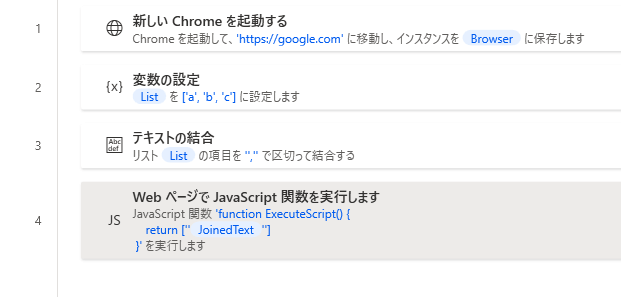
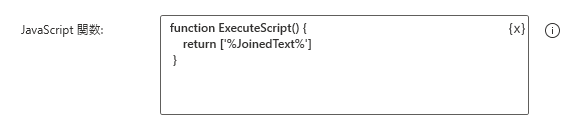
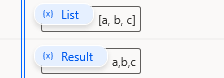
<p>文字だけのリストでは「テキストの結合」アクションでで区切り文字を<code class="language-plaintext highlighter-rouge">','</code>とします。またJavaScript関数は<code class="language-plaintext highlighter-rouge">['']</code>で囲みます。数値とは異なりシングルクオーテーションがついてます。</p>

<p><img src="/images/リスト_テキスト.png" alt="" /></p>

<p><img src="/images/リストJS_テキスト.png" alt="" /></p>

<p><img src="/images/リスト結果_テキスト.png" alt="" /></p>

<div class="language-plaintext highlighter-rouge"><div class="highlight"><pre class="highlight"><code>WebAutomation.LaunchChrome Url: $'''https://google.com''' WindowState: WebAutomation.BrowserWindowState.Normal ClearCache: False ClearCookies: False Timeout: 60 BrowserInstance=&gt; Browser
SET List TO ['a', 'b', 'c']
Text.JoinWithCustomDelimiter List: List CustomDelimiter: $'''\',\'''' Result=&gt; JoinedText
WebAutomation.ExecuteJavascript BrowserInstance: Browser Javascript: $'''function ExecuteScript() { 
    return [\'%JoinedText%\']
 }''' Result=&gt; Result
</code></pre></div></div>

<p>数値と文字が混ざっているリストでは<code class="language-plaintext highlighter-rouge">'%List[0]%,'%List[1]%',%List[2]%'</code>のようにLoopなどで力技でやる方法しか見つけられませんでした。</p>

<h2 id="テーブルの場合は行方向と列方向それぞれテキスト結合する">テーブルの場合は行方向と列方向それぞれテキスト結合する</h2>

<p>テーブルもリストと同様に<code class="language-plaintext highlighter-rouge">%Table%</code>のように書いても反応しませんのでテキスト結合で回避します。リストと異なり2次元配列となっているため、2回テキスト結合させます。</p>

<p>ただ、テーブルをFor Eachでまわすと1レコードはリスト型ではなくテーブル行の型になります。テーブル行型は何故か「テキストの結合」アクションがうまく適用されず、区切り文字がすべてカンマになってしまうので数値は渡せますが文字列を渡せません。</p>

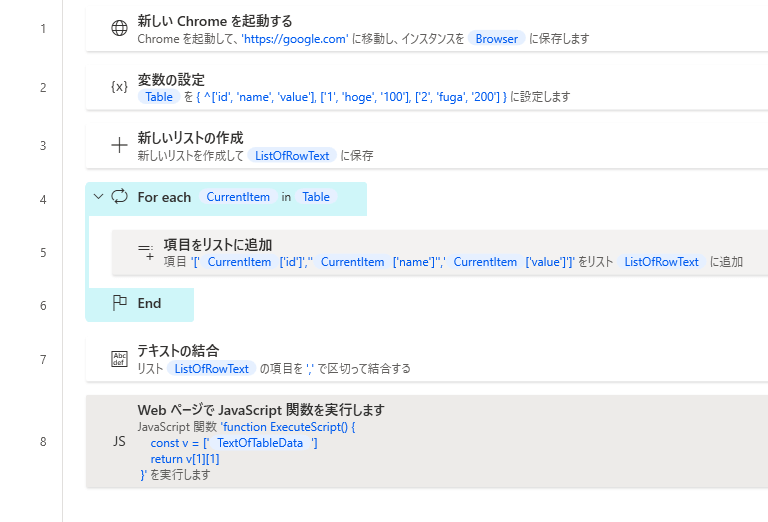
<p>テーブルは数字と文字が混ざる場合が多く「テキストの結合」が使いづらいです。そこで力技で回避します。</p>

<p><img src="/images/テーブル.png" alt="" /></p>

<p>5アクション目で1行のレコードをテキスト結合するのですが、テキストはシングルクオーテーションで囲み、数値は囲まないように列ごとに調整しています。7アクション目でテキストとなったレコードを結合します。</p>

<p><img src="/images/テーブルJS.png" alt="" /></p>

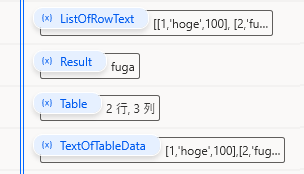
<p><img src="/images/テーブル結果_テキスト.png" alt="" /></p>

<div class="language-plaintext highlighter-rouge"><div class="highlight"><pre class="highlight"><code>WebAutomation.LaunchChrome Url: $'''https://google.com''' WindowState: WebAutomation.BrowserWindowState.Normal ClearCache: False ClearCookies: False Timeout: 60 BrowserInstance=&gt; Browser
SET Table TO { ^['id', 'name', 'value'], ['1', 'hoge', '100'], ['2', 'fuga', '200'] }
Variables.CreateNewList List=&gt; ListOfRowText
LOOP FOREACH CurrentItem IN Table
    Variables.AddItemToList Item: $'''[%CurrentItem['id']%,\'%CurrentItem['name']%\',%CurrentItem['value']%]''' List: ListOfRowText NewList=&gt; ListOfRowText
END
Text.JoinWithCustomDelimiter List: ListOfRowText CustomDelimiter: $''',''' Result=&gt; TextOfTableData
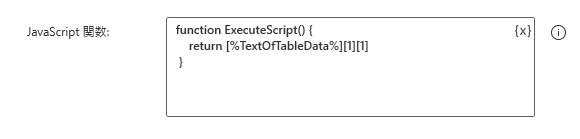
WebAutomation.ExecuteJavascript BrowserInstance: Browser Javascript: $'''function ExecuteScript() { 
    return [%TextOfTableData%][1][1]
 }''' Result=&gt; Result
</code></pre></div></div>

<h2 id="カスタムオブジェクトの場合はjsonテキストに変換してから渡す">カスタムオブジェクトの場合はJSONテキストに変換してから渡す</h2>

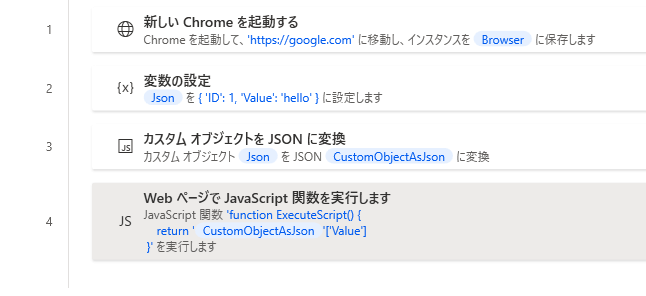
<p>カスタムオブジェクトもそのまま渡せないので「カスタムオブジェクトをJSONに変換」アクションでテキストにしてから渡します。</p>

<p><img src="/images/カスタムオブジェクト.png" alt="" /></p>

<p><img src="/images/カスタムオブジェクトJS.png" alt="" /></p>

<p><img src="/images/カスタムオブジェクト結果.png" alt="" /></p>

<div class="language-plaintext highlighter-rouge"><div class="highlight"><pre class="highlight"><code>WebAutomation.LaunchChrome Url: $'''https://google.com''' WindowState: WebAutomation.BrowserWindowState.Normal ClearCache: False ClearCookies: False Timeout: 60 BrowserInstance=&gt; Browser
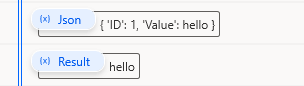
SET Json TO { 'ID': 1, 'Value': 'hello' }
Variables.ConvertCustomObjectToJson CustomObject: Json Json=&gt; CustomObjectAsJson
WebAutomation.ExecuteJavascript BrowserInstance: Browser Javascript: $'''function ExecuteScript() { 
    return %CustomObjectAsJson%[\'Value\']
 }''' Result=&gt; Result
</code></pre></div></div>

<h2 id="ということで">ということで</h2>

<p>型によって渡し方がここまで異なると不便極まりないので、おそらくこれらの現象は不具合だと信じたいです…。Pythonスクリプトの実行でも同じ課題がありそうですね。（未調査）</p>]]></content><author><name></name></author><category term="PowerAutomateDesktop" /><summary type="html"><![CDATA[Power Automate DesktopのアクションとしてWebページでJavaScriptを実行したかったのですが、引数を渡す方法に癖があったので備忘録としてまとめます。今後改善されるかもしれませんし、このやり方が最適な方法ではないかもしれませんのでそこはご了承ください。]]></summary></entry><entry><title type="html">Power Automate Desktop WebのUI要素を文字列で探す</title><link href="https://tomikiya.github.io/pad-selector-contains/" rel="alternate" type="text/html" title="Power Automate Desktop WebのUI要素を文字列で探す" /><published>2021-04-22T00:00:00+00:00</published><updated>2021-04-22T00:00:00+00:00</updated><id>https://tomikiya.github.io/pad-selector-contains</id><content type="html" xml:base="https://tomikiya.github.io/pad-selector-contains/"><![CDATA[<p>WebのUI要素を取得する最も簡単な方法はWebレコーダーを利用することです。また、右ペインのUI要素から「UI要素の追加」で取得する方法もあります。ただそれではうまく取得できないケースもあったため、文字列からUI要素を探す方法を見つけたので残しておきます。</p>

<h2 id="webレコーダーを使うとどうなる">Webレコーダーを使うとどうなる？</h2>

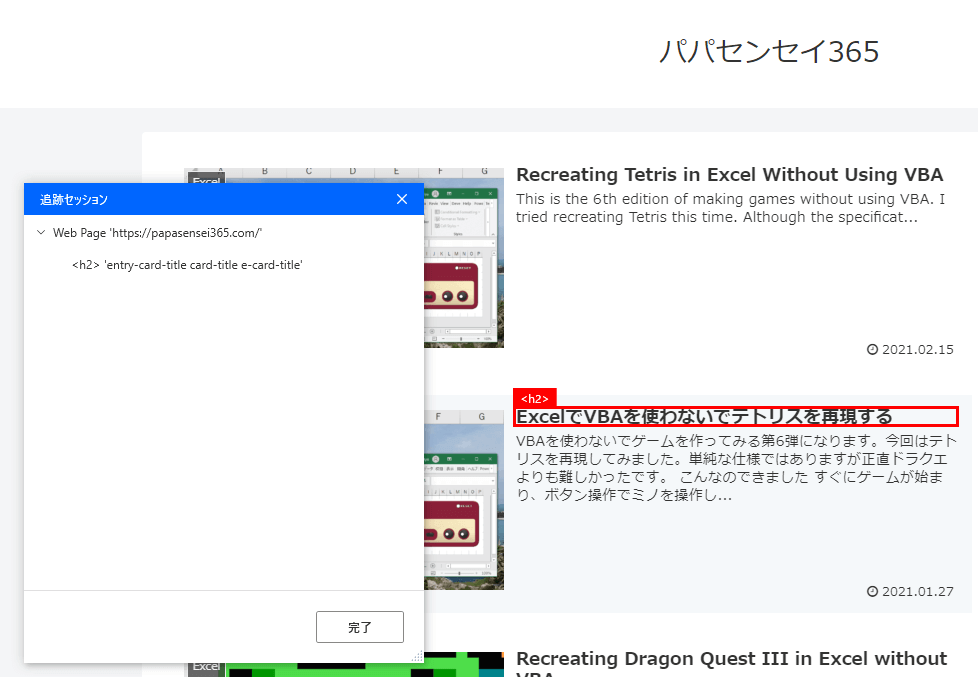
<p>Webレコーダーを使ってUI要素を取得するとボタンポチポチで簡単にセレクターを生成してくれます。自分のサイトで試してみると・・・、</p>

<p><img src="/images/Webレコーダー-2.png" alt="" /></p>

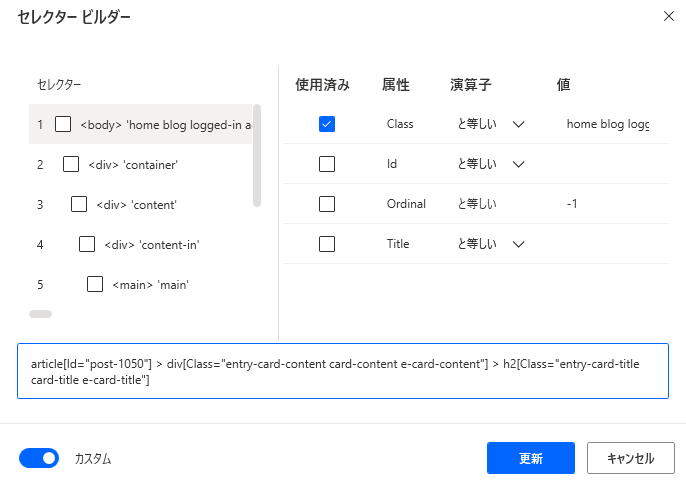
<p><img src="/images/Webレコーダー_セレクタービルダー.png" alt="" /></p>

<p>セレクターはこんな感じです。</p>

<div class="language-plaintext highlighter-rouge"><div class="highlight"><pre class="highlight"><code>article[Id="post-1050"] &gt; div[Class="entry-card-content card-content e-card-content"] &gt; h2[Class="entry-card-title card-title e-card-title"]
</code></pre></div></div>

<h3 id="webレコーダーでui要素を取得すると困る事">WebレコーダーでUI要素を取得すると困る事</h3>

<p>自動でセレクターを定義してくれるのはありがたいのですが、UI要素が一意になるように厳密に取ってくれるのでデザインに少しでも変更があったらUI要素が見つからないエラーが出ることがあります。またセレクターが長くなって div &gt; div &gt;div &gt;div &gt;div &gt;div &gt;div &gt;div みたいにどこを指定しているか分からなくなることもありますね。</p>

<h2 id="containsでui要素を見つける"><strong>contains</strong>でUI要素を見つける</h2>

<p>デザインの変更にある程度強くするために、文字列でUI要素を見つけられるように書き換えます。</p>

<p>まずはUI要素の場所を特定します。</p>

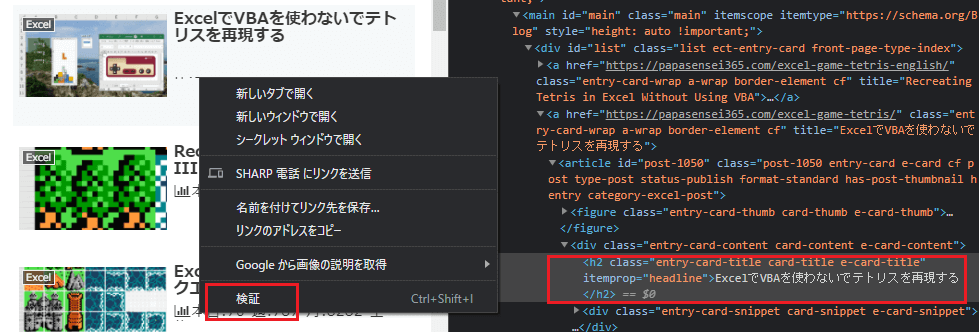
<h3 id="htmlを見てui要素のタグを確認">htmlを見てUI要素のタグを確認</h3>

<p>htmlを確認するためにchromeなら取得したいUI要素を右クリックして「検証」を選択します。するとhtmlが表示されます。</p>

<p><img src="/images/検証-1.png" alt="" /></p>

<p>欲しいUI要素はh2タグに含まれていることが分かりました。</p>

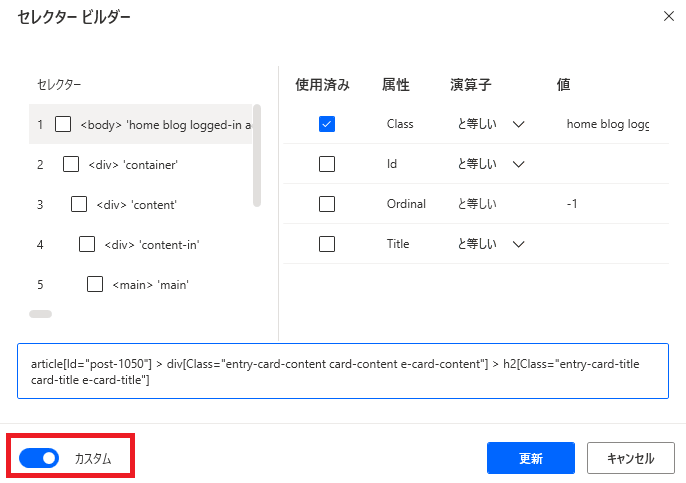
<h3 id="セレクターを書き換える">セレクターを書き換える</h3>

<p>それではWebレコーダーで取得したUI要素を編集します。セレクタービルダーのカスタムを無効にしてセレクターを編集できるようにします。</p>

<p><img src="/images/Webレコーダーkasutamu-.png" alt="" /></p>

<p>そして以下のように入力して更新します。</p>

<div class="language-plaintext highlighter-rouge"><div class="highlight"><pre class="highlight"><code>h2:contains('ExcelでVBAを使わないでテトリスを再現する')
</code></pre></div></div>

<p>これで文字列で検索してUI要素を取得できます。簡単ですね。</p>

<h3 id="containsとは何ぞや">containsとは何ぞや</h3>

<p>containsは、containsに指定した引数を含む要素を返します。「ExcelでVBAを使わないでテトリスを再現する」を含むh2タグは1つしかないのでUI要素を特定できたんですね。</p>

<h3 id="もし同じ文字列が複数あってcontainsでui要素を特定できない場合は">もし同じ文字列が複数あってcontainsでUI要素を特定できない場合は？</h3>

<p>同じ文字列が複数の場所にあるとcontainsは複数の要素を取得しますので</p>

<div class="language-plaintext highlighter-rouge"><div class="highlight"><pre class="highlight"><code>h2:contains('Excel'):eq(0)
</code></pre></div></div>

<p>のようにeqをつけて1つに絞ることができます。</p>

<p>また、親の要素を特定して範囲を絞ってから見つける方法もできます。</p>

<div class="language-plaintext highlighter-rouge"><div class="highlight"><pre class="highlight"><code>div[Class='author-content'] h2:contains('Excel')
</code></pre></div></div>

<p>containsやeq、なんだかjQueryの構文に似ていますね。</p>

<p><a href="https://jquerystudy.info/reference/selectors/contains.html">https://jquerystudy.info/reference/selectors/contains.html</a></p>

<h2 id="もしかしてjqueryの構文使える">もしかしてjQueryの構文使える？</h2>

<p>全てを確認したわけではないですが一部の構文は使えるようです。特定の子孫要素を持つ要素を探せるhas()も使えることを確認しています。jQueryのドキュメントを見ながらPower Automate Desktopのセレクターを考えることができそうです。</p>

<p>例えばこんなセレクターも作れそうですね。</p>

<div class="language-plaintext highlighter-rouge"><div class="highlight"><pre class="highlight"><code>div:has(th:contains('名前') ~ td:contains('太郎')) button:contains('編集')
</code></pre></div></div>

<h2 id="ということで">ということで</h2>

<p>Webレコーダーで作ったUI要素を少しデザインの変更に強くできますね。</p>

<p>（Power Automate Desktopによるテスト自動化が捗ります！）</p>]]></content><author><name></name></author><category term="PowerAutomateDesktop" /><summary type="html"><![CDATA[WebのUI要素を取得する最も簡単な方法はWebレコーダーを利用することです。また、右ペインのUI要素から「UI要素の追加」で取得する方法もあります。ただそれではうまく取得できないケースもあったため、文字列からUI要素を探す方法を見つけたので残しておきます。]]></summary></entry><entry><title type="html">Recreating Tetris in Excel Without Using VBA</title><link href="https://tomikiya.github.io/excel-game-tetris-english/" rel="alternate" type="text/html" title="Recreating Tetris in Excel Without Using VBA" /><published>2021-02-15T00:00:00+00:00</published><updated>2021-02-15T00:00:00+00:00</updated><id>https://tomikiya.github.io/excel-game-tetris-english</id><content type="html" xml:base="https://tomikiya.github.io/excel-game-tetris-english/"><![CDATA[<p>This is the 6th edition of making games without using VBA. I tried recreating Tetris this time. Although the specifications are simple, this was more difficult than Dragon Quest, to be honest.</p>

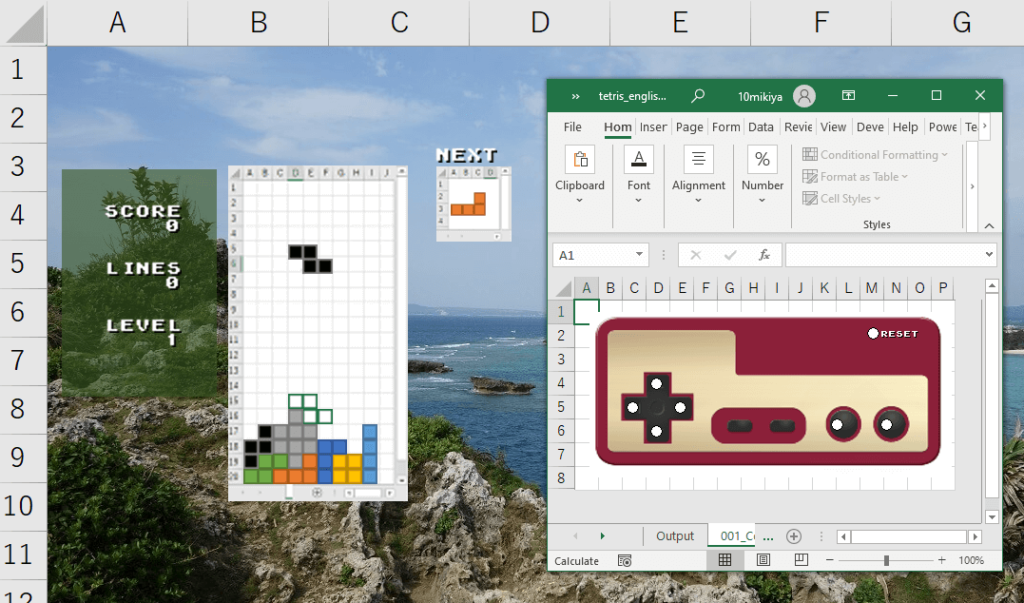
<h2 id="i-made-something-like-this"><strong>I Made Something Like This</strong></h2>

<p>https://twitter.com/10mikiya/status/1349004031491010560</p>

<p>The game starts right away, and you can play Tetris by controlling the pieces using buttons. When the pieces stack up all the way to the top, the game is over, and the specifications allow you to start again by resetting the game.</p>

<h2 id="making-the-file-public"><strong>Making the File Public</strong></h2>

<p>Since I have taken the file that I actually created and made it public on GitHub, please play with it by all means if you are interested in taking a look inside. Although I made it to work on Excel 2010 and newer, I have only checked it on Excel 2013 and Excel 2016 on Windows, so please let me know if there are any bugs. (Whether or not I will fix them depends on how motivated I feel.)</p>

<p>https://github.com/tomikiya/excel_game_tetris</p>

<p>Since the main sheet and the sheet for the controller are separate, please click on <strong>[View]-[Window]-[New Window]</strong> after you open the file to display another sheet. Then, it will start working if you continue to press F9!</p>

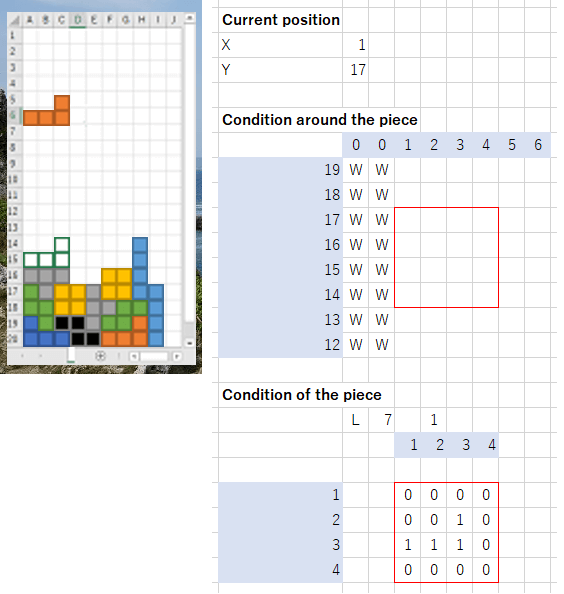
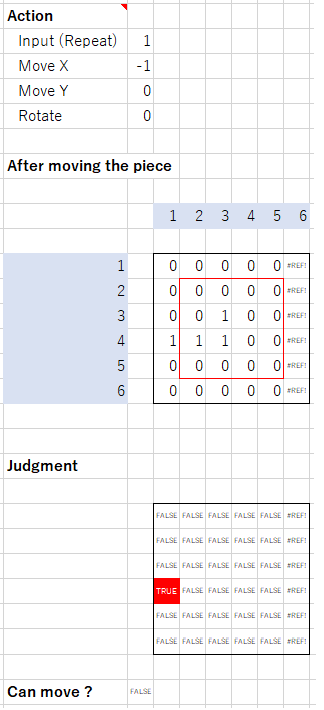
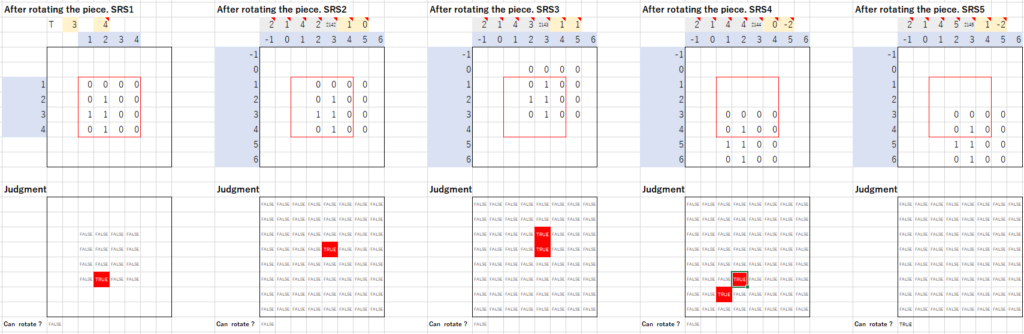
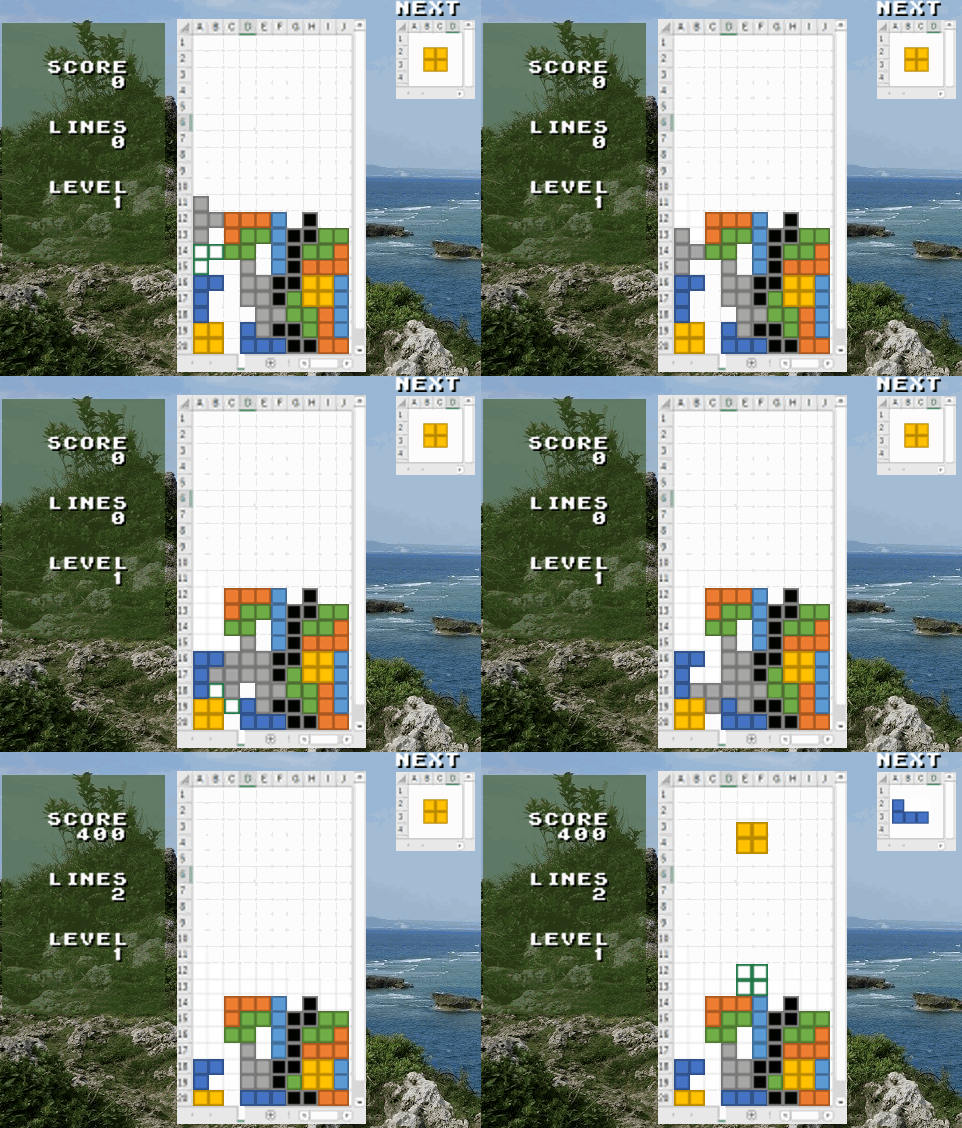
<p><img src="/images/テトリスイメージ-1024x603.png" alt="" /></p>

<h2 id="key-points"><strong>Key Points</strong></h2>

<p>I would like to summarize the key points when building Tetris.</p>

<ul>
  <li>Use a scatter plot for drawing</li>
  <li>Recreate the free fall of pieces by pressing and holding F9</li>
  <li>Avoid pseudocode programming as much as possible</li>
  <li>Also avoid volatile memory processing as much as possible</li>
</ul>

<p>From a technical perspective, the methods I used are mostly the same as those I used for Dragon Quest. However, since Tetris has more action elements compared to Dragon Quest, I had to pay close attention to the processing speed. How to overcome this issue was the essential point.</p>

<h2 id="details"><strong>Details</strong></h2>

<p>I would like to take this opportunity to explain even the detailed parts this time. If there are any parts that are difficult to understand, please skip over them right away.</p>

<h3 id="how-to-make-the-controller"><strong>How to Make the Controller</strong></h3>

<p>I made the controller using the table function and the option button under form controls. Since I also used this method for the 3D Maze and Dragon Quest, it can be applied to all kinds of games.</p>

<h4 id="creating-the-operation-history-table"><strong>Creating the Operation History Table</strong></h4>

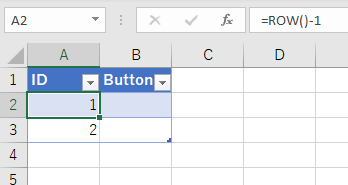
<p>First, I created the operation history table to record the history of the commands.</p>

<p><img src="/images/テーブルの作成.png" alt="" /></p>

<p>I created ID and Button columns and registered <code class="language-plaintext highlighter-rouge">ROW()-1</code> to the ID column. The idea is for history to be stored in the Button column when operating the controller.</p>

<h4 id="adding-option-buttons"><strong>Adding Option Buttons</strong></h4>

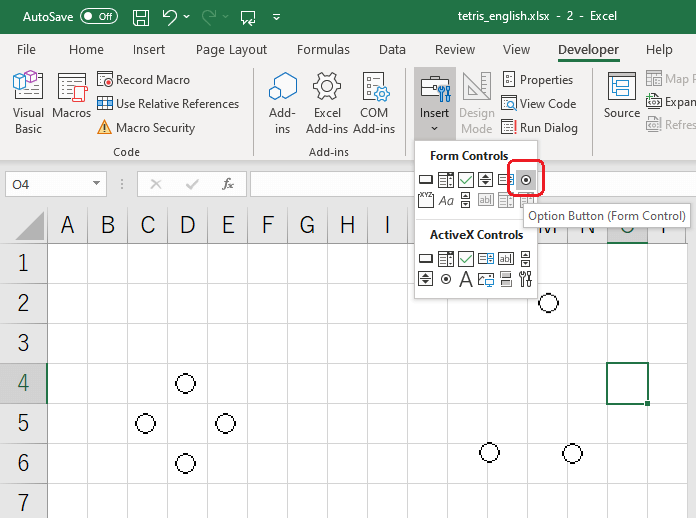
<p>I added seven option buttons under form controls. Option buttons are located under controls in the Developer tag.</p>

<p><img src="/images/オプションボタンの追加.png" alt="" /></p>

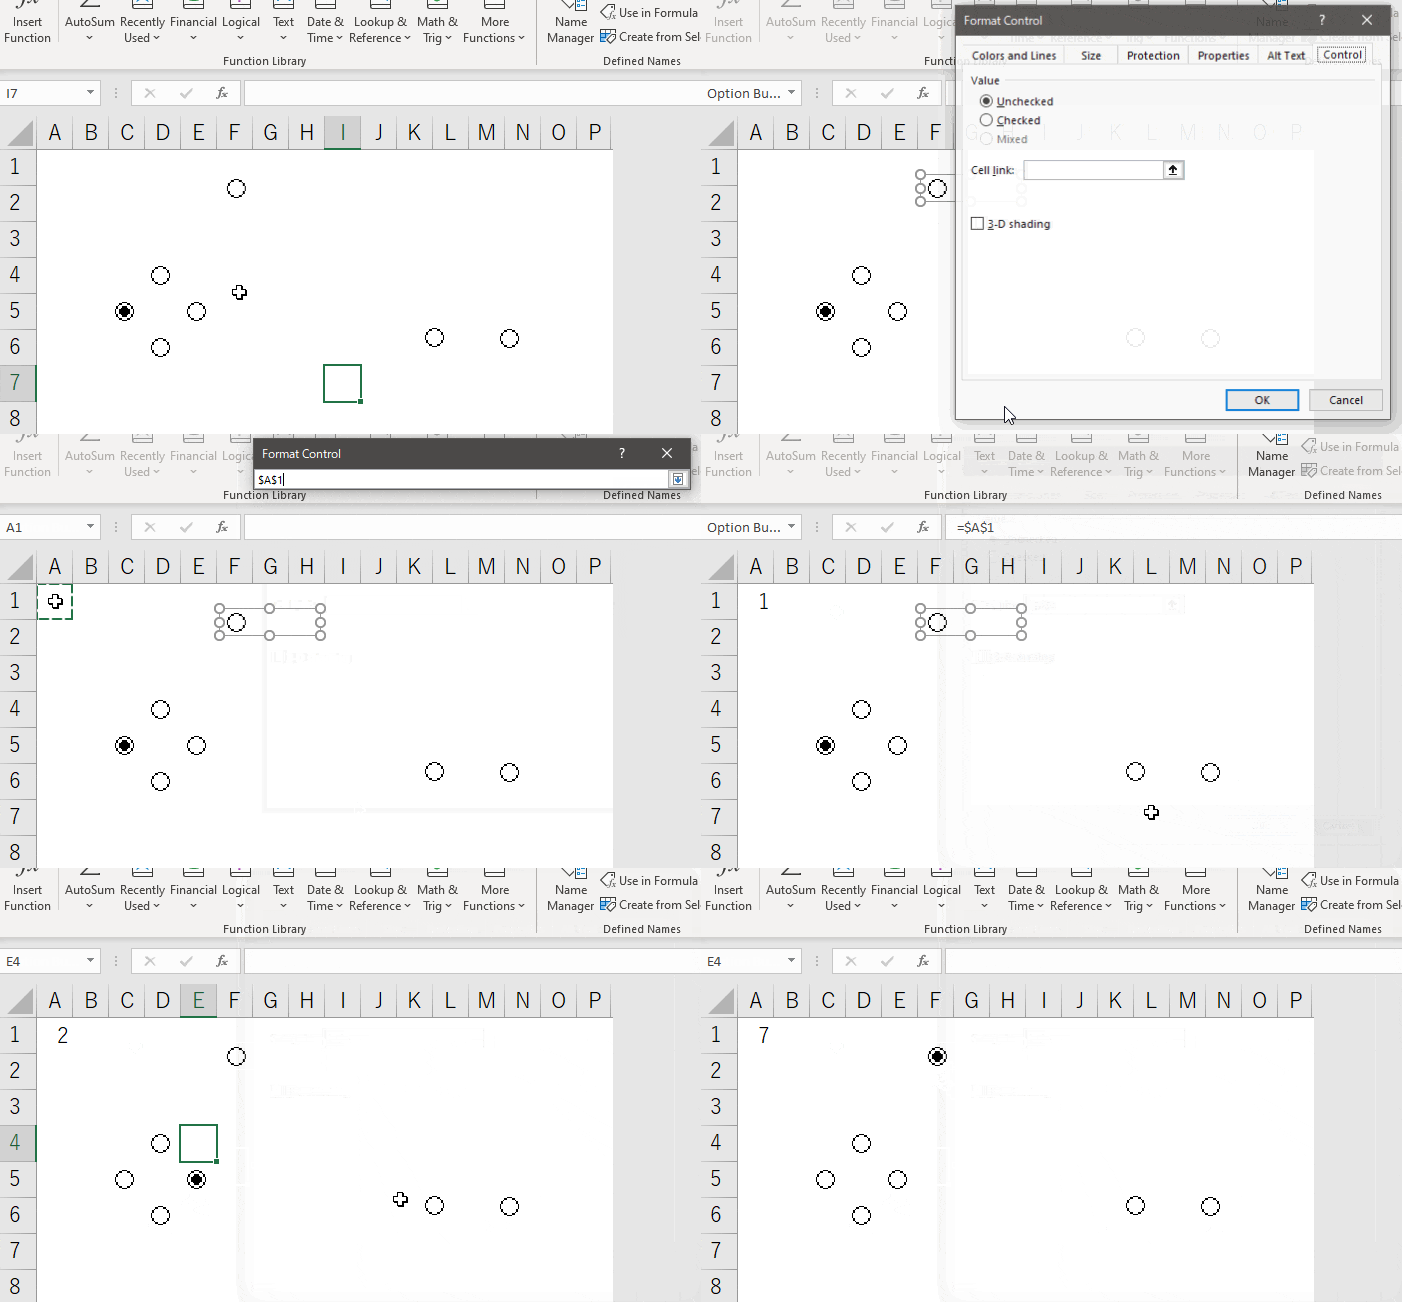
<p>There is a setting for “Cell link” in the format settings for option buttons. If you link the button to a cell, the information is reflected to the cell when the button is pushed. By using this feature, the button operations can be reflected in the cell.</p>

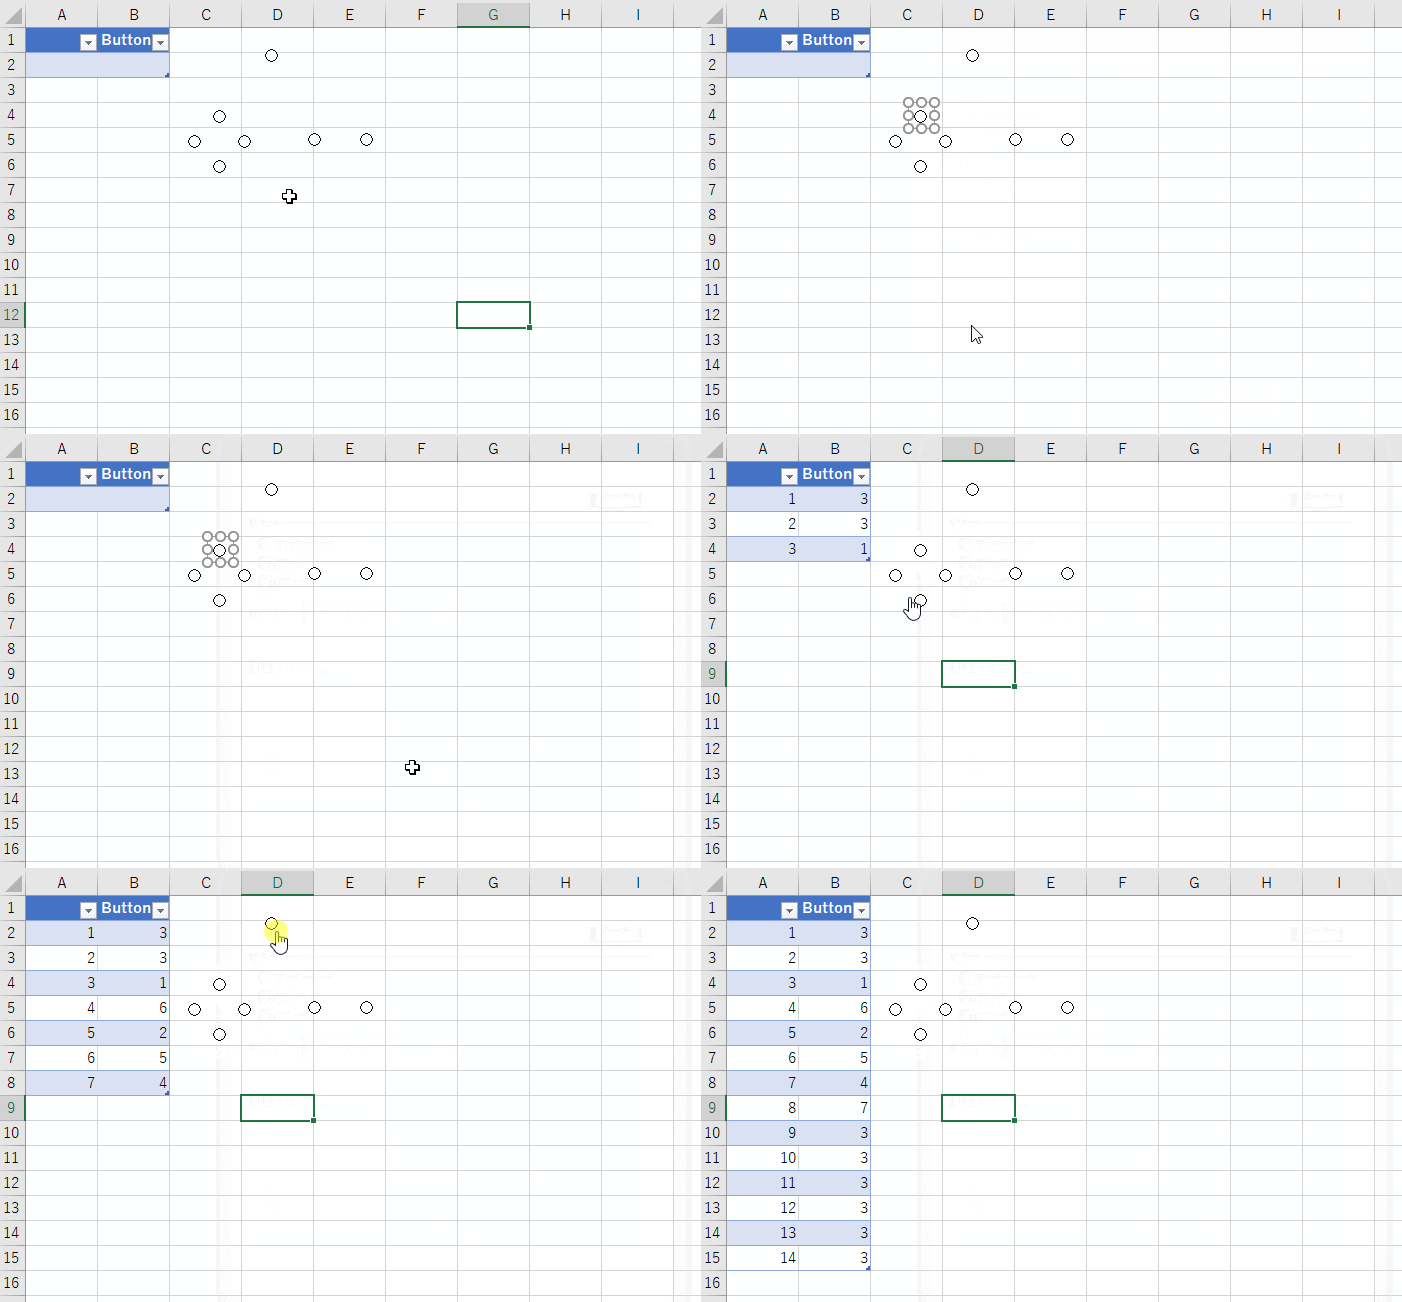
<p><img src="/images/リンクされたセルサンプル.gif" alt="" /></p>

<p>However, the A1 cell will be rewritten each time there is an operation if it is left this way, meaning that the history will not be recorded. Therefore, I set the cell link to change dynamically.</p>

<h4 id="dynamically-change-the-cell-link-through-defined-names"><strong>Dynamically Change the Cell Link Through Defined Names</strong></h4>

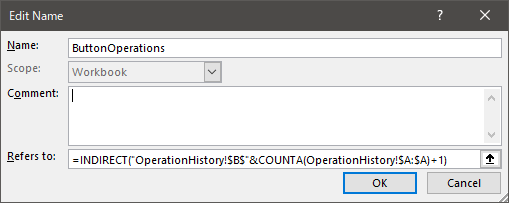
<p>Since formulas cannot be registered to “Cell link,” I used defined names. I registered the following formula to defined names. I set the name as “ButtonOperations.”</p>

<div class="language-plaintext highlighter-rouge"><div class="highlight"><pre class="highlight"><code>=INDIRECT("OperationHistory!$B$"&amp;COUNTA(OperationHistory!$A:$A)+1)
</code></pre></div></div>

<p><img src="/images/ボタン操作の名前定義.png" alt="" /></p>

<p>When I register this defined name to the cell link, the button operations are recorded without being overwritten.</p>

<p><img src="/images/コントローラの作成.gif" alt="" /></p>

<p>If I create a system that references the value when the final row is increased, I can pick up the event when a button is pressed.</p>

<h4 id="add-an-image-on-top-to-finish-it"><strong>Add an Image on Top to Finish It</strong></h4>

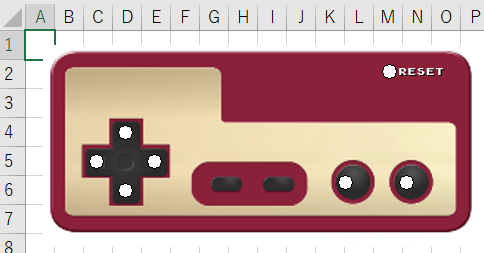
<p>The controller is finished when I prepare a suitable image and put it on top of the buttons.</p>

<p><img src="/images/コントローラー.png" alt="" /></p>

<p>Topic</p>

<p>It is not possible to change the size and color for form controls. The circles for the option button may come across as annoying, but I left them as is to give it some character.</p>

<p>There is a way to get rid of it, but it causes various restrictions, so I did not do so for Tetris. If this interests you, please read the following article.</p>

<p>https://tomikiya.github.io/excel-nonvba-3d-maze/</p>

<h3 id="draw-the-pieces"><strong>Draw the Pieces</strong></h3>

<p>There are several ways to draw the pieces. Which to use is the biggest question. There is a need to select the drawing method with as little activity as possible. (This time around, I spend the most time testing this.)</p>

<h4 id="introducing-several-drawing-methods"><strong>Introducing Several Drawing Methods</strong></h4>

<p>Since I tried several methods for drawing images without using VBA, I would like to introduce them. It is not possible to decide which is the best unconditionally. It depends on the content of the game.</p>

<h5 id="display-in-a-linked-picture"><strong>Display in a Linked Picture</strong></h5>

<p>The location referenced for a “Linked Picture” can be changed by changing the formula of the object.</p>

<p><img src="/images/リンクされた図.gif" alt="" /></p>

<p>The piece to display can be toggled by adjusting the formula to change with button operations and the passing of time. However, the linked picture has a heavy load. If multiple linked pictures are used, responses become slow, freezing happens frequently, and in the worst case, Excel crashes due to a lack of memory. If there is a need to use linked pictures, it would be best to only use about one per file.</p>

<p>↓This is the result of using a linked picture for drawing. The response is slow.</p>

<p><img src="/images/モック_散布図_リンクされた図バージョン.gif" alt="" /></p>

<p>I did not use this method for Tetris, but I used it for the map display for the Game &amp; Watch style game in the 1st edition and the 3D Maze.</p>

<h5 id="display-with-conditional-formatting"><strong>Display With Conditional Formatting</strong></h5>

<p>In this method, I made the width and the height of the cells small for a display that looks like pixel art. I changed the color of the cells appropriately by applying conditional formatting to each cell. This takes time, but it is the most simple method.</p>

<p><img src="/images/条件付き書式による描画.png" alt="" /></p>

<p><img src="/images/モック_条件付き書式.gif" alt="" /></p>

<p>Even though conditional formatting is simple to make, it is calculated each time because it is volatile. A concern is that the use of many types of conditional formatting slows things done easily.</p>

<p>The following GIF compares 35 types with 6 types. The speed is clearly different. I did not use this method for Tetris, but this method is more than adequate for games with few colors.</p>

<p><img src="/images/テトリス_条件付き書式の量.gif" alt="" /></p>

<h5 id="scatter-plot-drawing-method-1-use-markers-as-dots"><strong>Scatter Plot Drawing Method 1: Use Markers as Dots</strong></h5>

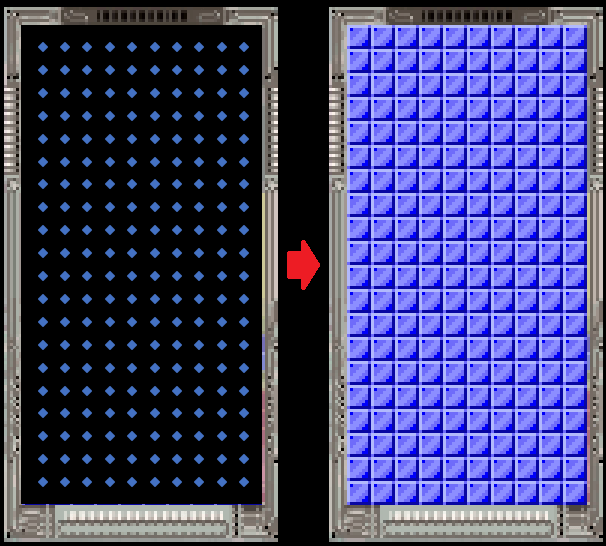
<p>In this method, I clustered scatter plot markers together to make pixel art and toggled the marker displays. The size of a block is 8x8, and since there are 10 blocks horizontally, 20 blocks vertically, and seven types of pieces, I placed 89,600 markers in total.</p>

<p><img src="/images/散布図マーカーだけで表現.png" alt="" /></p>

<p>It is a shame that it hardly moved because there are many markers.</p>

<p><img src="/images/散布図による描画マーカーだけ.gif" alt="" /></p>

<p>The number of games this method can be used on is limited.</p>

<h5 id="scatter-plot-drawing-method-2-use-images"><strong>Scatter Plot Drawing Method 2: Use Images</strong></h5>

<p>I also used this method for Dragon Quest. In this method, I registered images to the scatter plot markers and drew by toggling between displaying and not displaying the markers. The images are displayed at a certain speed regardless of the types of colors used. This method is the most stable at present. I try to make the scatter plot as small as possible, since movement tends to get heavy when the images are too large or when zooming in to display a wider portion of the sheet.</p>

<p><img src="/images/散布図で表示1.png" alt="" /></p>

<p><img src="/images/散布図による描画1.gif" alt="" /></p>

<p><strong>I used this method to make Tetris this time.</strong></p>

<h4 id="i-used-this-method-to-make-tetris-this-time"><strong>I used this method to make Tetris this time.</strong></h4>

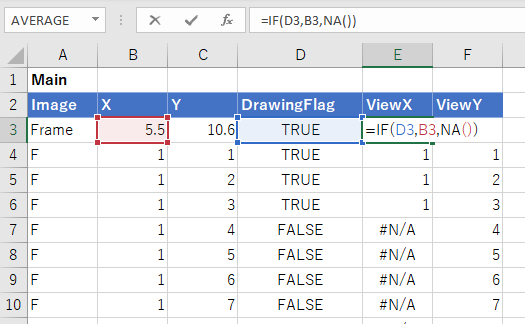
<p>Based on their specifications, scatter plot markers are not displayed when there is no data. Toggling is done by calculating the drawing flags to always produce an error except for the locations to be displayed. As shown in the following image, the scatter plot references ViewX and ViewY, and only the markers that have a TRUE drawing flag are displayed.</p>

<p><img src="/images/散布図データサンプル.png" alt="" /></p>

<h3 id="make-pieces-go-in-free-fall"><strong>Make Pieces Go in Free Fall</strong></h3>

<p>From here, I will explain how to implement movement.</p>

<p>Excluding certain exceptions, conditions cannot be changed to cause movement without an operation in Excel most of the time. Therefore, I used “pseudocode programming” and “keep pressing F9,” which I also used in Dragon Quest, to depict a free fall.</p>

<h4 id="about-pseudocode-programming-and-recalculation"><strong>About Pseudocode Programming and Recalculation</strong></h4>

<p>Pseudocode programming is a way to implement programming-like actions in cells. It is possible to chance the content inside cells for each recalculation by enabling iterative calculation, causing a circular reference, and recreating a counter. In addition, since recalculation is necessary to move the counter, recalculation can take place continuously by pressing and holding F9, which is the shortcut key.</p>

<p>I will omit this part, since I included a detailed explanation in the article about Dragon Quest. Please use it as reference by all means.</p>

<p>https://tomikiya.github.io/excel-game-dq3-english/</p>

<h4 id="precautions-when-using-pseudocode-programming"><strong>Precautions When Using Pseudocode Programming</strong></h4>

<p>Although most games can be recreated using pseudocode programming, there is a point to note. The point is the fact that it is slow. Since only one step advances per recalculation, the more steps there are, the slower it becomes. This is critical when making Tetris. Therefore, I limited pseudocode programming to the minimum amount when making Tetris.</p>

<h4 id="pseudocode-programming-for-free-fall"><strong>Pseudocode Programming for Free Fall</strong></h4>

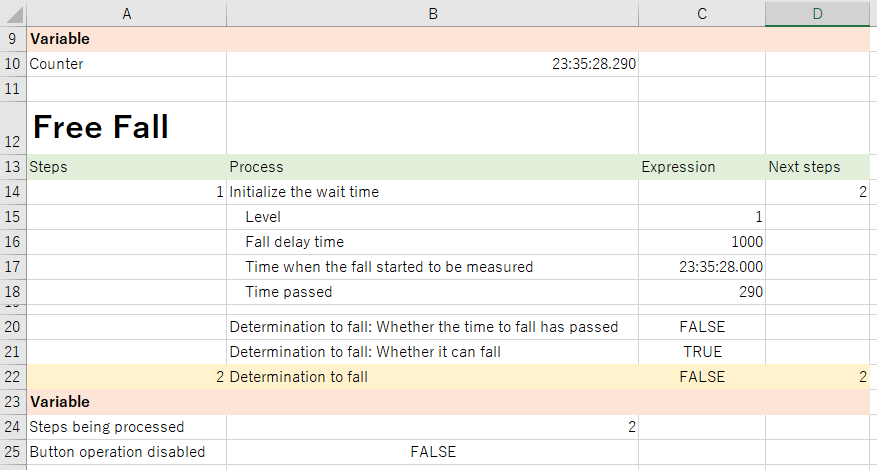
<p>I processed the free fall using two steps.</p>

<p><img src="/images/自然落下1-2.png" alt="" /></p>

<p>What is most important is to save the time when the fall started to be measured. This item saves the time immediately after the fall. When this value and the time on the counter become separated by a certain amount, the fall is processed again. Since this item only initializes the value at the moment of the fall, it must maintain a value outside of that moment. Since it is not possible to recreate this movement with normal Excel functions alone, I used pseudocode programming (=circular references).</p>
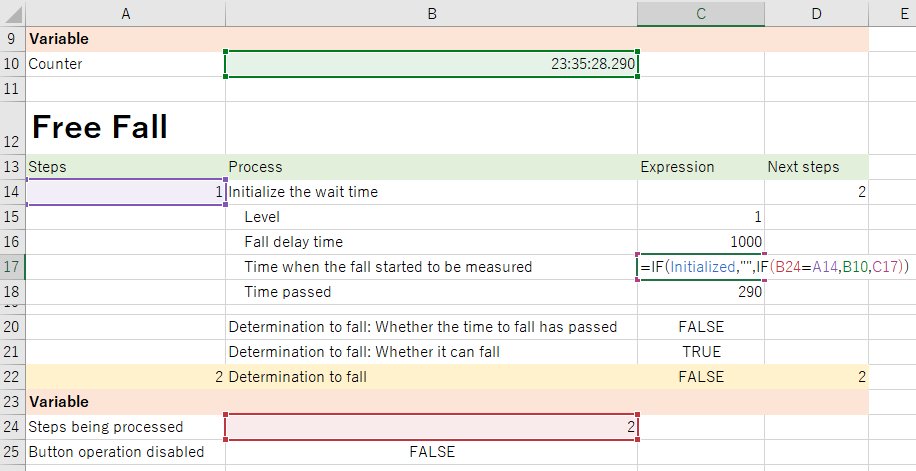
<p>↓This is the formula for the time when the fall started to be measured.</p>

<p><img src="/images/自然落下2-2.png" alt="" /></p>

<div class="language-plaintext highlighter-rouge"><div class="highlight"><pre class="highlight"><code>=IF(Initialized,"",IF(B24=A14,B10,C17))
</code></pre></div></div>

<p>Leaving aside the first IF statement of “processing to set a null value if initialized,” the next IF statement is important. If the “step being processed” is 1, the value of B10 is referenced. In other words, the value of the counter is copied to save the time when the measurement started. If the “step being processed” is not 1, the value of C17 is referenced. In other words, it will reference itself. The value does not change when a cell references itself. Normally, there will be a warning about a circular reference in this formula, but since iterative calculation is enabled, a warning will not appear. Since 1 and 2 are the only options for steps, the time when the measurement started is saved while in step 2.</p>

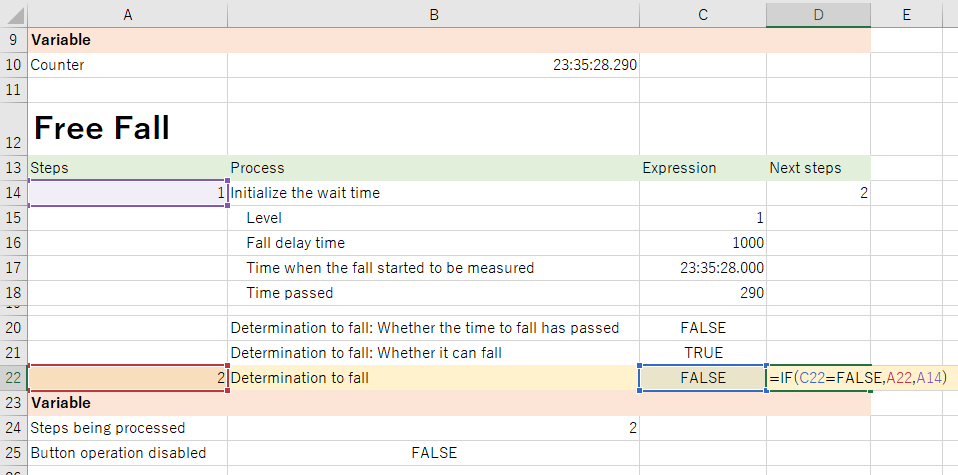
<p>In step 2, the fall is being determined, and step 2 loops while the determination is to not fall.</p>

<p><img src="/images/自然落下3-2.png" alt="" /></p>

<div class="language-plaintext highlighter-rouge"><div class="highlight"><pre class="highlight"><code>=IF(C22=FALSE,A22,A14)
</code></pre></div></div>

<p>The determination to fall is only TRUE when both “whether the time to fall has passed” and “whether it can fall” are TRUE.</p>

<div class="language-plaintext highlighter-rouge"><div class="highlight"><pre class="highlight"><code>Whether the time to fall has passed = Time passed &gt;= Fall delay time
Whether it can fall = NOT(Touching the ground)
</code></pre></div></div>

<h4 id="when-the-determination-to-fall-becomes-true"><strong>When the Determination to Fall Becomes TRUE</strong></h4>

<p>A portion of the formula to calculate the Y coordinate of the piece is the following. When the determination to fall becomes TRUE, the coordinate moves down one position.</p>

<div class="language-plaintext highlighter-rouge"><div class="highlight"><pre class="highlight"><code>Y coordinate = Y of current position - Determination to fall    '*A portion has been omitted
</code></pre></div></div>

<p>The above mechanism makes the piece go in free fall.</p>

<h3 id="move-the-piece-sideways-or-rotate-it"><strong>Move the Piece Sideways or Rotate It</strong></h3>

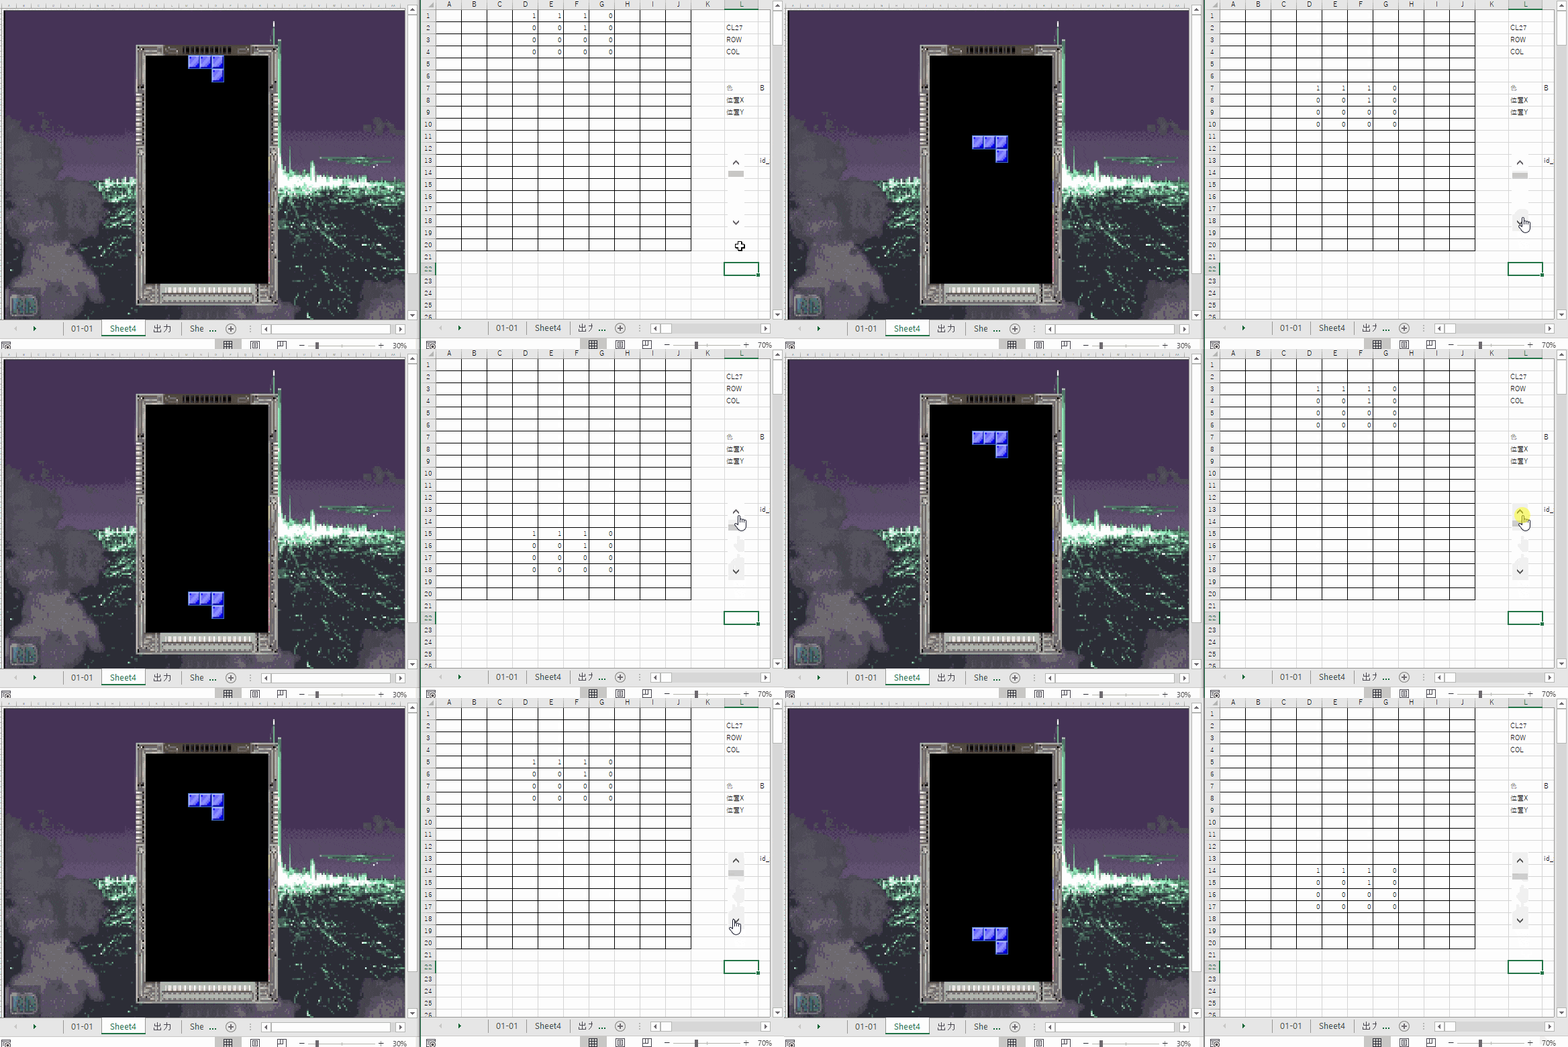
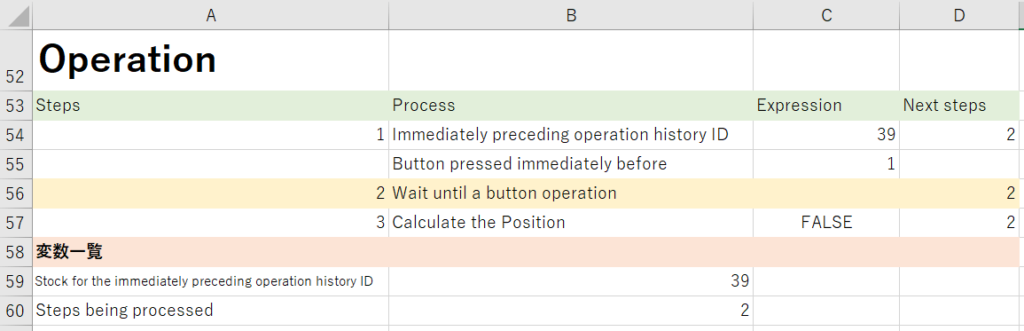
<p>Pseudocode programming is also used to change the position or condition of the piece through button operations as it was for free fall. For free fall, the steps moved with the passing of time. This time, the steps move with button operations. As I explained earlier for how to create the controller, there is a table where the operation history is stored, so the latest operation history is taken from there.</p>

<p><img src="/images/ボタン操作待ち1-1-1024x331.png" alt="" /></p>

<div class="language-plaintext highlighter-rouge"><div class="highlight"><pre class="highlight"><code>Immediately preceding operation history ID =MAX(OperationHistory[ID])
Button pressed immediately before = IFERROR(INDEX(OperationHistory[Button],MATCH($C$54,OperationHistory[ID],1)),"")
</code></pre></div></div>

<p>Step 2 loops until there is a button operation. When there is a button operation, the “immediately preceding operation history ID” is refreshed. If there is a difference from the “stock for the immediately preceding operation history ID,” it is determined that a button is pressed, moving on to step 3.</p>

<p>When moving to step 3, it moves on to the process to calculate the position after the move.</p>

<h4 id="calculate-the-position-after-the-move-with-functions-alone"><strong>Calculate the Position After the Move With Functions Alone</strong></h4>

<p>In order to increase the processing speed as much as possible, I calculated the position after the move with all functions so that pseudocode programming is not used. I converted the Tetris specifications into Excel functions just as they are.</p>

<p>In order to do so, I first managed information about the “piece being maneuvered” and the “pieces stacking up.”</p>

<h4 id="manage-the-condition-of-the-piece-being-maneuvered">Manage the Condition of the Piece Being Maneuvered</h4>

<p>The condition of the piece being maneuvered can be managed with the following information.</p>

<ol>
  <li>What is the type?</li>
  <li>How much has it rotated?</li>
  <li>Where is it?</li>
</ol>

<p>For the answer to “where is it?” there are two types: the X coordinate and the Y coordinate. Therefore, four parameters are prepared in real terms. These parameters are updated when the piece is in free fall or is moved using the controller.</p>

<h5 id="turn-the-shapes-of-the-pieces-into-data"><strong>Turn the Shapes of the Pieces Into Data</strong></h5>

<p>There are seven types of pieces in total. IDs are given to each piece so that they can be converted into numerical values.</p>

<table>
  <thead>
    <tr>
      <th> </th>
      <th> </th>
    </tr>
  </thead>
  <tbody>
    <tr>
      <td>ID</td>
      <td>Type</td>
    </tr>
    <tr>
      <td>1</td>
      <td>I</td>
    </tr>
    <tr>
      <td>2</td>
      <td>O</td>
    </tr>
    <tr>
      <td>3</td>
      <td>T</td>
    </tr>
    <tr>
      <td>4</td>
      <td>S</td>
    </tr>
    <tr>
      <td>5</td>
      <td>Z</td>
    </tr>
    <tr>
      <td>6</td>
      <td>J</td>
    </tr>
    <tr>
      <td>7</td>
      <td>L</td>
    </tr>
  </tbody>
</table>

<p>Then, the rotations are also managed using numerical values of 1 through 4. Also, since all pieces can be represented in 4x4, the shapes can also be turned into data.</p>

<p>For example, the shape that is made when rotating the T piece to the right once can be thought of as a table such as the following. Therefore, it is converted.</p>

<p><img src="/images/image-3.png" alt="" /></p>

<p>↓</p>

<p><img src="/images/ミノデータ.png" alt="" /></p>

<p>There are 448 records when converting every pattern into data. (The table name is “Shapes of pieces”)</p>

<h5 id="recreate-the-shape-from-the-piece-data"><strong>Recreate the Shape from the Piece Data</strong></h5>

<p>The shape can be recreated when the type of the piece and its rotation condition are provided by turning the shape of the piece into data.</p>

<p><img src="/images/操作中のみの-1.png" alt="" /></p>

<p>The above example is the condition when the T piece (ID: 3) is rotated once to the right (=2). The data is accessed directly using INDEX.</p>

<div class="language-plaintext highlighter-rouge"><div class="highlight"><pre class="highlight"><code>B12 = INDEX(ShapesOfPieces[Value],($C$10-1)*64+ ($E$10-1) *16 + (B$11-1)*4+$A12)
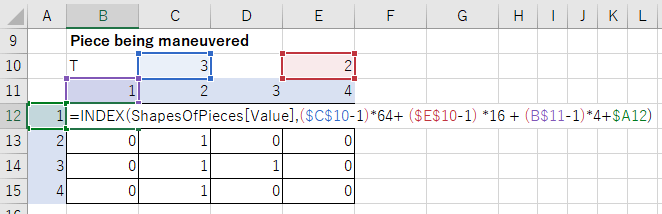
</code></pre></div></div>
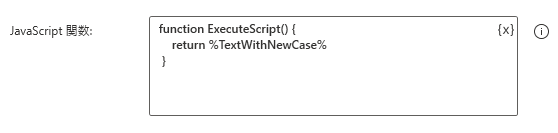
<p><img src="/images/操作中のみの2.png" alt="" /></p>

<h4 id="managing-the-stacked-pieces"><strong>Managing the Stacked Pieces</strong></h4>

<p>There is also a need to manage the stacked pieces separately from the piece that is being moved. The data is updated for each event to solidify a piece.</p>

<p><img src="/images/積み上がったミノデータ.png" alt="" /></p>

<h4 id="simulate-the-condition-after-moving-or-rotating-to-return-the-result"><strong>Simulate the Condition After Moving or Rotating to Return the Result</strong></h4>

<p>When using button operations, pieces cannot rotate or move unconditionally. This changes depending on the condition of the stacked pieces. If the piece is next to a wall, it cannot move further in that direction. If the piece is surrounded by pieces, it cannot rotate. The result of the move is returned based on the condition of the piece being moved and the stacked pieces.</p>

<p>However, the determination for the move is relatively easy, as it only determines if the piece cannot actually move due to a wall or other pieces. The processing for rotation is similar. Since there are specifications called the <a href="https://tetris.fandom.com/wiki/SRS">Super Rotation System</a> (SRS) that are unique to Tetris, rotation is carried out according to them.</p>

<p>First, I acquired the shape around the piece based on the data for the stacked pieces and also called the condition of the piece.</p>

<p><img src="/images/移動判定1.png" alt="" /></p>

<p>Then, for “move to the left” for example, I actually move the piece to the left and carry out a determination while comparing it to the “condition around the piece” to determine that the piece “cannot move” if it hits in at least one location.</p>

<p><img src="/images/移動判定2.png" alt="" /></p>

<p>The red location is where it is hitting. The value that is returned as a result of this calculation is “cannot move.” In other words, X movement is 0, Y movement is 0, and rotation is 0.</p>

<p>The same is processed for rotation. As mentioned earlier, the SRS is used for the determination.</p>

<ul>
  <li><img src="/images/移動判定3.png" alt="" /></li>
</ul>

<p>This example is a specification that is called T spin in which the piece moves while rotating. The SRS carries out 5 determinations in order on the back end, and if even one of them is determined to be “able to rotate,” the piece moves to that position.</p>

<p><img src="/images/移動判定4-1024x334.png" alt="" /></p>

<p>It may be a bit difficult to see, but since only the fifth and last determination was that the piece can move without hitting any of the other pieces, this movement takes place. The values to be returned are 1 for X movement, -2 for Y movement, and -1 for rotation.</p>

<p><img src="/images/Tスピン.gif" alt="" /></p>

<p>The information to move with the above calculation is returned, and the position and rotation condition parameters are updated based on these values.</p>

<h3 id="solidifying-and-erasing-pieces"><strong>Solidifying and Erasing Pieces</strong></h3>

<p>I also process these actions using mostly functions only, while mixing in some pseudocode programming that I mentioned earlier. Since Tetris has specifications, such as time to make changes before being solidified or allowing for several rotations after touching the ground, I incorporated them.</p>

<p>Since the philosophy for how to make it is the same, I will emphasize circular references in this explanation to avoid a repetitive explanation.</p>

<h4 id="recognize-the-calculation-order-for-circular-references"><strong>Recognize the Calculation Order for Circular References</strong></h4>

<p>As I mentioned in the article about Dragon Quest, circular references have a calculation order, as they are calculated from left to right and top to bottom. If formulas are connected in random positions without thinking about anything, unexpected results will be produced.</p>

<p>For example, if process 2 is sought based on the calculation result of process 1 and process 3 is sought based on the calculation result of process 2, there are no issues if they are written from left to right.</p>

<p>In the following example, the result of the preceding process is added to the cell itself.</p>

<p><img src="/images/循環参照1.png" alt="" /></p>

<p>When the value of process 1 is changed to 1, process 2 becomes 1+0, which is 1. Since process 3 is calculated after process 2 became 1, it similarly is 1+0, which is 1. As a result, all of the values become 1.</p>

<p>However, what will happen if the positions of the cells are changed so that process 3 is brought to the front?</p>

<p><img src="/images/循環参照2.png" alt="" /></p>

<p>When the value of process 1 is changed to 1, the cell furthest to the left, which is process 3, is calculated first due to the specifications for circular references. Since process 2 has yet to be calculated, process 3 becomes 0+0, which is 0. Since process 2 is 1+0, which is 1, only process 3 becomes 0 as a result.</p>

<p>In this manner, “which position to do the calculation in” becomes very important for circular references. In order to avoid throwing off the calculation order, there is a need to bear in mind to write the flow of the calculation from left to right and top to bottom.</p>

<p>In order to control this calculation order, the sheet to manage the stacking condition is set up step-wise.</p>

<p><img src="/images/循環参照注意3-1.png" alt="" /></p>

<p>On a side note, there are also calculation orders among sheets. Calculations are processed in ascending order of sheet name. The reason why the sheet names are set as “number_******” is because that is the order for the calculations to be processed.</p>

<h4 id="utilizing-specifications-of-the-calculation-order"><strong>Utilizing Specifications of the Calculation Order</strong></h4>

<p>In Tetris, pieces are solidified after a certain amount of time has passed since the pieces touch the ground. However, there is a specification that the piece is not solidified if it continues to be moved. However, this would allow for endless movement by repeatedly hitting the button. Therefore, the piece is forcibly solidified after 15 operations. (*There is also a version in which it is not solidified.)</p>

<p>This time, I incorporated the specification to solidify the piece after 15 operations. Based on this implementation, I will explain how to utilize the calculation order.</p>

<p>The following is the process for touching the ground. The “operation count” to record the count of operations and the “bottom value” to manage the timing to reset the operation count are prepared. The “bottom value” is a variable that manages how far the piece has fallen. The system involves the operation count being reset when the bottom value is updated.</p>

<p>A variable for temporary records is also prepared for the bottom value. The formula is set up so that the operation count becomes 0 if the temporary record value differs from the latest value.</p>

<p><img src="/images/接地処理-1.png" alt="" /></p>

<div class="language-plaintext highlighter-rouge"><div class="highlight"><pre class="highlight"><code>Operation count = IF(B40&lt;&gt;B42,0,IF(Button operation,OperationCount+1,OperationCount))
</code></pre></div></div>

<p>The second IF statement adds an additional operation to the count if there was a button operation. What is important here is the first IF statement.</p>

<p>This time, we will look at each of the formulas for “bottom value” and “temporary record of the bottom value.”</p>

<div class="language-plaintext highlighter-rouge"><div class="highlight"><pre class="highlight"><code>Bottom value = IF(Next piece FLG,22,MIN(Y of current position,Bottom value)) 
Temporary record of the bottom value = IF(Next piece FLG,22,IF(Bottom value&lt;&gt;Temporary record of the bottom value,Bottom value,Temporary record of the bottom value))
</code></pre></div></div>

<p>In both formulas, the value is reset to 22 when switching to the next piece.</p>

<p>The “bottom value” is set to update to the lower value when compared to itself after the Y of the current position is lowered. The “temporary record of the bottom value” compares itself to the “bottom value” and copies the value of the “bottom value” if they differ.</p>

<p>When these three formulas work in the calculation order for circular references, the values change as follows.</p>

<p>Assuming that the Y of the current position is 20, the piece will have lowered by 1 through free fall when the “bottom value” and the “temporary record of the bottom value” are both 20. Since calculations are carried out from top to bottom according to the calculation order for circular references, the “bottom value” is evaluated first.</p>

<ol>
  <li>Since the piece was lowered by 1, the “bottom value” becomes 19.</li>
  <li>Next, the formula for “operation count” is evaluated. Since the “bottom value” is 19, and the “temporary record of the bottom value” is 20, the operation count becomes 0 because the values differ.</li>
  <li>Finally, the “temporary record of the bottom value” is evaluated. Given that the values, which are 19 for the “bottom value” and 20 for itself, differ, the value for the “bottom value” is copied to become 19.</li>
</ol>

<p>As a result, both the “bottom value” and the “temporary record of the bottom value” become 19, while the “operation count” becomes 0. If the piece lowers again in a similar manner, the bottom value decreases from 19→18→17… The system also makes the operation count 0 each time.</p>

<p>By utilizing the specifications for the calculation order in this manner, the “change in condition” can be sensed to cause a different action.</p>

<h4 id="flow-from-the-determination-to-solidify-the-piece-to-erasing-the-line"><strong>Flow from the Determination to Solidify the Piece to Erasing the Line</strong></h4>

<p>I will provide a simple explanation about the determination formula for solidification and the steps until erasing the line.</p>

<p>The condition for solidification is written in a single formula.</p>

<p><img src="/images/接地判定-1024x325.png" alt="" /></p>

<div class="language-plaintext highlighter-rouge"><div class="highlight"><pre class="highlight"><code>Solidification processing = AND(B45=A34,TouchingTheGround,OR(B39&gt;=TimeToMakeChanges,OperationCount&gt;=15,C56=Const_Up_Button))
</code></pre></div></div>

<p>Solidification processing becomes TRUE if the piece is touching the ground somewhere and the time to make changes has passed, there has been 15 or more operations, or the user did a hard drop.</p>

<p>When solidification processing becomes TRUE, the cell that manages the stacking condition copies the value of the piece from the current position and solidifies the piece.</p>

<p><img src="/images/接地処理2.png" alt="" /></p>

<div class="language-plaintext highlighter-rouge"><div class="highlight"><pre class="highlight"><code>Stacking condition = IF($A$2,"",IF(AND(Solidify,'040_Current position'!I23&lt;&gt;""),'040_Current position'!$B$10,IF(EraseTheLine,U75,C7)))
</code></pre></div></div>

<p>As you can see in the second half of this formula, there is also a flag to erase the line. If this becomes TRUE, the “condition after erasing” that has been calculated beforehand is copied.</p>

<p>What I described above is the flow from processing the fact that the piece is touching the ground to erasing the line. To be honest, I do not like that there are multiple processes within the series of processes that I can probably separate out, but this was the outcome after considering performance. There may be a way to improve this, but I am satisfied with this for now.</p>

<h2 id="game-over-etc"><strong>Game Over, Etc.</strong></h2>

<p>It is mostly the same, so I will omit this. If you are interested in this, please download the sample file and have a look.</p>

<h2 id="what-i-could-not-implement"><strong>What I Could Not Implement</strong></h2>

<p>I could not implement music this time either. It is a shame. Also, perhaps because the load increased as processing increased, long pressing and animations did not work as I had imagined. I have also passed on implementing these features.</p>

<h2 id="other"><strong>Other</strong></h2>

<h3 id="why-is-the-controller-on-a-different-sheet"><strong>Why Is the Controller on a Different Sheet?</strong></h3>

<p>This is because the scale for Tetris does not match the scale for the controller. I have put in measures to make the images as small as possible for Tetris to reduce the load, while the controller cannot be made small because it contains form controls. If I put them together, the controller would be extremely large.</p>

<p>Also, Excel tends to crash more frequently if they are placed together. On my device, making even a single operation on the controller caused freezing and a low memory error. I manage them on separate sheets to stabilize the actions also.</p>

<h3 id="what-is-the-size-of-the-file"><strong>What is the Size of the File?</strong></h3>

<p>It is 487KB as of my first time making it public. It becomes 289KB if I delete the background image. I was able to keep it smaller than I had anticipated.</p>

<h3 id="does-it-not-work-on-excel-2007"><strong>Does It Not Work on Excel 2007?</strong></h3>

<p>I used RANK.EQ for the “next piece” calculation. It may be possible to make it work by changing this to RANK. Please try it.</p>

<h3 id="how-long-did-it-take"><strong>How Long Did It Take?</strong></h3>

<p>It took me two months. Most of this time was spent researching how to make the processing speed faster. I may have been able to finish it a bit faster had I not lost motivation.</p>

<h2 id="in-conclusion"><strong>In Conclusion</strong></h2>

<p>Although there were no new methods, I was able to grasp what kinds of combinations slow things down because I faced many performance issues. I could probably apply this knowledge to work also. My next tasks will be to implement smooth animations and long pressing.</p>

<p>Next up is Mario, but I am not sure if I can actually make it, since it depends on whether or not I have time. (Since I need to study a different platform soon… please do not get your hopes up…)</p>

<p>[Series of Excel Games That Do Not Use VBA]</p>

<p>https://tomikiya.github.io/excel-game-dq3-english/</p>

<p>https://tomikiya.github.io/excel-game-minesweeper/</p>

<p>https://tomikiya.github.io/excel-nonvba-3d-maze/</p>

<p>If you feel that not using VBA is very difficult, it may be best to start with making games using VBA.</p>]]></content><author><name></name></author><category term="Excel" /><summary type="html"><![CDATA[This is the 6th edition of making games without using VBA. I tried recreating Tetris this time. Although the specifications are simple, this was more difficult than Dragon Quest, to be honest.]]></summary></entry></feed>